Layered V-Neck Tutorial from mahlicadesigns

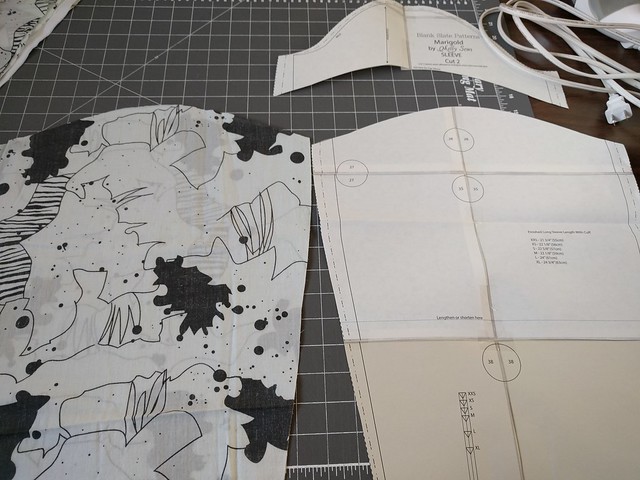
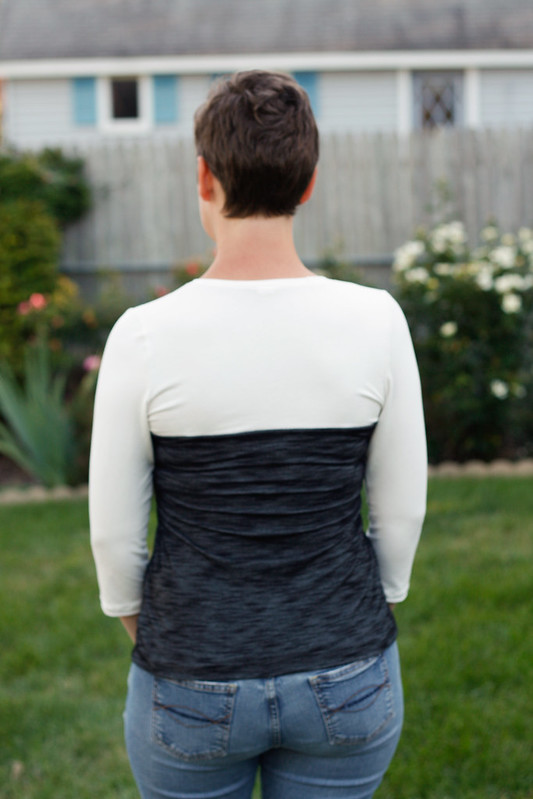
I ran across a picture of a v-neck tee a while back that had a double layered neck band and added it to my collection of interesting clothing details to try someday. Unlike most things in my little collection, I did spend some time working this one out using the Tabor V-neck pattern and I’ve put together a tutorial to share with you.

For my layered V-neck I used oatmeal Baby French Terry from Simply By Ti. The baby french terry is light enough to drape nicely in the Tabor and there’s barely any bulk in the double layered neckband. When choosing fabric for your project, experiment by folding layers together to see if you like how they look.

I’m really happy with the overall look I achieved with the layered neckband and this color has been a very useful addition to my wardrobe. If I were to do it again though, I might not use the Tabor pattern combined with this technique. The V on the Tabor is pretty deep and using a narrower band than the pattern calls for at the center front makes me feel a little exposed.

Maybe, but probably not, I’ll put on the wider band that the Tabor calls for (because I love this top) and make another layered V-neck using another pattern.

Layered V-Neck Tutorial

The measurements provided are based on the Tabor V-neck size 8. As a guideline, the outerband should come down and cover approximately 2/3 the length of the front of your v-neck, shoulder to center front. My innerband starts at the shoulder and goes to center front. You can also cut the inner band to fit the entire neckband if you are not concerned about bulk.
You can adapt the technique to your favorite V-neck tee pattern, but you’ll need to adjust the band lengths I’ve given to fit.

Cut your custom bands:

Innerband cut 2:   2.25in X 14in    (3/4in finished width)

Outerband cut 1:   3in X 25in    (1 1/8in finished width)

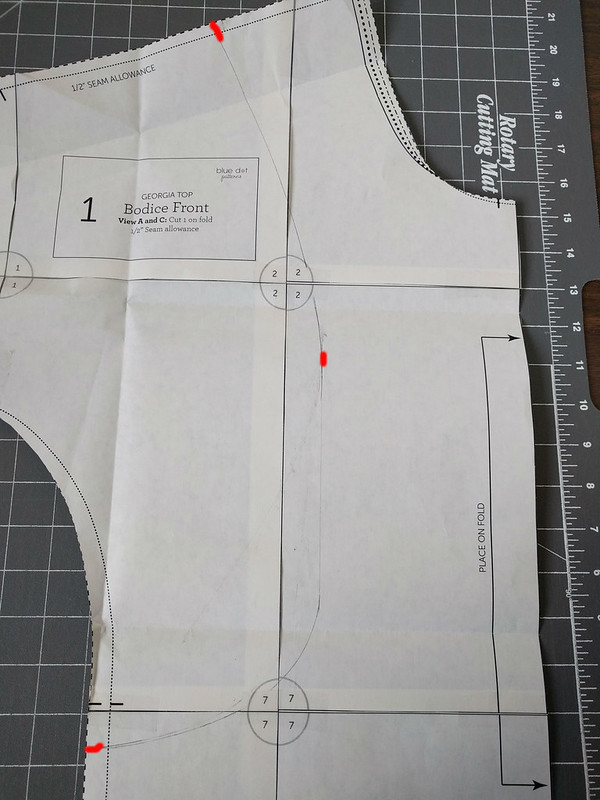
Interface the center V on the bodice of your tee and sew the front and back together at the shoulders.

Apply fusible web along the short ends of the outerband piece. Fold back the short ends wrong sides together by 1/2in and press to secure with the fusible web.

Mark the center (center back) and mark the shoulder seams 5in away from center back on the outerband.

Sew the innerband pieces together forming a V at center front. Using a 3/8in seam allowance, insert and baste the innerband into place along the V. Don’t baste the entire length of the inner bands, just a few inches around the center V.

Starting at center back, leaving the outerband unfolded, pin the single layer of the outerband in place along the neckline. Stretch the outerband slightly as you pin in place from center back to the shoulder seam. The bands don’t need to be eased in from shoulder to center front.

Next, pin the innerband in place along the bottom portion of the neckline up to the shoulder seam. The innerband should overlap the single layer of the outerband.  Trim away any excess length of the inner band that extends past the shoulder seam.

Lastly, fold over the outerband, sandwiching the innerband within and repin all layers as needed along the entire neckline. Remember the outerband is eased slightly between the shoulders and center back.

If you want to check your proportions first, baste the entire neck band into place (innerband and outerband now functioning as one unit) using a 3/8in seam allowance.

Sew/serge your layered neckband into place using 3/8in seam allowance. Complete the construction of your tee per the pattern instructions.

As always, thanks for reading today.

You can follow me on instagram, Bloglovin, or by entering your email in the right side bar.

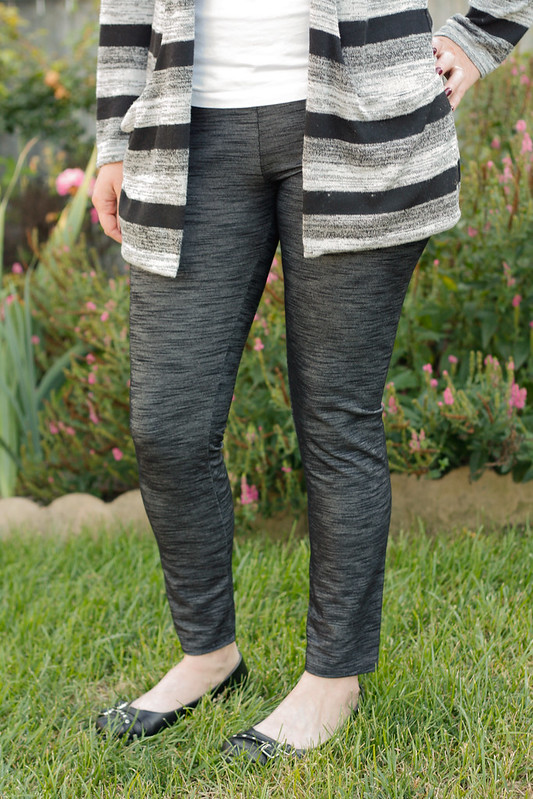
You might also like: Tabor V-Neck and Lander shorts

Save For Later

Pin this image, so you can come back when you’re ready to start sewing your version.

Juliet Bodysuit for It’s Gonna Be May tour

Hi sewing friends.  Today I’d like to share something new that I’ve tried for the It’s Gonna Be May blog tour. Brought to you by Petite Stitchery & Co. (Tour details and a giveaway are below-read on)

You may have noticed that I’m pretty slow to follow trends, so again I’m behind the curve on the popular bodysuit. Bodysuits seamed like a bear to fit and I couldn’t see a use for one in my wardrobe. Until now.

We’ll be taking a flight soon and I’m one of those people who has an ideal for what to wear on a plane. I want my legs covered so my skin isn’t touching those super gross seats. I have to carry bags and keep track of a little boy, so I want clothes that are fuss free: no retucking, no riding up, and minimal adjusting. I also like knits so I’m not a wrinkled mess at the end of the day.

I’d already worked out that I like to wear jeans in winter and skirts in summer, but I still struggled with the right topper that didn’t need continual adjusting. Then it dawned on me, a bodysuit!

The Juliet bodysuit and skirt from Petite Stitchery & Co. will make the perfect outfit for plane travel. It ticks off all my boxes.

The Pattern

The Juliet bodysuit in size large with no alterations. I chose to do the low scoop back and full coverage seat. I cut and sewed my lining first to test the fit. I trimmed a little away from the cheek area on the back piece and was good to go. My fitting worries came to nothing.

Next time I’d take advantage of the built-in swayback adjustment.

The Juliet circle skirt size large and cut at the xsmall midi-length hemline for length. Altered to be a 1/4 circle skirt and waistband shortened to 6in finished depth.  I’m not going to share how I made the alteration to a 1/4 circle skirt because I messed it up royally. You really can’t see it on, but believe me it’s there.

Next time, I’ll choose a longer length- just an inch more would be great.

Petite Stitchery provided a complementary copy of the Juliet pattern for me to use in my post.

The Fabric

For the bodysuit- about 3/4 yard each of Art Galley cotton/lycra paired with a rayon/spandex jersey for the lining. I found these paired well together.

For the skirt-  1 1/8 yards of brushed poly from Boho Fabrics.


And now for the rest of the tour…

It's Gonna Be May blog tour

Sunday April 22nd:
Sewjourns,  Kathy’s Kwilts,  Naadjesendraadjes,  Diskordia’s Curvy Sewing,  Sewing Adventures in the Attick,  Sewing Southern Belle
Monday April 23rd:
Margarita on the Ross,  Our Play Palace,  The Scatty Sewer,  Rebel and Malice,  My Heart Will Sew On,  Sewing With D
Tuesday April 24th:
Sea of Estrogen,  Seams Like Style,  That’s Sew Amy,  Mahlica Designs,  Leslie J’s Sewing Shack,  Miss Marah Sewn
Wednesday April 25th:
Liviality,  Lime Leaves,  My Sewing Roots,  Tales From a Southern Mom,  Jot Designs USA,  Seams Sew Lo,  The Needle and The Belle
Thursday April 26th:
Candi Couture Designs,  Momma Sew Savvy,  Blooming Skies,  Stitched By Jennie,  House of Estrela,  Sewing Ambi

Don’t miss this:

Southern Belle Fabrics is offering a giveaway for a $50 store credit to support the blog tour. I think you could make up quite a few It’s Gonna Be May inspired pieces with Southern Belle Fabrics. I personally recommend the double brushed poly for circle skirts.

Enter to win a $50 store credit from Southern Belle Fabrics.


As always, thanks for reading today.

You can follow me on instagram, Bloglovin, or by entering your email in the right side bar.

You might also like:

Ally Skirt & Onyx Top


Coffee House Pant from Blue Dot Patterns

Diane from Blue Dot Patterns has created another pattern with a modern look that has become a closet staple for me. The Coffee House Pant is a loose fitting cropped pant with an elastic waist and “notched” pocket detail.

Being on the short side (almost 5’4″) I just stear clear of cropped pants and capris. I just can’t seem to find that magic length that looks right. So when I saw Diane’s new pattern was a cropped pant, I was happy to make up a pair as a tester, but didn’t imagine I’d end up with something that would actually work for me.

But looky here:

.

One of the chararteristics that appeals to me is that while these are so very comfortable to wear, they look neat and classic.

The Pattern: Coffee House Pant from Blue Dot Patterns in size 8 with no alterations.

The Coffee House Pant is on sale until Jan 14th to celebrate it’s release.

As with all the other Blue Dot patterns that I’ve made, the pattern is well drafted and the instructions professional and easy to follow. I think you would be happy with any of her patterns.

The Fabric: A natural woven that my mother picked up from an estate sale. The original sale tag was dated 1954. It drapes wonderfully and doesn’t wrinkle all that much.

As always, thanks for reading today.

You can follow me on instagram, Bloglovin, or by entering your email in the right side bar.

Fun with Zierstoff -Giveaway Week

zierstoff-giveaway-week-1

Welcome friends, I’ll be your M.C. for fun with Zierstoff Patterns over the next few weeks. We have some giveaways lined up and then a really fun event.

zierstoff-event-week-1


To start things off this week, Zierstoff is giving away two 10 Euro vouchers to Etsy. Oh the the goodies you’d be able to choose from: fabric, patterns, notions, or you know…anything.

One of the giveaway options is to complete a survey. The gals at Zierstoff would really like you to take a look around the Zierstoff site and share what you think, so I’m giving you extra entries for doing so and my sincere thanks too. Don’t be shy, take a good look.

Enter the GIVEAWAY here.

Make sure you’re following the mahlicadesigns blog so you don’t miss out on the fun that’s happening next.

Dreamtime Jammies

It’s that time of year where Christmas sewing takes over and the to do lists pile high. I’m not into stressing myself out in that way, so I keep my Christmas sewing easy with just one obligation; Christmas Eve pajamas for my little guy.

Flannel pjs using the Pajama Rama pattern from ShwinandShwin have been my standard, but I’ve mixed things up a bit by sewing a new pattern; the Dreamtime Jammies from Blank Slate Patterns.

Are you sewing any pajamas this holiday? If you are, you can join the Pajama Linkup Party hosted by Pearberry Lane. (Ends 12/14/16)

The Fabric: Superhero Pups Interlock from Joann.com. I like that this knit is a little thicker for winter and has enough stretch to easily use for the cuffs and neckband on the pattern.

The Pattern: I downloaded the free size 4 last year from Melly Sews. A full pattern in all sizes was released this fall on her Blank Slate Patterns store. I can’t really give a pattern review here since I didn’t look at the instructions. I’ve sewn enough tees and knit pants that I can just do it. I will say the fit is spot on for a size 4. (Too bad my 4 1/2 year old hit a growth spurt)

The Dreamtime Jammies should take you about 2 hours to make. I used about 1 yard at 60in wide.

Total Cost: $7      Pattern $0   Fabric $6      Notions $1


Little boy photoshoot outtakes

Giggle Monster:

Yeti impersonation:

“I keep falling down”

Zircon Sweater for Sew Long Summer

I’m saying Sew Long Summer by dusting off my fall sewing wish list and making it happen.

One of the projects on the top of my list was to make another Zircon Sweater from Paprika Patterns. The inserts on the Zircon let me have two of my favorite things; geometric shapes and high contrast colors.

I’ve made the Zircon before, so I knew no alterations were needed. Take note that the Zircon sleeve is supposed to be bracelet length, but hits my shorty self right at the wrist were I prefer it.

Those inserts might look scarey to make correctly, but if you follow the directions and take your time to line up the stitching lines, you’ll be good to go.


Stop by today’s bloggers for more inspiration.

AppleGreenCottagemahlicadesignsKaleidothought, PrettiModesti, Olive Ashby, Sewing Bee Fabrics

Wednesday Teaser collage

And…enter our giveaway for a pattern from On the Cutting Floor.

How about some fun discounts and coupon codes from our sponsors:

Zeirstoff Patterns 20% off patterns   Code: zierstoffpatterns20  Ends 9/17/16

Blue Dot Patterns       25% off patterns    Code: SewLongSummer  Ends 9/17/16

On the Cutting Floor   50% off patterns   Code: SEWLONG   Ends 9/17/16

Sponsor Collage Final

Sarah Top and Dress – Pattern Review

On the Cutting Floor is putting out some really interesting patterns, with unique details that take them above and beyond the many basics you see out there in the Indie pattern world. I have many of them on my list to make.

I started with the Sarah Top and Dress Pattern** Those origami-like folds, oh yeah, so very cool. I had the perfect color ponte in my stash to fit into my Core Wardrobe too.

The pattern comes with lots of options, 24 all together, so you need to read the “How to Print” instructions to get the pattern pieces you need.

Sarah Top and Dress technical drawing

The easily understandable instructions walk you through how to complete the many options and they’re organized so there’s no confusion. Sewing the pleated panel was a breeze because of good markings and clear instructions.

Item of note: The curve from waistline to hip is not a gentle one. This is great for pear shapes like me, but if you’re a rectangle or inverted triangle shape you might want to check that.

My alterations, which I have to do to most patterns. A drop shoulder adjustment of 3/8in. Shortened 3in at hem line, I had to eliminate the bottom pleat to make it look right. Shortened the sleeve by 3in to make it a length I like.

Next time, I’ll use a binding on the neckline instead of folding over and topstitching. I prefer a binding or facing.

I had a few fit issues with the test version of the pattern. (I don’t see adjustments for these in the final version)

1. I got a lot of gaping at the center front neckline of my muslin (not shown). I ended up removing two 1/2in wedges from the neckline to compensate.

2. I found the neckline sat high up on my neck at the shoulder line. I ended up removing 1in here.

3. I found the front piece 1/2in narrower than the back piece in the same size. I used a size 10 front piece and size 8 back piece in my final version.

The fabric: One yard of a nice ponte de roma from Finch Fabrics. (sold out)

The Pattern: Sarah Top and Dress in size 8/10. Pleated front, short sleeve options.

The Sarah Top & Dress is 50% off until Friday to celebrate the pattern release, so hop on that now.

The pleated front, short sleeve version of the Sarah Top should take you about 1.5 hours to complete.

Total Cost: $2          Fabric $2           Pattern $ 0- Free as a pattern tester


**Affiliate link, meaning your purchase provides me a modicum of compensation to fuel my hobby.

Ally Skirt from Blue Dot Patterns

Frankly, I was very happy to let the current “denim everything” trend pass on by me. If I followed the trend back in middle school, I just don’t want anything to do with it.

And yet once again, my mind was changed by a pattern. The Ally Skirt is a six gore skirt with contoured waistband, length options, flap, pocket option, and top stitching.

Ally skirt on mahlcadesigns

Two ideas struck immediately when looking at the Ally; denim with copper snaps and yellow top stitching or corduroy in a camel/caramel color for that 70s feel. So very on trend right now. The new Ally Skirt just called out to be made up in denim.

I tested the Ally Skirt pattern for Blue Dot Patterns. Blue Dot Patterns may sound familiar. I’ve made up two Georgia‘s (here and here), hosted the Creative Sewing Challenge last fall, and one of my ideas for the Margo Blouse is on my sewing table now.

Ally Skirt by mahlicadesigns

I used a lightweight 7 oz. denim from my stash to make up my Ally in a size medium. With some pattern piece Tetris and using an extremely tight lay out, I was able to get my skirt cut out of 5/8 yard x 60in wide. If you have a directional print, fabric with nap, or narrower fabric; you’ll need more.

Ally Skirt by mahlicadesigns

Why I recommend the pattern: 1. Oh my is it so easy. All the pieces could get confusing, but the way they’re labeled and notched makes it no problem. 2. Diane, the pattern designer, even includes fitting as part of the pattern directions. Instead of a 1/2in seam allowance at the sides, I used a 5/8in seam allowance: Fitting Done! 3. A contoured waist band. I’m a pear shape so that’s perfect for me. 4. The style is classic and very on trend right now too.

Get yours! Get your Ally pattern for 30% off, for a limited time, directly from Blue Dot Patterns or from UpCraft Club.

Ally Skirt by mahlicadesigns

I chose snaps that were bigger than the recommended button size, so I skipped the top stitching at the outer edge of the button placket.

Ally Skirt by mahlicadesigns

Hey, I’m pretty proud of my top stitching here.

Ally Skirt by mahlicadesigns

That pocket flap is purely decor. I don’t need pockets in everything, so I’m cool with it. If you are in the pockets on everything camp there’s a pocket option for you.

I styled the Ally skirt with a cowl neck tee; with my banded Kirsten Kimono tee and RTW jacket; and a RTW sweater.

Ally Styling collage

The Ally should take you about 3.75 hours to complete. In a size medium with creative layout I used 5/8 yard of fabric.

Total cost: $6.50           Fabric: $3      Notions: $3.50       Pattern: $0*


*I received the Ally Pattern for free as a tester. Do I have to explain that these are my own thoughts about the pattern? They are.

Quilted Jade Skirt for SV Design Crew

Jade Skirt v.2

I made up a modified version of the Jade Skirt from Paprika Patterns using a wonderful quilted double knit from Sew Vagabond. I recently joined the SV Design Crew**.

Jade Skirt styling

The Pattern: I’ve made the Jade skirt before here, so I knew it would be perfect for making a mini skirt to show off the quilted texture of this fabric. To skip the folded front, I used the front lining pattern piece as my shell instead. I also lengthened the front and back pattern pieces to 16in. The Jade’s waistband is one curved piece, so to conserve fabric and keep the textured pattern of the fabric a little more lined up, I pieced the waistband instead.

I made up a size 5 again, lengthening it as I said above and then, because the fabric has a good stretch, I end up using a 3/4in seam allowance on the sides instead of 1/2in given in the pattern.

I’ve done an exposed zipper before with only a so-so result, so I wanted to try one again to give the skirt that extra something and to get a better hold on the technique. I struggled getting the zipper in without having little tucks and wrinkles at the bottom corners. I finally got it after a few tries and changing the order of construction. Now I know what I need to do to nail it next time.

Jade Skirt styling

The Fabric: A natural fiber quilted double knit in navy from Sew Vagabond Shop (available late summer) for the shell and a navy jersey knit from my stash for the lining. I’ve actually used a similar fabric before, but wow what a difference between the two. My Jasper dress made in a quilted jaquard made it into my February Fail post because the fabric was just an absolute disaster, it has that slick polyester feel and is snagging and pilling like crazy. This navy quilted knit is holding up so well after washing and even after having to rework that exposed zipper many times and a little seam ripping too.

Fabric comparison

I’ve styled my new Jade with a rtw blouse and my Burda 7140 faux leather jacket, with my Melly Sews Peasant Blouse, and a rtw plain white tee.

Jade styling collage

Making a modified Jade skirt should take you about 3.25 hours, assuming you get an exposed zipper in on the first try. In a size 5 with a pieced waistband I used 1/2yard of the quilted knit and 1/2yard of the jersey knit lining.

Total Cost: $3   Pattern: stash   Fabric shell: Free**  Lining: $1   Notions: $2

** When I make a qualifying purchase as part of the SV Design Crew, I receive 2 free yards of fabric to make what ever I want and Sew Vagabond Shop gets to use my pictures to show off their fabrics.

Marigold Dress by mahlicadesigns

After making the Marigold Blouse, I was ready to step up to making the Marigold Dress from Blank Slate Patterns in a cotton voile I purchased from IndianBeautifulDirect last year.

Marigold 2

100_4483

No fit alterations were needed, not even my usual FBA. I did make a few changes to minimize the print showing through when using layers of the very sheer fabric. I added a lining to the skirt portion, omitted the pockets, and used a piece of the lining material for the inside yoke piece on the bodice. I also made 3/4 length banded sleeves because I made a goof when cutting them out.

Marigold 3

This is not the way to make your sleeves 3/4 length, but it worked out for me because I have short, skinny arms. Since I made the Marigold blouse first, I cut the sleeve pattern apart to use the cap sleeve portion, but forgot to tape it back together before cutting the long sleeve dress version. To fix my mistake, I laid the sleeve head portion of the pattern over the top of my sleeve fabric piece and recut the top edge. I ended up with sleeves at a perfect 3/4 length but I needed to cut a wider band to fit around my forearm. I wasn’t sold on putting a traditional buttoned cuff at the 3/4 length, so I did a simple band instead.

Marigold Sleeve mess up

Marigold 1

If you’d like some more Marigold inspiration, take a look at the Pinterest boards I put together. Marigold Blouses, Marigold Dresses, Marigold Skirts

Marigold back

The Marigold Dress should take you about 5.5 hours, cut to finish. A 3/4 sleeve dress without pockets or sash in size small used 3 1/8 yards @ 45in width.

Fabric $16.95  Lining $6.41  Notions $2  Pattern: $ 4.53*  Total: $29.89

* $9.06 was the sale price I paid. I divided it by two since I made this pattern twice.

Georgia On My Mind. I hacked the Georgia Top again

I made my first Georgia Top for the Creative Sewing Challenge back in November and when putting together a post to inspire creativity with the Georgia pattern, I just had to put another version on my “to sew” list.

Georgia Hack by mahlicadesigns

I used the Georgia Top from Blue Dot Patterns in a size small again and modified the pattern by adding length to the sleeves and making a new cutting line for the lace piecing (tutorial below).

Georgia Hack by mahlicadesigns

I used a stable jersey knit from my stash paired with a lace purchased from Fabric Mart. I’ve not sewn with lace before, but since the lace I chose is not as fine and sheer as some lace can be, I just treated it like a knit and constructed the whole project with my serger. No problems.

Georgia Hack by mahlicadesigns

I’m just as pleased with my second Georgia, but have to laugh at myself for making two versions that have built in ventilation.

Georgia Hack by mahlicadesigns

Get my look (tutorial):

Let’s draw a new pattern line on the front pattern piece. I marked my outside shoulder at 4.25in from the neckline. I made a bust mark 4in down from CF neckline and 5in over (next time I’d make it 6in over to cover more of my chest). I marked the side 4in up from the bottom. I used a French curve to draw my new cutting line; keeping the line through most of the body vertical with a slight curve up to the shoulder and a dramatic curve at the waistline.

**I had the benefit of having a Georgia already made that I could use to determine the placement of my markings.

New Drawing lines

Cut along your new pattern line. Take a moment to label your new piece. Use your new front piece to trace your line onto the unmodified back piece. Cut your new pattern line on the back and label.

New drawing line traced

New Pieces Cut

I added 7.5in to the sleeve to make it long sleeve on me ( I’dd add more next time). I recommend you do some measuring to figure what will work for you.

Tips:

  • Label your new pattern pieces.
  • Add seam allowance to your new cut lines: I marked the cutting line on my fabric with chalk; you can trace off new pattern pieces if you want.
  • Make sure you’re ok with the amount of exposure the lace will give. I plan on wearing a cami.

A modified Georgia top should take you 2 hours to complete. Add about 20 minutes to draw new pattern lines.

Fabric $3  Pattern $0*  Total Cost $3

I received the Georgia Top Pattern free as a gift for hosting the Creative Sewing Challenge

Introducing VS. A Pattern Showdown Series

VS.

I started making a list of patterns from my stash and my Up Craft Club membership that I wanted to try in 2016. If I own it I should at least sew it once; right? Well, maybe. My list ended up having a lot of tee patterns, which to be honest, can make for some boring posts.

So, to spare you from excessive droning on about all these knit tee patterns and to give you something useful, I’m putting similar patterns together in a head to head showdown and will declare a winner. I just may find some TNT (Tried ‘N’ True) patterns too.

I’ll be comparing dolman sleeve, boatnecks, and raglan sleeve style tees. And for a little twist I’m through in some leggings too.

Week 1: Aurora Tee by Hey June Handmade VS Georgia by Blue Dot Patterns

Week 2: Shoreline by Blank Slate Patterns VS Butterick 6084(oop)

Week 3: Lane Raglan by Hey June Handmade VS Easy Tee Raglan from It’s Always Autumn

Week 4: Matilda Legging from Spit Up & Stilettos VS Sloan Leggings from Hey June


Be sure you’re following mahlicadesigns so you don’t miss what I’m doing next. (Over there on the right side bar)


In it for the long haul with Burda 7140 jacket

It’s been a few years since I’ve taken on a time intensive project like the Burda 7140 jacket. On a whim I purchased some faux leather online thinking maybe I’ll make a jacket. So far I’ve made a wristlet, this jacket, and  have plans to work it into a top that’s a few notches down on my sewing list.

Faux leather jacket by mahlicadesigns

I decided to join in a coat sew along hosted by Erica B in October. All of a sudden this “maybe someday” jacket was in the works. I came really close to meeting the suggested deadline too. The night before the sew along ended, I needed to put in my zipper, attach the bottom hem, and close up the lining; simple right. Too bad the suggested zipper length was 1.5 inches too short. Of course I didn’t get to the store for another 10 days to get a replacement zipper. 10 days which I filled up with the Georgia Top and volunteering as a tester for the Zircon Sweater.

Georgia Top by mahlicadesigns

Working with the faux leather wasn’t tough by any means it just took patience;  no pins allowed, tissue paper under the presser foot, press and press again kind of patience.

To add a little body to the faux leather and faux suede accent, I used interlining on all pieces except the sleeves. I ran out of the interlining fabric and figured an interlining wouldn’t be needed in the sleeves any way. I like the finished result and the interlining made resolution of  big problem possible.

I could press the faux leather but it did not keep a press very well. I found myself pressing and repressing over and over and was feeling pretty gloomy about how the jacket was going to work if the seams wouldn’t stay pressed. I was getting to the last steps before completion when…yes, you guessed it! I used a herringbone catch stitch on all those seam allowances. I wouldn’t have been able to fix the problem of the seams without being able to attach them to that interlining. The solution was pretty basic, but having never needed to use a catch stitch before, it was slow to come to me.

Faux leather jacket by mahlicadesigns

I used the pattern instructions only as a general guide. I did not want seam lines on my cuffs and hem, so I tacked the cuff to the side seam to keep it in place. Using a jump hem, and tacking the hem up at the bodice seams was the solution for the hem line.

Details: Burda 7140 View A Size 12.

Alterations: Added 1/2in to the depth of the shoulder darts. Shortened sleeves by 3in and it looks like they could use some more attention. Used a 1/2in seam allowance on the bodice seams to give a little extra ease. The ease stated in the pattern was nowhere to be found in my muslin or final version.

Next time I would slim down the sleeves a bit and consider going up a size to compensate for the lack of ease.

Fabric: knit faux leather from Fabricmart (Similar to), faux suede, poly interlining and lining.

Burda 7140 took me 14.5 hours to complete, but if you choose an easier fabric you could probably get yours done in half that time. Seriously.

Fabric/Supplies $33.50    Pattern $2  Total $35.50

Feeling like a bad a**: Priceless


On another note, I’ve added a Buy It page up there in the menu. I have a few things I’ve made, some fabric to destash, and even a few free things*

*you pay to ship

So Simple Shrug the hard way

Without planning it, I  found a way to up my sewing patience by taking a quick and easy pattern and making it difficult.

Shrug 1

The So Simple Shrug, is an apt name for this pattern. One pattern piece, easy fabric, and easy finishing were just what I needed during a busy December. Here’s how it went off the rails.

  1. Velvet seemed to be just the luxe look needed to pair with a sequined dress for my Christmas party. So off I go with my long shopping list, hubby and little guy keeping busy at the store next door. In all the happy alone time fabric shopping I didn’t think to check that the knit velvet I selected had enough stretch for the pattern. It turned out to have next to none.
  2. Spend extra time measuring pattern so I could compensate for lack of stretch. All in all, I just used the largest size, planning to reduce down if needed.
  3.  Because my fabric has a nap, I cut it out single layer and did not cut out the pattern diagonal to the grain line as instructed, resulting in not having enough fabric and a return to the store for more.
  4. I used velvet, that shifty little stinker. Those fibers kept pushing away from each other. I pinned the stuffing out of this, basted and then sewed each seam.
  5. To avoid a noticeable stitch line, I use a blind hem stitch, only to realize the process pressed in a crease. Pretty visible.

Shrug 3

Using the largest size F for 43in bust instead of the  C for 35in bust worked just perfectly to compensate for the lack of stretch in the fabric. The only modification was to shorten the sleeve length by 1/2in, still giving me 1.5in to use for a sleeve hem.

Shrug 4

I added 1/2in to the neckline, front and bottom of back of the pattern before cutting, so I could hem that edge.

Shrug back

Next time, I would modify the front curve to give a little more coverage. Just my personal taste.

Getting Creative with Georgia

When I’m looking for inspiration, Google and Pinterest and sometimes Etsy are my tools. I really wanted to nail it for my Creative Sewing Challenge project, so I gathered lots of ideas for myself and to share with you.

Today, let’s take a look at ideas for the Georgia Top from Blue Dot Patterns. At first look the simplicity of a dolman top can lull you into thinking there aren’t many design details to work with, but there are lots of ways to amp this girl up.


First up, I’m looking at the dolman sleeve itself. We can do some interesting things with an insert along the shoulder. How about using some lace, a sheer, twisted tucks, chevrons, or even leather?

Georgia inserts hack collage final


I made my Georgia with a rectangular cut out with crossbars.

Georgia Hack by mahlicadesigns

You could do different cut out shapes and use some interesting closures too; like chain, leather toggles, button tabs, or bows.


Goergia Hacks Button Tabs collage
For the bodice area, the Georgia already includes a view with color blocking. Don’t limit yourself to the design lines that come with a pattern, you can make lines every which way on most patterns to do colorblocking. Don’t forget colorblocking’s design cousin, fabric mixing. Here’s an awesome idea of using lace on the sides in a curved shape that I’m itching to knock off. I’ve also had this zippered neckline in my pinterest boards forever that would look great on the Georgia.

Georgia bodice hacks collage

What are you imagining for the Georgia?

SALE:

Be sure to visit Blue Dot Patterns to take advantage of the 40% off sale (for a limited time).

GIVEAWAY:

Blue Dot Patterns is sponsoring two generous giveaways. Leave a comment here with which pattern you would like to make and be sure to click through to get entered:
a Rafflecopter giveaway

Next, visit the Blue Dot Patterns blog, gatorbunnysews, for another giveaway.

Week 3 of the Creative Sewing Challenge with Blue Dot Patterns + Giveaway


ChallengeButton Primary

Diane (gatorbunnysews) of Blue Dot Patterns and I asked sewists to let their creativity flow with their choice of the Blue Dot Patterns. Be sure to click through to see the details of these projects. Then be sure to visit Blue Dot Patterns to take advantage of the 40% off sale (for a limited time).

Melissa (that’s me) from mahlicadesigns added cut outs along the shoulder to make my Georgia a little edgy. I have a quick tutorial if you want to hack the Georgia like I did. I feel pretty cool with my Georgia and my leather look skinny pants.

Georgia Top


Cindy from CindyParrett.com modified her Margo to make it dress length and added a gathered full length sleeve. Cindy styled her Margo with dress pants for work or leggings and boots for fun around town. Cindy already has a request from her daughter for a Margo of her own.


Amy from That’s Sew Amy liked her first Georgia so much, she took on the challenge of pattern matching to make another one. Once you get a handle on a crazy print on a four-way stretch knit you can quickly have another Georgia for yourself or to give as a gift.


Blue Dot Patterns is sponsoring two generous giveaways. Leave a comment here with which pattern you would like to make and be sure to click through to get entered:
a Rafflecopter giveaway
Next, visit the Blue Dot Patterns blog, gatorbunnysews, for another giveaway.

Modifying the Margo

Wanting to modify the Margo from Blue Dot Patterns? Let’s break it down.

Sleeves can be altered for lot’s of looks. Sleeveless, banded, a peek-a-boo slit, A gathered cap, layers of lace, a simple sheer, or an added bow are all ideas to start.

Margo Sleeve Hacks collage

The yoke on the Margo is a prime opportunity for your creativity.  Mix fabrics by using a lace, sheer, or dramatic print up top. Wouldn’t encrusting the yoke with pearly buttons be cute. The scoop neckline could also mean you can eliminate the button closure, replace it with a keyhole opening and tie, or a split neck opening.

Margo Yoke Hacks collage

Something I always forget is that you can modify a pattern to be a dress. You can layer sheers for a cool transparent effect and layer lace over anything for an extra feminine touch.  Using a woven for the yoke and a jersey knit for the body would be an interesting mix. How about a big switch up by moving the button placket to the back?.

Margo bodice Hacks collage

What can you dream up for the Margo?

SALE:

Be sure to visit Blue Dot Patterns to take advantage of the 40% off sale (for a limited time).

GIVEAWAY:

Blue Dot Patterns is sponsoring two generous giveaways. Leave a comment here with which pattern you would like to make and be sure to click through to get entered:
a Rafflecopter giveaway

Next, visit the Blue Dot Patterns blog, gatorbunnysews, for another giveaway.

Week 2 of the Creative Sewing Challenge with Blue Dot Patterns + Giveaway


ChallengeButton Primary

Diane (gatorbunnysews) of Blue Dot Patterns and I asked sewists to let their creativity flow with their choice of the Blue Dot Patterns. Be sure to click through to see the details of these projects. Then be sure to visit Blue Dot Patterns to take advantage of the 40% off sale (for a limited time).

Ashley from Sewn by Ashley took a tee shirt from a local establishment she calls home and used the Margo to make it so much more memorable. A once oversized tee has been transformed into a stylish way to sport her favorite tavern’s logo. Ashley looks like one of the family, but in a way that is all her own.


Wear the Georgia at hip length or more like a tunic; the choice is yours with an alteration that Kyla from Life By Ky shows us. Kyla  found inspiration in her Knit Fix and loves her Georgia.


Sarah from Musings of a Seamstress took the Georgia from a top to a dress in a show stopper print. You know you have a winner when you get lots of compliments and already have plans for another version.

Blue Dot Patterns is sponsoring two generous giveaways. Leave a comment here with which pattern you would like to make and be sure to click through to get entered:
a Rafflecopter giveaway
Next, visit the Blue Dot Patterns blog, gatorbunnysews, for another giveaway.

Stay tuned to see more Creative Sewing Challenge projects next week from:

Melissa of mahlicadesigns
Cindy of Cindyparrett.com
Amy of Thats Sew Amy

Design hacking the Dover

Are you ready for some ideas for the Dover jacket from Blue Dot Patterns?

You can personalize your Dover with embellishments. Some pearly beads around the neckline with a hidden closure would look really posh. Hand stitching details would look nice around the edges or as a motif on the back yoke. Add ruffles along the button front, ’cause who doesn’t love a ruffle? You could attach a wide ribbon as a closure if you dropped the waistline down.

Dover Hacks Embellisments collage

With a few alterations to the pattern, you can change up Dover’s look for a little variety. Instead of gathers, you can add width to the back piece to make some knife pleats. If you dropped the gathering line down on view B you can do the ribbon tie at the waist like above, or add a tab detail at the center back. Instead of buttons how about a zip up Dover, and make me happy by making it asymmetrical.

Dover Hacks Design collage

How would you make the Dover special for you?

SALE:

Be sure to visit Blue Dot Patterns to take advantage of the 40% off sale (for a limited time).

GIVEAWAY:

Blue Dot Patterns is sponsoring two generous giveaways. Leave a comment here with which pattern you would like to make and be sure to click through to get entered:
a Rafflecopter giveaway

Next, visit the Blue Dot Patterns blog, gatorbunnysews, for another giveaway.


Creative Sewing Challenge with Blue Dot Patterns + Giveaway

Welcome the the first week of the Creative Sewing Challenge. I’m glad you’re here.

ChallengeButton Primary

I’ve paired up with Diane (gatorbunnysews) of Blue Dot Patterns to host the Creative Sewing Challenge. We’ve asked sewists to let their creativity flow with the patterns. I’ll be featuring these creative projects for you over the next couple weeks. Be sure to click through to see the details of these projects and get ready to put these at the top of your To Sew list. Then hop on over to Blue Dot Patterns to take advantage of the 40% off sale (for a limited time).

Michelle from That Black Chic has this amazing rendition of the Margo pattern. The Margo is a great pattern to showcase a beautiful print. By creating a sleeve add on and a simple skirt, Michelle gets a variety of looks out of her Margo.

Taking a pattern from good to great is so easy with a thoughtful use of fabrics. Amy from That’s Sew Amy found a soft lace to make Georgia just her style. Wear it with jeans or funky pants to look all around awesome.

Shannon from Shanniloves used lace and pintucks to make her Margo in a sweet boho style that suits her. To make her Margo extra special Shannon used a vintage lace from her stash, inspiration from a RTW garment, and a soft rayon fabric that drapes beautifully.

front2_Snapseed


Blue Dot Patterns is sponsoring two generous giveaways. Leave a comment here with which pattern you would like to make and be sure to click through to get entered:
a Rafflecopter giveaway
Next, visit the Blue Dot Patterns blog, gatorbunnysews, for another giveaway.

Stay tuned to see more Creative Sewing Challenge projects next week from:

Ashley of sewnbyashley
Sara of musingsofaseamstress:
Kyla of LifebyKy

Introducing the Creative Sewing Challenge

ChallengeButton Primary

I have partnered with Diane (gatorbunnysews) of Blue Dot Patterns to host the Creative Sewing Challenge. We’ve asked sewists to let their creativity flow with the patterns. I’ll be featuring these creative projects for you over the next few weeks.

Please visit our creative sewists to learn more about them and maybe get a sneak peak of their project.

Michelle of thatblackchic
Ashley of sewnbyashley
Sara of musingsofaseamstress
Cindy of Cindyparrett.com
Shanni from Shanniloves
Kyla of LifebyKy
Amy of thatssewamy
and me: Melissa of mahlicadesigns


Stay tuned to see the Creative Sewing Challenge projects beginning next week, enter the Blue Dot Patterns giveaways, and watch for another surprise.


Thank you to Rachel from bobbinsonmymind; who is participating in spirit, but preparing for baby in reality.

Give fall the cold shoulder with the Georgia Top

Georgia Hack by mahlicadesigns

In a couple weeks (Dec 1st), I’ll be hosting the Creative Sewing Challenge with Blue Dot Patterns. Today, you get a sneak peak of how I altered the Georgia top pattern for the challenge.

Georgia Hack by mahlicadesigns

The Georgia is a dolman sleeve tee that has a soft look and comfy fit. I wanted to add a little bit of edge to my look by adding a cut out with cross bars.

Georgia Hack by mahlicadesigns

I won’t do a repeat of this look as I have other plans for the Georgia pattern, but next time I would make the cutout narrower. It’s gapes a little.

Georgia Hack by mahlicadesigns

I like my edgy Georgia and its a perfect transitional piece that fits in with my Core Wardrobe.

Georgia Top

I used an interlock knit from my stash that is just the right weight for fall and spring. The cutouts do make this cold all the time girl a little chilly, so it won’t see the rounds come winter.

Georgia Hack by mahlicadesigns

Get my look:

When cutting out the pattern, I simply folded down the shoulder edges of the front and back bodice pattern pieces by 2in to create a 3in finished opening. At the neck line and just above the cuff, I added inserts to cover my shoulder and hide the cuff’s seam.

Georgia cutout

I sewed and turned a long tube to create the cross bars and spaced them 2in apart measuring up from the lower insert.

Georgia cutout 2

I used a 1/2in seam allowance throughout. I pressed the serged edge of the opening to the wrong side and topstiched to keep that seam allowance in place.

Be sure you’re following me on bloglovin or by email to see what’s coming up for the Creative Sewing Challenge.

Georgia Top by mahlicadesigns

See ya next time.

Burda 6928, the most boring skirt ever.

The last piece I’m sharing from the Sew With Me challenge is Burda Young #6928, a pieced straight skirt.

Burda Skirt
Burda Skirt

I ordered this fabric for its ivory/vanilla/putty color to fit in with my Core Wardrobe color palette. What I got looks exactly like unbleached muslin, it even has some of those flecks of color like muslin. I was under a deadline and sending it back didn’t make $ense, so I used it anyway. The resulting skirt is perfectly fine as a basic and fills a hole in my Core Wardrobe, but it’s resemblance to muslin and shape make it a pretty boring piece.

Burda Skirt by mahlicadesigns

Pattern Notes:

Burda #6928 View A, Size 12. Bottom weight cotton/lycra twill in Vanilla from Fabric mart (sold out)

Apparently the “Young” part of the pattern means no shaping through the hips. If you are straight up and down this pattern is for you, I am not. A pretty stretchy fabric and altering the waist band redeemed this pattern.

Burda 6928 Skirt by mahlicadesigns

I added 3in in length to make this mini a workable length for me (I’m 5’4″ and modest). The back waistband gapped a bit. Two 1/4in darts positioned right above the two back seams did the trick. I was not loving this skirt from almost the start, so I did not bother redrafting and recutting the back waist band. With the stretch of the fabric I was able to eliminate the zipper altogether. I also skipped the piping detail, which may have made this a little less boring but I was not inspired to do so at the time.

burda skirt detail

Burda 6928 should take you 2.75 hours to make, but honestly find a better pattern.

Pattern $1.99 Fabric $4.75  Total $6.75

Tonic 2 Tee pattern hack by mahlicadesigns

As part of the Sew With Me challenge in September to make four coordinates, I used some of the remaining fabric from my Matilda leggings, to make a color blocked version of the Tonic 2 Tee from SBCC patterns. (Previous Tonic 2’s here & here & here )

Tonic 2 Tee hack by mahlicadesigns

I made a size small with a few adjustments to the pattern this time. I raised the neckline  by 1in at center front, narrowed the neckline by 1/2in at the shoulders and drew a new neckline curve. I also shortened the sleeves to about 17in finished length to make a 3/4 sleeve.

Tonic 2 Tee hack by mahlicadesigns

For the color blocked portion, I used one of my previous versions to determine where I’d like the new sewing line to be, retraced pattern pieces and added seam allowances. I also noted where my center bust point was so I could slightly curve the color block line down from center bust to about 1/2in lower at the sides.

Tonic 2 Tee hack by mahlicadesigns

It didn’t quite come out as hoped. Next time I’ll move the sewing line up a little more above my bust and redraw the curve to be more noticeable. I also learned to consider stretch more carefully. The stretch in the top fabric is much less than previous fabrics used and pulls across the top of my shoulders.

Tonic 2 Tee hack by mahlicadesigns

The Tonic 2 Tee should take you about 2.25 hours cut to finish, plus time to redraft your pattern.

Fabric $5  Pattern $0   Total $5

I also entered my Tonic 2 into the Sewing Indie Month contest.

Matilda Leggings from Spit Up and Stillettos

I’m pretty sure I mentioned earlier in a post about my Core Wardrobe that I would never wear leggings. I loath that people wear them as pants and I did leggings (stirrup pants back then) in middle school so…

Tonic 2 Tee hack by mahlicadesigns

So here are some leggings I made. Yup, never say never. In September, I joined in a challenge from the facebook group, Sew Alongs & Contests to sew four coordinates. For the challenge I made the Matilda leggings, a skirt, the color blocked Tonic 2 Tee you see above, and a self drafted wristlet. (Watch future posts for details)

The leggings were made to wear under skirts, but are already in heavy rotation around the house as a slightly less frumpy option then wearing my pjs past 10am. (Ah, the problems of a stay at home mom)

Matilda legging by mahlicadesigns

Just a few thoughts on the Matilda Leggings pattern:

This pattern is seriously short in the rise. Without the 3in waistband you’d be a little indecent. I added 1in to the front and back rise and will add another 1/2in to the back rise next time.

Matilda leggings by mahlicadesigns

I made a straight medium according to my measurements, but am feeling a little like a sausage around the rear end, so a little adjustment is needed there. There’s also a little extra room around the calves to slim down.

Matilda legging by mahlicadesigns

Caption: Earlier photo shoot with longer hair

If you are tall you’ll need to add some length to the legs also. I’m 5’4 and the length is perfect for me. I measured the inseam at about 27in.

matildas closeup 2

I picked up 1.5yd of this fabric from the red tag shelves of Joann Fabrics. (Of course I can’t find it online to link you) The right side is a grayish blue with a faded denim look. I used the wrong side, as it was so much cooler and in my Core color palette. I’d say it’s a medium weight knit with good stretch.

Matilda leggings close ip

Caption: I thought I set the..

These went together so quickly I was a little stunned. How often do you get a project done, cut to finish, in one hour? Bonus: At my height, I only used half of my yardage, so plenty left to make the Tonic 2 Tee (to be blogged later) and more.

The Matilda Leggings should take you one hour to complete.

Fabric $8   Pattern $Free    Total Cost: $8