Toaster Sweater & Tabor V-Neck Mashup Tutorial

Hi there. I hope you are happy and healthy.

{mahlica’s note: Hey, if you are not seeing photos, please try clicking through to the post (click the post title) instead of reading on my home page. Bear with me as I figure out this glitch}

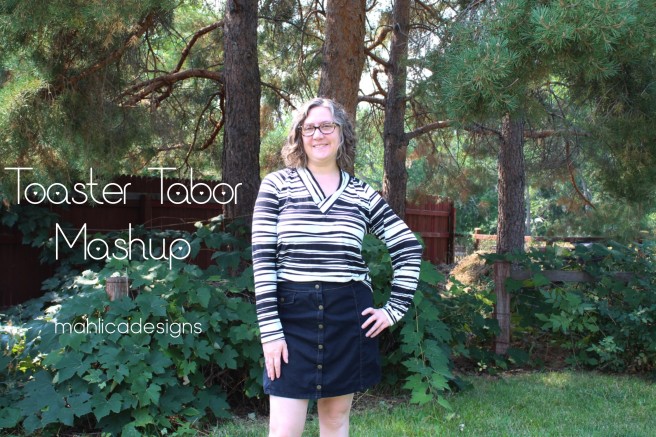
Last week I made up a pattern mashup using the Toaster Sweater and Tabor V-Neck patterns from Sew House Seven. My goal was to recreate a GAP tee from my “Stripes” pinterest board. I think I got there with the design lines, but with the irregularly striped fabric I used from my stash, I’d give myself a 9 out of 10 based on not having the stripes matched up on the raglan seam.


Here’s how I did it.

Supplies needed:

Toaster Sweater Version 1 and Tabor V-Neck patterns assembled and cut to your size, tracing paper, 3 different colored pencils/pens, fabric, and basic sewing supplies.

Alter the Toaster’s front bodice.

Fold the Toaster sleeve piece in half lengthwise lining up the underarm seams. Mark your fold for several inches at the upper edge of the sleeve pattern to denote the shoulder line.

Trace off the Toaster front bodice. Leaving about 8in of paper below the bottom cut line and 10in above the top of the neckline. (Set aside for a minute.)

Line up the front bodice and sleeve pattern pieces along the raglan seam. Overlap the pieces by 5/8in to remove the seam allowance and temporarily tape the pieces together. They need to line up along the upper part of the seam near the neckline. They won’t line up further down the seam.

Reposition your tracing over the front bodice/sleeve. Using a contrasting colored pencil (orange), trace along the extended neckline and upper edges of the sleeve. Mark the shoulder line for several inches. These traced lines will be your points of reference for future steps.


To draw the v-neck line, place the Tabor front bodice piece on top of your tracing. Line up the Tabor with the Toaster’s shoulder and make sure the Center Front fold lines are parallel. Trace along the Tabor’s v-neck line. (Keep your pattern pieces under the tracing paper for future steps)


Lengthen the Toaster bodice to eliminate the bottom band. I added 6.5in below the original cut line and extended the side seam down. You may need more length depending on your height. I’m 5’4″. Keep in mind that the Toaster is a semi cropped style, so if you need room at the hips, you’ll want to curve that side seam, instead of extending it straight down.

Alter the Toaster’s back bodice.

You can trace off the Toaster back bodice piece leaving extra paper above the neckline or simply tape on a scrap piece of tracing paper like I did. Overlap the Toaster back bodice and back portion of the sleeve along the seam allowance. Like the process for the front, you’ll be able to overlap the seam allowances close to the neck line, but they won’t match up along the lower portions. Using a contrasting colored pencil (blue), trace around the upper portion of the back bodice to create reference lines. Set the back bodice aside for a minute. Extend the Center Back fold line up, then free hand or use a curved ruler to draw in a new, higher neck line that matches up with the curve on the sleeve (Gray lines in the pic below). Tape on a scrap of tracing paper and trace over the new neckline curve you created. Lastly, add length to the back bodice piece just as you did the front.


Alter the Toaster’s sleeve.

No need to trace off a new sleeve. Lay your sleeve piece over your tracing paper, lining up the upper edges with your traced reference lines (orange). Fold down the front triangle point along the line you traced for the vneck (green area) and add a small triangle at the back edge to fill in the gap (green area).


Lay the Toaster’s cuff piece over the bottom edge of the Toaster’s sleeve, lining up the two pieces to make a smooth cutting line along the side edges of the sleeve. Temporarily tape together.


Alter the Tabor’s neckband (maybe).

I used the wide lapped neckband from the Tabor pattern. In the end, I shortening the neckband by 1in to get my rayon jersey to lay flat. This may not be needed for more stable fabrics. I suggest basting in the neckband and determining if you need to shorten it. I took out the extra length from the center back neckband seam.

Now you can cut out your new lengthened Toaster bodice with a v neckline pattern piece and the back and sleeve pieces if you traced those off.

Sewing overview:

Apply the small piece of interfacing to the bottom of the Vneck and stay stitch according to the Tabor’s pattern/instructions.

Assemble the bodice and sleeves according to the Toaster’s instructions.

Sew and insert the neckband according to the Tabor’s instructions.

Hem your sleeves and bodice according to your liking.

You’re finished with your Toaster Tabor Mashup! I hope you love it. Tag mahlicadesigns on Instagram, so I can see your version.
As always, thanks for reading today.

You can follow me on instagramBloglovin, or by entering your email in the right side bar.

You might like to see my Toaster with Tapirs, Toaster in sweater knit, Tabor vneck, Tabor layered vneck tutorial.

Pin it for later!


My Montavilla Dress for Minerva

I’ve been on a small Sew House Seven sewing kick for a while. I’ve made up the Free Range Slacks, a short sleeve Merlo Field tee, and an Underwood Tank and Dress. I’m sure I’ll be making another Toaster Sweater soon too.

Today I’d like to give you a look at my latest Sew House Seven creation, the Montavilla Dress that I made for the Minerva blogger network. You can read the full details here.

Until next time,

Melissa E of mahlicadesigns

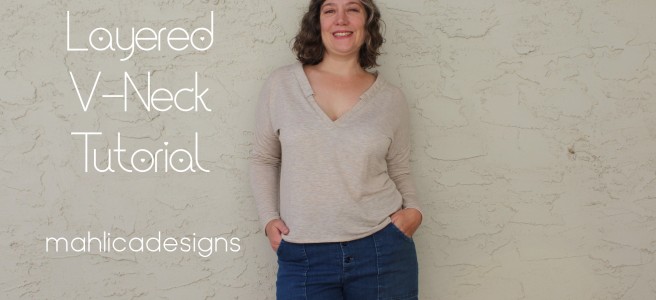
Layered V-Neck Tutorial from mahlicadesigns

I ran across a picture of a v-neck tee a while back that had a double layered neck band and added it to my collection of interesting clothing details to try someday. Unlike most things in my little collection, I did spend some time working this one out using the Tabor V-neck pattern and I’ve put together a tutorial to share with you.

For my layered V-neck I used oatmeal Baby French Terry from Simply By Ti. The baby french terry is light enough to drape nicely in the Tabor and there’s barely any bulk in the double layered neckband. When choosing fabric for your project, experiment by folding layers together to see if you like how they look.

I’m really happy with the overall look I achieved with the layered neckband and this color has been a very useful addition to my wardrobe. If I were to do it again though, I might not use the Tabor pattern combined with this technique. The V on the Tabor is pretty deep and using a narrower band than the pattern calls for at the center front makes me feel a little exposed.

Maybe, but probably not, I’ll put on the wider band that the Tabor calls for (because I love this top) and make another layered V-neck using another pattern.

Layered V-Neck Tutorial

The measurements provided are based on the Tabor V-neck size 8. As a guideline, the outerband should come down and cover approximately 2/3 the length of the front of your v-neck, shoulder to center front. My innerband starts at the shoulder and goes to center front. You can also cut the inner band to fit the entire neckband if you are not concerned about bulk.
You can adapt the technique to your favorite V-neck tee pattern, but you’ll need to adjust the band lengths I’ve given to fit.

Cut your custom bands:

Innerband cut 2:   2.25in X 14in    (3/4in finished width)

Outerband cut 1:   3in X 25in    (1 1/8in finished width)

Interface the center V on the bodice of your tee and sew the front and back together at the shoulders.

Apply fusible web along the short ends of the outerband piece. Fold back the short ends wrong sides together by 1/2in and press to secure with the fusible web.

Mark the center (center back) and mark the shoulder seams 5in away from center back on the outerband.

Sew the innerband pieces together forming a V at center front. Using a 3/8in seam allowance, insert and baste the innerband into place along the V. Don’t baste the entire length of the inner bands, just a few inches around the center V.

Starting at center back, leaving the outerband unfolded, pin the single layer of the outerband in place along the neckline. Stretch the outerband slightly as you pin in place from center back to the shoulder seam. The bands don’t need to be eased in from shoulder to center front.

Next, pin the innerband in place along the bottom portion of the neckline up to the shoulder seam. The innerband should overlap the single layer of the outerband.  Trim away any excess length of the inner band that extends past the shoulder seam.

Lastly, fold over the outerband, sandwiching the innerband within and repin all layers as needed along the entire neckline. Remember the outerband is eased slightly between the shoulders and center back.

If you want to check your proportions first, baste the entire neck band into place (innerband and outerband now functioning as one unit) using a 3/8in seam allowance.

Sew/serge your layered neckband into place using 3/8in seam allowance. Complete the construction of your tee per the pattern instructions.

As always, thanks for reading today.

You can follow me on instagram, Bloglovin, or by entering your email in the right side bar.

You might also like: Tabor V-Neck and Lander shorts

Save For Later

Pin this image, so you can come back when you’re ready to start sewing your version.

Chi Town Skirt in Corduroy for The Fabric Guys

In an effort to spark some motivation to sew, I put together a small sewing plan to round out my fall wardrobe. I included a Chi Town Skirt, a couple pairs of pants and some easy to make tops.

I’m working through the bottoms slowly and have pretty much given up on the idea of making the tops. I guess making a plan didn’t really work to get the fires lit under my sewjo after all.


I did add a wonderful rust corduroy skirt to my wardrobe though. Here’s a sneak peek of the Corduroy Chi Town skirt that I made for the Sewcial Network blog featuring corduroy from The Fabric Guys. You can read the full details here.


On the topic of corduroy, I needed a refresher on sewing with it, so I compiled all the tips I gathered up into one helpful post to share. Click through to see.

11 Tips for Sewing with Corduroy

Until next time,

Melissa E of mahlicadesigns

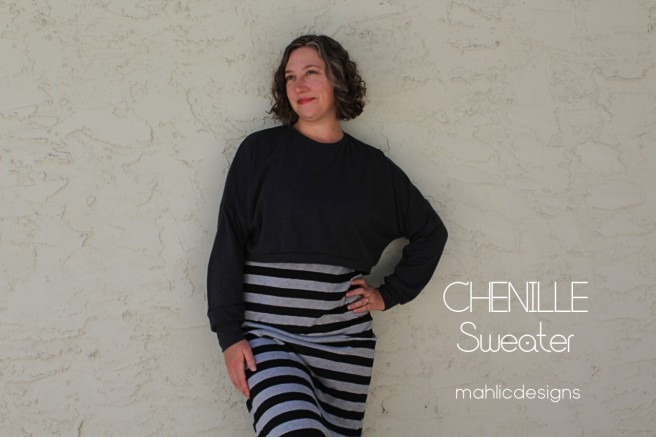
CHENILLE Sweater for Minerva

My fabric stash and my dresser drawers can attest to the fact that charcoal grey knit is my spirit fabric. I’m sticking to what I love with the grey sweater knit fabric that I chose to make a Chenille Sweater from Kommatia Patterns (now Studio Calicot).

Today you can read about the Chenille that I made for the Minerva blog. You can see the full details here.

Until next time,

Melissa E of mahlicadesigns

Find Me on instagram

ITS Spotlight on the Hepburn Turtleneck

Today I’m contributing to the ITS Spotlight September with three versions of the Hepburn Turtleneck from Itch to Stitch (ITS). I made my Hepburns in three fabric types to show off the different looks you can achieve with one well designed pattern. (Keep reading for tour details, a discount code, and a giveaway)

Version 1: Ribbed Knit.  Horizontal Stretch: 100%  Vertical Stretch: 60%  Weight: 9 oz.  Cotton/Rayon/Spandex Blend

My first attempt at sewing with knits about 8 years ago was with a ribbed knit on my sewing machine. I had no idea what I was doing and the result was a complete fiasco. I haven’t touched ribbed knit again until this project.

With a little bit of experience under my belt I had a few ideas on how to do it better. I spent a little time tweaking my overlocker settings trying to get them right. I felt like I was circling around my target but not hitting the bulls eye.

Finally I just googled for some suggestions. I got lucky when the first place I looked was using my exact machine. When I  adjusted the settings to match up to Indie Sews’ recommendations, overlocking in direction of greatest stretch worked perfectly. I then adjusted the differential feed back toward the 1 setting (feed dogs moving equally) when overlocking along the grainline. I used my walking foot and a lengthened zigzag stitch on my regular sewing machine for the hems.

Rib knit conquered !

Version 2: Sweater knit. Horizontal Stretch: 95% Vertical Stretch: 25% light weight.

I’ve sewn with this sweater knit before (here), so I was able to knock it out on my overlocker and then using a walking foot and lengthened zigzag stitch for the hems on my sewing machine. I think I need to pair this one with a cardigan to get a professorial look.

Version 3: Double Brushed Poly. Horizontal Stretch: 100% Vertical Stretch: 75% light weight. 100% Polyester.

I made this one specifically for layering. I think it will look great with my cardigans without being bulky and as a base layer for some outdoor winter activities.

The Pattern Hepburn Turtleneck from Itch to Stitch made in a straight size 8.

The Hepburn is on SALE TODAY ONLY as part of the ITS Spotlight Tour. Use code 916itsblogtour25 to save 25% off the Hepburn Turtleneck. To find more patterns on sale, visit all of today’s bloggers. Check the tour every day, for daily discounts.

The Fabrics Striped rib knit and double brushed poly from Boho fabrics. Grey sweater knit from DG Patterns.

I modeled my Hepburns with my well loved Lindy Petal skirt and Liana Jeans both from Itch to Stitch.

**This post may contain affiliate links. If you purchase through my links, I get a small commission to help pay for my sewing hobby.

The ITS September Spotlight Itch to Stitch Blog Tour features these talented sewists:

September 16th 
September 17th 
September 18th 
September 19th 
September 20th 

Visit our Sponsors and enter our Rafflecopter Giveaway for a chance to win one of 2 amazing prize packages:

Prize # 1
Itch to Stitch: 3 PDF patterns of choice
Raspberry Creek Fabrics: $100 Store Credit
D&H Fabrics Co: $50 Store Credit
Simply By Ti: Prize of $20 Store Credit

So Sew English Fabrics: Prize of $40 Store Credit
Sly Fox Fabrics: $25 Store Credit

Prize #2
Itch to Stitch: 3 PDF patterns of choice
Beautiful Textiles: $100 Store Credit
D&H Fabrics Co: $50 Store Credit
Surge Fabric Shop: $20 Store Credit
Knitpop: $50 Knitcoin Credit

Sew Long Summer, Hello Astoria and Pirate Pencil

I say Sew Long Summer by sewing up new fall outfits. My newest outfit is the Astoria Sweater from Seamwork Magazine and the Pirate Pencil Skirt from Patterns 4 Pirates.

I knew they would make a colorful fall outfit that I can also leverage for my business casual office. (Oh hey, keep reading to learn about the Sew Long Summer blog tour)

The Astoria

This is my first time trying a pattern from Seamwork magazine. My first impression of the Astoria was it’s overkill of information except for an accurate description of the two versions. I had to dig to find that the versions are long sleeve and 3/4 sleeve. (The 3/4 sleeve descriptor is actually on the pattern piece inventory- nowhere else) I made a straight size Med per my measurements and I’d say it’s a good fit.

The Pirate Pencil Skirt

The Pirate Pencil is a free pattern, but is not lacking in the time and effort put into regular quality patterns. My only critique is that the print instructions don’t have you print pages 18 & 23 for the above knee version. You will need them. The only thing I’d change is adding a little length for next time.

I used stash fabrics to make both pieces; a striped ponte knit to make up the Pirate Pencil and a textured double knit for the Astoria.

Thanks for reading today.


The full tour includes these talented sewists, so I hope you’ll follow along and comment on their posts this week.

Sept. 9th   Sewing A La Carte,  mahlicadesigns, Sewing Vortex, Sewing With Sarah

Sept. 10th The Bear and Pea Atelier, Auschick Sews, Stitched by Jennie, Miss Marah Sewn

Sept. 11th Sew Cute Couture by Kathy, A Rose Tinted World, mahlicadesigns

Sept. 12th Little Heart Threads, Lulu and Celeste, The Crafting Fiend, Fils Anddraps

Sept. 13th  Petite Font, Sew 4 Five, The Sewing Scientist, Sew Cute Couture by Kathy, Kitty Makes It

You can follow me on instagram, Bloglovin, or by entering your email in the right side bar.

Viewridge top- pattern review

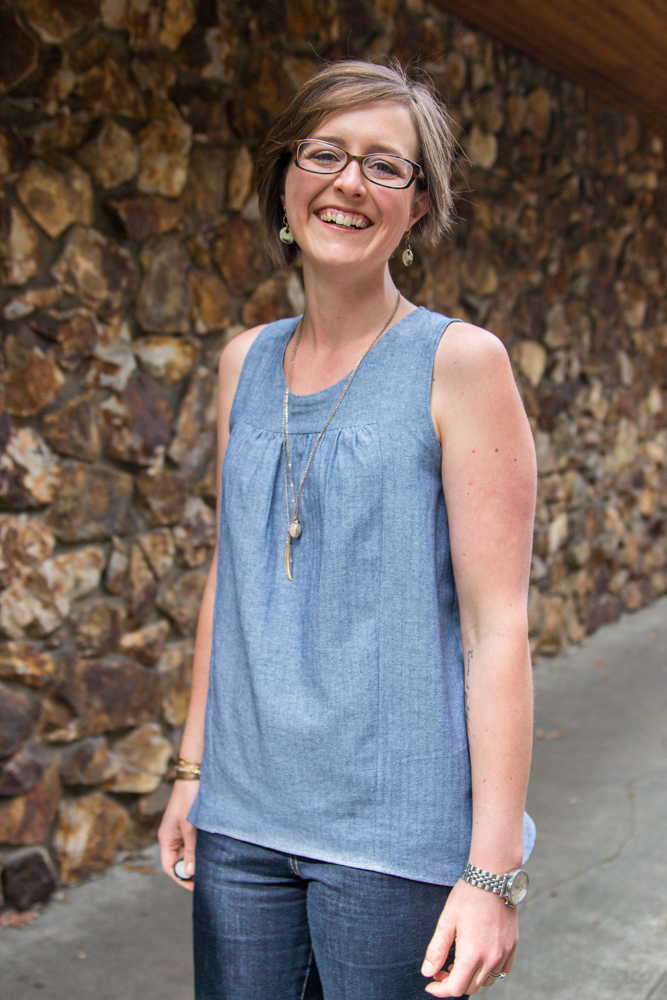
This spring I’m finally getting around to starting in on those woven tanks I’ve been meaning to make for the last three summers. It feels like I have oodles of patterns in the stash to try, but I’m starting with the Viewridge Top from Straight Stitch Designs that I won in last year’s Indie Pattern month on The Monthly Stitch.


I like loose fitting tops for summer, but gathers and pleats seem to add too much volume at the bust for my taste. The Viewridge does have small gathers at the front, but I think they are nicely balanced by structured side and yoke pieces.

Viewridge view B includes small gathers at center front. Photo from Straight Stitch Designs

The Viewridge should be pretty easy for an advanced beginner sewist due to the use of bias tape to finish the neckline and arm hole and making even gathers. Even so, I managed to make it difficult on myself. I didn’t press my fabric when I pulled it back out of my stash. Slightly wrinkled shifty and slippery rayon wovens are not fun to cut and I ended up with one piece slightly off grain. I definitely had some hair pulling as I tried to figure out why one piece ended up slightly lopsided (because it was off grain and wrinkly) and how to fix it.

As I was working through that, Rachel of Oakblue Designs was sharing her success in cutting the same type of fabric after treating it with a spray stabilizer. Noted.

I also found a small error on the pattern at the shoulder. The pattern marking doesn’t line up. Use them to help you know which pieces go together, but you’ll be fine lining up these pieces without them.


The Pattern: Viewridge Top from Straight Stitch Designs, view B in size 10 and shortened 2in at the adjustment line. I chose a size 10 based on my 37.5in bust measurement. The pattern instructions suggest that for larger cups sizes to try one size larger for the front pattern pieces than you use for the back pieces. I stuck with a straight 10 and feel like it fits well.  Overall I give the pattern an A, the instructions are well put together and the pattern is well drafted. That one misaligned pattern marking is easily overcome.

The Fabric: I picked up this floral rayon a year or so ago at Joann Fabrics. It’s beautiful and unfortunately it was only available for a moment.


As always, thanks for reading today.

You can follow me on instagram, Bloglovin, or by entering your email in the right side bar.

This post may contain affiliate links. If you purchase through my links, I get a small commission to help pay for my sewing hobby.

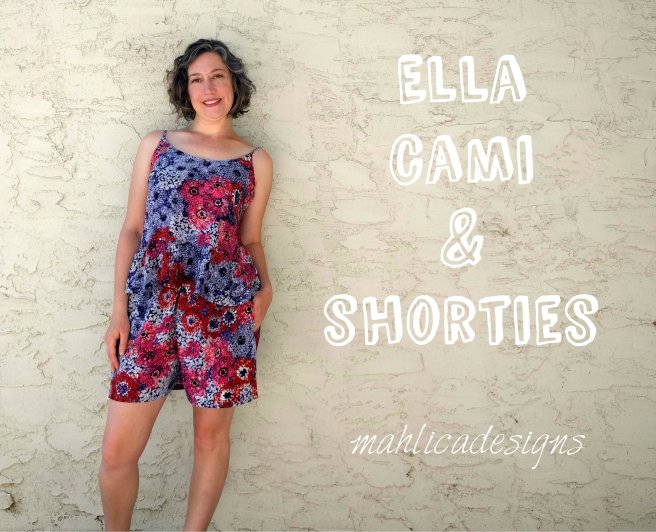
You might like: My Ella Cami Set made in the same fabric.


Save For Later  Pin this image, so you can come back when you’re ready to start sewing your version.

Lily Wrap Skirt- Let’s Sew Together

Designer Stitch is developing a set of Let’s Sew Together patterns that are designed to be sewn with a novice or friend that you can help along the way and share the love of sewing with.

The concept of having a line of patterns that are beginner friendly and bring people together is so lovely and Ann of Designer Stitch really hit the mark in the first implementation of her idea- the Lily Wrap Skirt.

Lily 1

Why the Lily works.

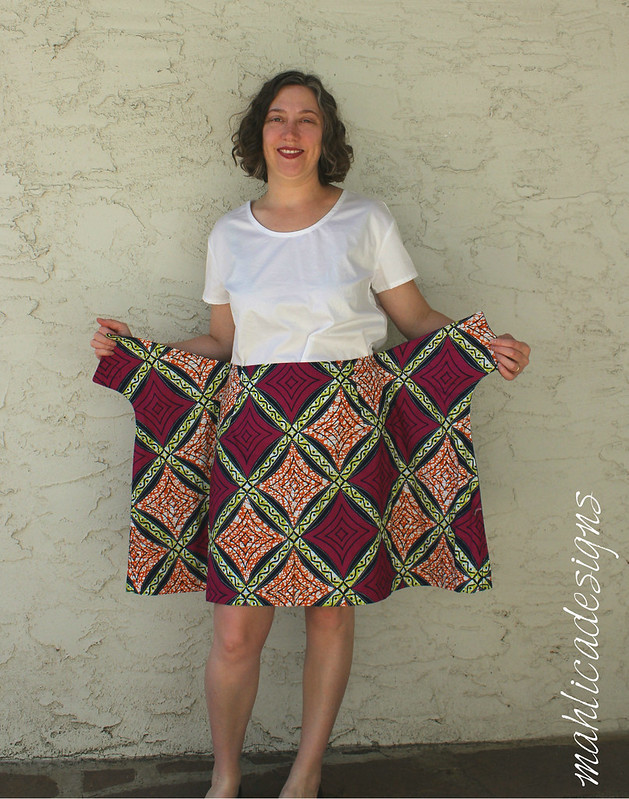
The design is interesting with the two sides that fold over each other, reminding me of origami and there’s something about the shaping that brings to mind mathematical curves and lines.

The Lily is not only a beginner friendly pattern but it is thoughtful in its design to make it easy to help someone brand new to sewing. For example: 1. A 1/4in seam allowance is used along the curved edge with the tab. The narrower seam allowance removes the need to clip along that curve saving time and construction steps. 2. Using hook and loop as a closure is simple and easy to apply and much quicker that other types of closures.  3. The need for fitting is minimized. You may need to adjust your darts, but no alteration to fit the width of your waist or hips is needed in this design.

The Lily also works because it’s a great project to use fun fabrics with and heck, a reversible skirt is fun for all ages.

buckle close up

Take your Lily to the next level

After making the Lily, I have a few notes on how to add some of your intermediate sewing skills to the project. 1. Upgrade your closures. I used buckles and a hidden slide clasp because I’m not planning on wearing mine as reversible. Sewing with D used some really cute buttons on hers. 2. Add a facing or interface your waistband edge. The waistband is a turned over edge, I think this is probably fine for most, but I just feel like I need a little more support in my waistband.

Lily 3

How to partake in the fun without a “novice” to sew with you.

The timing wasn’t right for me to work with someone who would need a little help learning to sew the Lily skirt, so I explored two other options. Firstly, I paired with Diane of Sewing with D to talk through the process using video chat in facebook messenger. Secondly, since Elizabeth of Elizabeth Made This and I live in the same city, we arranged to do a sewing meet up to work on our skirts together.

In the initial chat with Diane we talked about the pattern, fabrics, and ideas we were considering. We were able to work out any questions we had about the pattern, get a second opinion about fabric choices, and of course just chat about whatever. Our second video conversation took place after we both had most of the construction completed. We talked about what we might do differently the next time we made the pattern, shared pictures of button and buckles we were deciding on and gave our opinions, and of course more sewing chit-chat. Most of my sewing friends are online, so I really liked having the video chats with Diane, whom I’d been acquainted with for some time, but never actually spoken to or met with in person.

Meeting with Elizabeth in person was another fun way to work on the project. We shared some tea and cinnamon rolls and then as two moms with limited sewing time are want to do, got right down to the business of sewing. Now neither Elizabeth or I need hand holding, but it is really nice to be able to say “what are you doing here”, or “how are you coming along on this step” and so on. So much better than talking to myself in my sewing room.

Thanks Elizabeth and Diane for being my sewing buddies on this project!

Lily 2

The Pattern: Lily Wrap Skirt in size 4. I shortened mine by 4in to hit above my knee.

The Fabric: Navy cotton sateen and a cotton wax print from my stash.


As always, thanks for reading today.

You can follow me on instagram, Bloglovin, or by entering your email in the right side bar.

This post may contain affiliate links, if you purchase through my links I get a small commission to help pay for my sewing hobby.

Save For Later

Pin this image, so you can come back when you’re ready to start sewing your version.

Breaking Ground with the Tracey Bee Top

I’m Breaking Ground with the Tracey Bee Top from new to me Seen & Sewn Patterns. I’m also hoping to break out of my ongoing sewing funk by using some energizing colors for spring in the midst of our ice and snow. (Oh hey, keep reading for tour details and to enter the giveaway)


What I like most about the Tracey Bee are the insert details. These create interesting design lines if you sew it up in a solid fabric and opportunities to mix fabrics if you like colorblocking.

I made my Tracey Bee with a rayon challis type of fabric. The drape is wonderful, but it did get a little clingey with static around my waist. Instead of a double fold hem, I decided to use a cotton bias binding and that seems to have helped the fabric stand away from my skin enough to resolve the problem.


The Pattern: Tracey Bee Top** in size L, cropped view. Due to the challenge of sewing inserts, I’d recommend this top for an advanced beginner or above. Other than the challenge inserts can offer, the pattern goes together easily. There was a small mismatch at the side seam when the dart was folded, so I sewed the dart at half the width and that resolved the mismatch and didn’t affect the fit for me in the least. (the designer is checking the pattern to correct).

The Fabric: Rayon woven paired with scraps of teal eyelet from the ole stash.


I’m still having a hard time getting excited about a next sewing project, but starting with fabrics in my stash that do give me some energy is a good strategy. I do wish it was warm enough to wear my spring projects instead of just looking at them.

The Braking Ground Blog Tour includes all these creatives… we hope you’ll visit us each day:

Monday March 11That’s Sew Lily, Sewing A La Carte, Mijn 11jes & ik

Tuesday March 12mahlicadesigns, Embrace Everyday, Jot Designs, auschick sews, Raising Stripling Warriors

Wednesday March 13Musings of A Seamstress, Very Blissful, Sew4Five, Just Sew Something, Hazelnut Handmade, Crafting Through Time, Tales From A Southern Mom

Thursday March 14Make It Sew with the Bear and Pea Atelier, Ronda B Handmade, SequioaLynn Sews, Sewing with D, The Sewing Goatherd, OOYAmade, My Golden Thimble, Custom Made by Laura

Friday March 15–  Sew Cute Couture by Kathy, Sewing Novice, Ronda B Handmade, Momma Bear Sews, MeMade, My Golden Thimble, Lulu & Celeste

Breaking News: our tour sponsor Phat Quarters is offering 2 patterns of choice from her pattern shop to one lucky winner.

Enter Here!

***

We’d love to see how you’re Breaking Ground this month. Share with us what you’re working on by using the hashtag #BreakingGround2019 across social media.

As always, thanks for reading today.

**This post may contain affiliate links. If you purchase through my links, I get a small commission to help fund for my sewing hobby.

Lazo Trousers from Thread Theory- featuring DG Patterns Organic Tencel

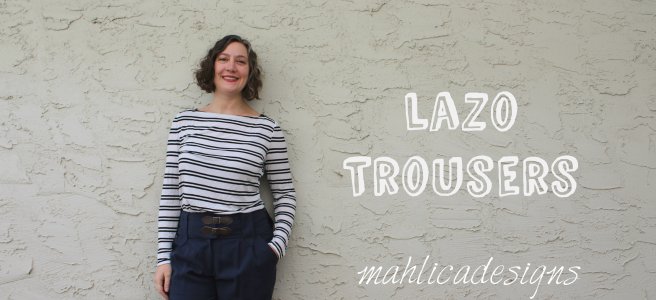
It took me about a month to get it done, but I sewed up my first pair of Lazo Trousers from Thread Theory. The pattern isn’t hard at all, November was just slow going on the sewing front.

I originally picked up the Lazo pattern hoping to use them to knock off this look I found on pinterest, but my interest in that project has waned.

Picking up a big bag full of discounted closures at Hobby Lobby did bring the Lazos back into focus though. I really like the look they have with two buckles at the waistline and now I can totally do that.

The Pattern: Lazo Trousers in size 10 and shortened 2in. After my muslin, I pinched out a 1/2in wedge from the center back yoke.

Pattern feedback- 1. you should stay-stitch the upper edge of the pants after making your pleats, not after you’ve constructed the whole pant and inserted the fly. I didn’t have a problem with my fabric stretching, but play it safe and do this step early on.  2. I’m not a fan of attaching the zipper to the fly shield as it doesn’t look as neat on the inside. I really like the fly insertion instructions from the Liana Jeans and often use them when making other pants. 3. I inserted the belt tabs into the waistband seam for extra security and a neater finish.

The Fabric: Organic Tencel in navy from DG Patterns shop. If you haven’t sewn with tencel yet I really encourage you to pick some up and give it a whirl. Tencel has nice drape and is super soft to the touch. The silk setting on my iron seamed to work best in combination with a pressing cloth. Direct pressing tended to leave a mark and slight sheen on multiple layers. Tencel woven is one of the recommended fabrics for the Lazos and would work well with any pant, skirt, or dress that needs a nice drape.

As always, thanks for reading today.

You can follow me on instagram, Bloglovin, or by entering your email in the right side bar.

*As a DG Patterns Fabric Ambassador I receive complementary fabric from the DG Patterns fabric shop to use for a project in exchange for sharing it with you.

You might also like The modern striped boatneck top I’m wearing.

Save For Later: Pin this image, so you can come back when you’re ready to start sewing your version.

ITS Time To Sew an Uvita

Click through the links in the above graphic to see all the posts

ITS about time I sewed up the Free Uvita pattern* from Itch to Stitch (ITS) to wear this fall with my Liana jeans. What Itch to Stitch pattern have you been putting off making? Now’s the time to get it figured out, because during the blog tour this week Kennis is featuring a daily sale. You’ll need to read the days blog posts to find out about the sale patterns. (Read on to see today’s sale and a GIVEAWAY)

The Uvita is a relaxed, dropped-shoulder top perfect for getting comfy and cozy in the cool weather. I wanted to do a colorblocked version in French Terry from my stash and this color combo of greys ended up working the best together. The good thing is I busted some remnants, the bad thing is I made myself yet another grey top to add to my stacks of grey tops for fall/winter.

My new Uvita pairs perfectly with my Liana jeans. The Liana’s are the first pair of pants/jeans I ever made almost two years ago now. Aren’t they holding up well? These are going to last me a good while.

I made my second pair of Liana’s last fall and had a little hiccup with the waistband. I over stretched the front corners so they look weird and I forgot to add the twill tape to stabilize the top edge of the wasitband and that turned out to be a big woopsie in this stretch denim. As I wear them, the top edge of the waistband stretches and flips out in the front. It is totally annoying. I thought I could live with it, but no. These are under alteration so I can love them like they deserve.

My third pair of Liana’s is in the planning stage. I have a medium blue denim washed and ready, but I can’t seem to get past the step where it is just sitting on my cutting table.

If you are ready to get the Liana Jeans Pattern, Itch to Stitch is offering the patterns featured in today’s tour posts for a special one day sale price. The Liana Jeans* are $9 , Mila Top $9, Anza Dress $9, Arenal Top $9, Bonn Shirt & Dress $9, La Paz Jacket $9, and Beasoleil Top & Dress $9. The Uvita top is FREE everyday.

Mabel Madison, one of the tour sponsors is offering $10 off a $50 order with the code ITSTOUR through September 30th.

And yes, there is more…

Visit our sponsors and enter our Rafflecopter giveaway for a chance to win this unbelievable prize package:

Itch to Stitch: 2 PDF patterns of choice
Simply By Ti: Prize of $20 GC

So Sew English Fabrics: Prize of $30 GC
Mabel Madison Modern Makers: Prize of 3 yard coordinated bundle
Sly Fox Fabrics: $25GC
Raspberry Creek Fabrics: $50 GC
Surge Fabric Shop: $20 GC
Organic Cotton Plus: $25 GC
WarmCrochet: Pair of scissors

(ENTER HERE)

As always, thanks for reading today.

You can follow me on instagram, Bloglovin, or by entering your email in the right side bar.

*This post contains Itch to Stitch affiliate links. If you purchase through my links, I get a small commission that I put toward my sewing hobby.

You might like my other Itch to Stitch creations:

Lindy Petal Skirt, Lisbon Cardigan and Liana Jeans #2, Brasov Wrap Top, Paro Cardigan, Liana Jeans #1, Idylwild Tank


Sew Long Summer, Hello Michelle & Robinson

I say Sew Long Summer by sewing up new fall outfits. My newest outfit is the Michelle Cardigan from DG Patterns* and the Robinson Trousers from Ensemble Patterns. Both of these hit my sewing list way back in the spring when I first saw the Michelle pattern at its release and then I won the Robinson Trouser pattern in a facebook group. I knew they would be a perfect fall outfit. (Oh hey, keep reading to learn about the blog tour and GIVEAWAY!)

The Michelle

I chose a sweater knit from The Fab Clique to make my Michelle cozy for fall. I’m really liking this reddish color on me.

I started with a size 10, per the sizing chart, but ended up sizing it down to an 8 from the waist up. It’s a roomy fitting top so you may want to choose your size with that in mind.


I do have a little tip on the Michelle construction. When you fold up the front curved hem there is a slight gap (shown in blue) between the hem allowance and the side seam. In most knits this probably isn’t a problem, but in the sweater knit it created a weak point between the side seam and the upturned hem. To avoid this you can stretch the fabric in the hem allowance to be caught in the side seam or you can include an extra tab of fabric when cutting to make sure the hem allowance reaches the side seam.

The Robinson Trousers

I used a lightweight (6-7oz) stretch denim from deep in my stash for the Robinsons and boy do I wish I could photograph black better so you could really see them.

The designer has combined comfort and style in the Robinsons. The elastic waistband and easy fit are paired with a faux fly, nice sized front slash pockets, optional patch pockets for the back, and several finishing options at the ankle to make these more than a simple pair of pull on pants.

I chose to make the exposed zipper and tab closure at the ankle ’cause that’s just my style. I think they look pretty cool.


All week we have sewing bloggers sharing how they say Sew Long Summer. The full tour includes these talented sewists, so I hope you’ll follow along.

Sept. 10th   Sewing A La Carte, Tenille’s Thread, A Custom Clothier, Made for Little Gents, Miss Marah Sewn

Sept. 11th Manning the Machine, mahlicadesigns, Sewing Vortex, Crafting Fiend

Sept. 12th Auschick Sews, Aurora Design Fabrics, My Heart Will Sew On, Vicky Myers Creations

Sept. 13th Flaxfield Sewing, Sewing with D, Musings of a SeamstressMake it Sew with the Bear and Pea AtelierPetite Font

Sept. 14th Sewing à la CarteSewing by Ti, Stitches by Laura, Sewing with Sarah, My Sewing Roots  

Share what you’ve been making to say “Sew Long Summer” to be entered into our random drawing. (Full details here)

Continental US participants will be entered to win a $20 store credit from Simply by Ti Fabrics.

All other participants will be entered to win a pattern of choice from DG Patterns.

To enter, please tag your sewing project with #SewLongSewcial18 on Instagram or facebook. You can also leave a link in the comments on the mahlicadesigns intro post. Please limit your entries to items you’ve sewn between Sept 10th and Sept 28th 2018. Winners will be notified and announced shortly thereafter.

We can’t wait to see what you’re making.

You can follow me on instagram, Bloglovin, or by entering your email in the right side bar.

*This post may contain affiliate links. If you purchase through my links, I get a small commission to help pay for my sewing hobby.

Dana Top pattern review

I’ve been keeping it pretty simple in the sewing room this summer. Can we say Summer Break!

Working through my stash has been a motivator though. My feelings about my stash tend to swing between “I’m glad to have this resource” to “I’m never going to be relieved of this burden.” This summer I’ve been in the “stash burden” zone as stash overflow has piled up in front of my fabric shelves.

Making the Dana top and a pair of Chi Town shorts to go with, helped bust through some stash and were pretty easy projects for my lazy summer approach to sewing.

I originally planned to replace the side tie on the Dana with a cool looking buckle, but when it came to it the buckle just looked and felt too heavy. Any suggestions? I feel like something to add a little interest would be good.


The Pattern The Dana top from DG Patterns in size 10. Made without the side tie. I added two hidden snaps along the cross over to keep the top from gaping open at the bust and when I bend at the waist. If you’re looking for an easy pattern that gives you a nicely put together look, I think the Dana top is a good pattern for you.

Chi Town Chino shorts. These are my fourth pair, so nothing new to add. See my previous pairs here and here.


The Fabric Dana was made in a shirt weight woven that I picked up from Hancocks before they closed down. These Chi Towns are made in a cotton twill I picked up from Joann Fabrics.

Total stash busted:  1.25 yards for Dana and 1 yard for Chi Towns.

As always, thanks for reading today.

You can follow me on instagram, Bloglovin, or by entering your email in the right side bar.

This post may contain affiliate links. If you purchase through my links, I get a small commission to help pay for my sewing hobby.

Save For Later

Pin this image, so you can come back when you’re ready to start sewing your version.

McCalls7351 Shirt Dress pattern review

Here’s a little story about the Who Made It Best Challenge that isn’t.

I’ve come close to making the popular shirtdress style when I made a Marigold dress a couple years back, but I hadn’t felt like I was losing out on anything by not having a proper one. When Stephanie from the Petite Sewist, suggested the M7351 shirtdress to do together for a Who Made It Best challenge, I was ok with the idea but didn’t think I’d wear it much outside of church on Sunday.


As we worked on our muslins, I found I had to go down a full size in the bodice and was alright from there. Stephanie was so frustrated getting the fit correct that she has put it in the naughty corner. The challenge was off, but I was starting to like the dress.


As I worked through the project I  relearned the lesson to read through the directions ahead of time.  Where I got burned on this was the instruction to hand stitch the entire placket and neckband facing – that equals about 8 feet of hand stitching on my dress. After doing all that handstitching, the next step is to topstitch all along that same seam. Gosh darn it, I could have just topstitched and skipped all that hand stitching. Catherine Daze’s Blog found the same thing in another McCalls shirtdress pattern too.


One of the final steps is the turn under and hem the sleeves. I just didn’t like the look of this, so I settled on the idea of adding a cuff. Going through my patterns I found the cuff from the Onyx Shirt by Paprika Patterns would give the look I was going for. First I shortened the sleeve by 1 1/2in at the hem line and determined that a size 7 cuff from the Onyx would fit my new opening, then attached the cuff following the directions for the Onyx.


The Pattern McCalls7351 view B with no pockets. Size 14 C cup in the bodice and size 16 skirt. My measurements put me in a straight size 16 but after muslining the bodice I sized down to the 14.  Sleeve shortened by 1.5 inches and I added the size 7 cuff from the Onyx shirt pattern.

The Fabric Robert Kauffman yarndye in wineberry. Used 2.5 yards


As always, thanks for reading today.

You can follow me on instagram, Bloglovin, or by entering your email in the right side bar.

You may also like to see: my Marigold Dress

Save for later

Sail Away Lander Short Tutorial & How To Attach Slotted Buttons

Lander wm 4

I got a lot of positive feedback on my Sail Away Lander shorts that I made in the Who Made It Best challenge. They turned out pretty close to my vision, so I’m happy.

If you’d like to make a pair for yourself or borrow any of my ideas, I’ve put together a tutorial of my modifications to make it easier for you. Check out my Sail Away inspiration board for even more ideas.

I made modifications that fall into three categories: 1. Angle the pocket opening 2. Lengthen for a higher waist and 3. Relocate the fly closure.

I’ll also share how I attached my slotted buttons.

Size: I originally made a pair of Lander pants and shorts in size 10 per the measurement chart. I like the length I get in that size, but really needed to size down to an 8 for a better fit in the width. For my Sail Away Landers I wanted a pretty slim/snug fit in the stretch twill, so I sized down even further to a 6, still keeping the length of my pieces at a size 10.

  1. Angled Pocket

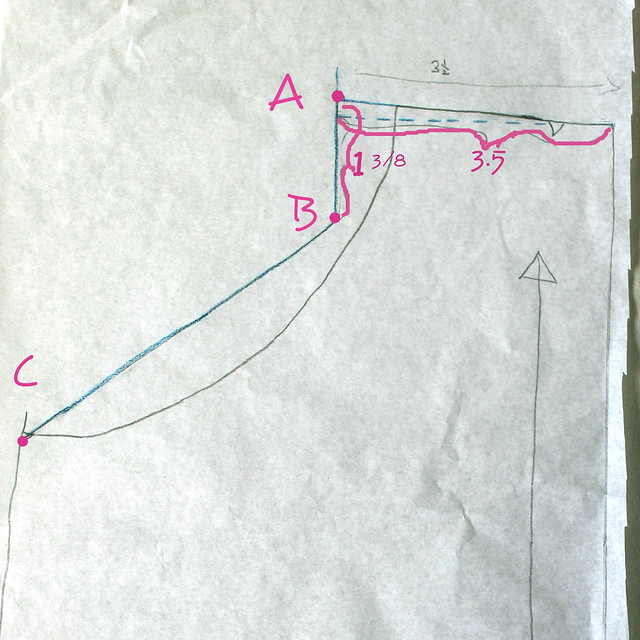
Trace off the pocket pattern piece in your size and be sure to add the grainline marking. Measure and mark a line 3 1/2in away from and parallel to the long edge of the pocket. Mark the point (a) where the slightly curved top edge of the pocket meets the newly drawn parallel line. Measure down 1 3/8in from your (a) mark and mark again (b). Mark point (c) where the original pocket curve meets the side of the pocket. Connect (b) and (c) with a straight line. You now have an angled pocket opening. ** You may have to tweak these measurements slightly for a different size, but they will get you really close. (Original design lines are in grey pencil, newly drafted lines are in blue pencil)

Pocket alteration 1.2

Next up you’ll need to draw a new pocket interfacing piece. Simply trace your new angled pocket edge and draw a matching line 1in away to create the new piece.

Interfacing collage


2. Lengthen for a higher waist

I measured down 1 1/2in from top of the side seams (front & back pieces) to mark my lengthen line. Your lengthen line should be perpendicular to the grain line. Cut and spread 1in (or more). I’m short-waisted so 1in was plenty for me.

I chose not to lengthen my pocket piece. If you choose to, I suggest lengthening below the angled pocket opening, so you don’t skew those proportions.

3. Move the fly

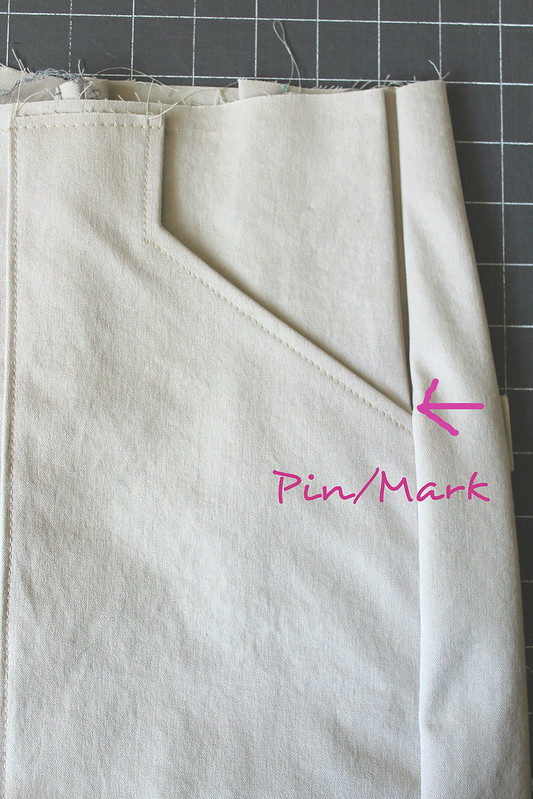
We’re mostly just switching up the construction a little. Pin or mark just above the pocket on the side seam. Stitch the side seam closed from bottom(hem) up to your marking and back stitch to reinforce.  The dot marking on the fly pieces will match up to the top of your side seam stitching.

Pin mark

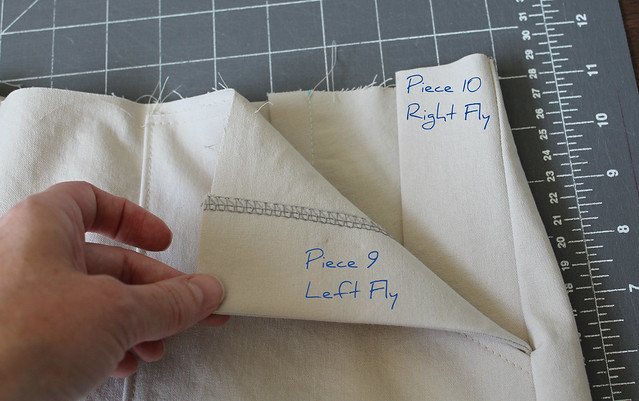
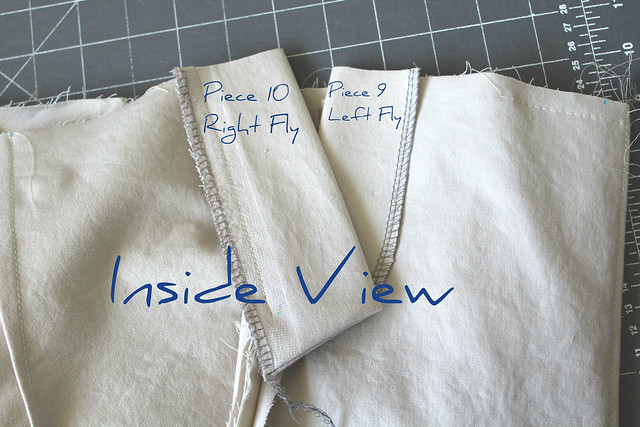
In the pattern instructions the left fly attaches to the left (as worn) center front and the right fly piece attaches to the right (as worn) center front. Instead, you will attach the Left fly to the Front pant/short piece and the Right fly to the Back pant/short piece.

Fly pieces

Fly pieces inside view

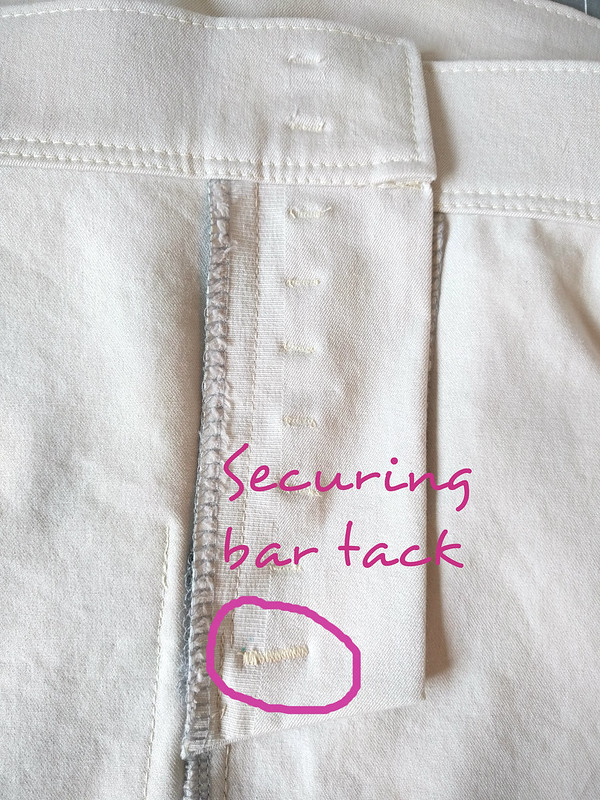
Follow the pattern instructions for completing the fly and button closure. The fly pieces as cut will extend up past the waistline, simply trim any excess. Once you have the fly completed, you’ll want to add a securing bar tack through the two fly pieces. Make sure they are laying flat over each other like they do when the fly is closed. Pin together and sew the bar tack through the two layers.

Bar tack detail 1

Note: Moving the fly to the side will make the pattern notches on your waistband irrelevant, but you’ll be fine. Simply attach following the directions and ease any areas that need it.

Things to consider.

  1. I’ve made two Landers before, so I knew I would be ok with a shorter side fly.
  2. I made mine with stretch twill, so going down a size and the shorter fly still works for me.
  3. Raising the waist may require further alterations of your CB seam, darts, and possibly the waistband.

Attaching Slotted Buttons (aka Canadian buttons or bar buttons)

I turned to the Self Sewn Wardrobe facebook group for direction with these.  I got the suggestions that these are attached with a ribbon, twill tape, or self fabric running through them and an example pic from a rtw jacket with this type of closure. I haven’t found a tutorial to verify that I did this properly, but this will get you started. If you have any suggestions, I’d love to hear them.

Your ribbon will run right down the middle of your buttons, so mark your button placement to the outside of each button so you can still see the markings after laying down the ribbon. Don’t skip the marking because we’ll be shifting those buttons up and down on the ribbon as we sew.

placket collage

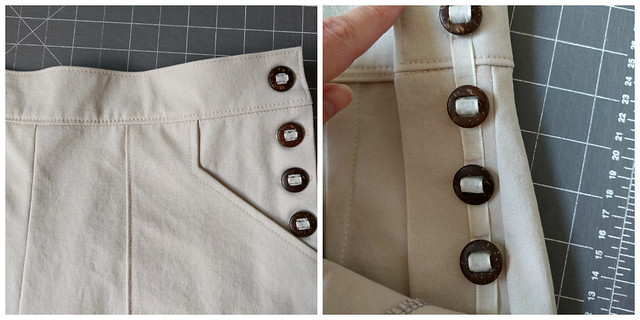
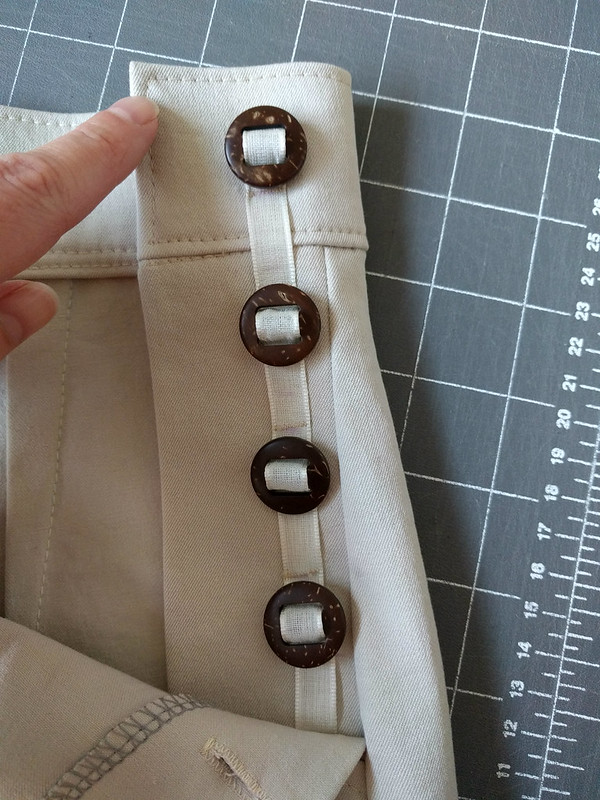
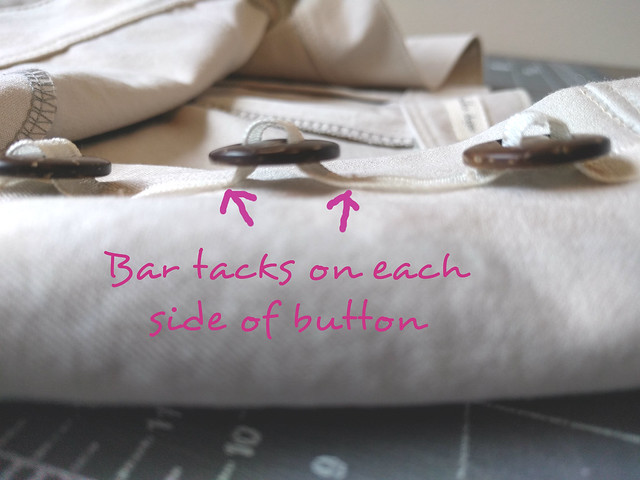
Cut your ribbon about 1.5 times the length of the fly and slide all the buttons onto the bottom of the ribbon. Starting at the top of the fly. Slide one button up to the top of the ribbon leaving about 5/8in of ribbon extending above the top of the button. Position your button to line up with your placement mark, fold under the top edge of the ribbon by 1/4in and pin the ribbon in place. Also pin or mark your ribbon just above the top of your button. Slide the button down and out of the way to make two bar tacks. One along the top folded edge of the ribbon and the second on the marking for the top of the button. Straight stitch along the edges of the ribbon between the bar tacks.

Slide the button back up into position and get ready to experiment with how much slack you’ll need in the ribbon. I tried using a match stick, chop stick, and a couple other things before settling on the shaft of my seam ripper. Place your spacer beneath your button keeping the button centered with your button placement marking. Pin down the ribbon to line up with the bottom edge of the button. Your next bar tack will go where you pin. Remove your spacer and test how well the button fits through the button holes. Adjust as needed. When you have the slack determined and the ribbon pinned, slide the button up as far as you can and make a bar tack where you pinned. Your first button is now secured.

Button detail

Repeat this process for the rest of your buttons. Positioning your button with the ribbon flat, marking and sewing the top bar tack along the top edge of the button, repositioning the button with your spacer to get your slack, and marking and sewing the bottom bar tack. If you have a presser foot that will fit, straight stitch along the ribbon edges between your buttons. (I couldn’t make that work.)

Slotted Button Detail 1

After all your buttons are secured, leave enough ribbon to extend to the bottom of the fly and straight stitch along the ribbon edges to secure. I was also able to catch the bottom of my ribbon in a bar tack that I used to secure my fly pieces together. Trim any excess.

Next time I’d do the top button with a separate piece of ribbon. I think I’d like the looks of that better. I’d also apply my buttons before attaching the waistband, then I could secured top edge of the ribbon in a seam and have a nicer finish.

As always, thanks for reading today.

You can follow me on instagram, Bloglovin, or by entering your email in the right side bar.

Save For Later

Pin this image, so you can come back when you’re ready to start sewing your version.


Lander Shorts – Who Made It Best

Welcome back to Who Made It Best from mahlicadesigns.


Who Made It Best is a friendly challenge where one of my sewing friends joins me in making up the same pattern to see Who Made It Best. The challenge rules are simple: 1. We agree on a pattern to use 2. sew it up to suit our personal styles 3. share it with you and ask you to vote. (Oh, and we keep what we’re up to a secret from each other)

WMIB Label 4

Arielle from Seen & Sewn Patterns has joined me in making up the Lander Shorts for this week’s challenge. Please also check out Arielle’s blog here to see her super cute version. Isn’t this print she choose wonderful?

Arielle collage

The Lander Shorts are a high waist button fly short/pant pattern with optional expansion pack for a zipper fly.

Lander wm 2

I’ve already made a pair of Lander shorts (here) and pants (here) and was ready to try something different with this pair. My inspiration started with a picture of a side button closure and grew into a board of ideas for what I’m calling my Sail Away outfit.

Lander wm 4

The details I settled on for the shorts are an angled pocket opening, button fly closure moved to the side seam, and a high waist.

I’m wearing a Durango tank from Hey June that I modified with a lower neckline and a contrast piece at the lower bodice. Totally forgot to get photos of that- geesh.

** I’ll have a seperate blog post soon to walk you through how to make these modifications. (Find the tutorial here)

Lander wm 1

Lander wm 5

The Pattern: Lander Shorts made in size 6 and modified as described.

The Fabric: Khaki stretch twill from Simply By Ti. I only needed 1 yard!

Lander wm closeup

So, who do you think made their Landers the best?

Please visit Seen & Sewn Patterns for more pictures of Arielle’s version, then place your vote for Who Made It Best. The poll will be on both blogs, so you can see both versions before you choose your favorite. Voting open for one week and results will be posted on Instagram.

VOTE HERE

You can also take a look at the Bronte Tee, Shoreline Boatneck, Sorbetto Top,  Greenwood Tank, Cheyenne Tunic, Chi Town Chinos, and  Ladies Caroline Dress that were part of past Who Made It Best challenges.

You can follow me on instagram, Bloglovin, or by entering your email in the right side bar.

As always, thanks for visiting and voting today.

Tabor Vneck and Lander Shorts

Have you seen the newly released Tabor Vneck from Sew House Seven?

There are many options to choose from in the pattern, but I was most drawn to the cropped sweater version. I thought it would look great with a pair of Lander Shorts I’ve been planning.


About the Tabor

The Pattern: Tabor Vneck view 5 (cropped sweater) in size medium with no alterations. This is an easy pattern to put together, but setting in the point on a Vneck can be tricky to do without puckers. The pattern instructions walk you through a construction technique for the V that I’ve had the most success with.

The Fabric: The Tabor was sewn using baby French Terry in two toned burgundy from Simply by Ti Fabrics*. This view of the Tabor is made for sweater knits with stretch and the fabric works perfectly. I have the stretch that is required and the baby FT is light enough for spring weather and drapes well.


About the Landers

The pattern: Lander Shorts from True Bias Patterns in size 10. No alterations.

The fabric: Stretch Denim from Simply by Ti Fabrics*. I did not size down to account for the stretch and they fit just fine for photos, but after a hot humid day at a Florida amusement park they were feeling a little loose. I’d go down a size next time. I’d recommend starting with your regular size and slim down at the side seams if needed (this fitting step is included in the pattern instructions anyway).

As always, thanks for reading today.

You can follow me on instagram, Bloglovin, or by entering your email in the right side bar.

*As a Simply by Ti Ambassador I received complimentary fabrics for this post from the Simply By Ti shop to use in exchange for sharing it with you.

You might also like: The Lander Pants I made for the Breaking Ground Blog Tour.

Save For Later

Pin this image, so you can come back when you’re ready to start sewing your versions.


VS Pattern Showdown: 5 Women’s Tank Patterns Go Head to Head

Welcome back to VS.

An occasional series here at mahlicadesigns with the aim of pairing similar style patterns against each other in a friendly showdown to see which pattern better suits me, all while working through my pattern stash.


Today I’m comparing 5 knit tank tops:

Dahlia Tank from Leala Jeyne

Durango Tank from Hey June Handmade

Greenwood Tank from Straight Stitch Designs

Idyllwild Tee from Itch to Stitch

Lago Tank from Itch to Stitch

VS. Tanks front collage 2

The Dahlia Tank is “a well-fitting tank top for use with knit fabrics in cup sizes A-E. The scoop neckline is finished with bindings, not bands, for a professional look. Hip and crop lengths.”

The Durango Tank is a “casual sleeveless shirt with a center back seam and longer flared hem… is fitted at the shoulder and bust and loose through the waist and hip for an easy fit.”

The Greenwood Tank features “a wide open neckline and two back options.”

The Idyllwild Tee is a “fitted t-shirt and dress pattern… jam-packed with options… you can literally make 42 garments with different looks!”

The Lago Tank is a relaxed fit racerback tank with slightly scooped neckline.

For all my tanks I used the 10oz cotton lycra solids from Simply By Ti. I’ve used this C/L in many projects as I love the weight and quality (here & here & here & here & here). As a Simply by Ti Ambassador I received complimentary fabrics for this post from the Simply By Ti shop to use in exchange for sharing it with you.

Now let’s compare.

VS. Tanks front collage 1

VS. Tanks front collage 2

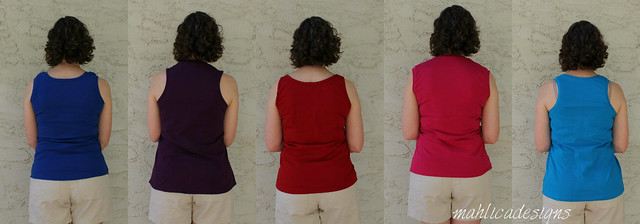
Left to right: Dahlia in Cobalt, Durango in Eggplant, Greenwood in Tomato Red, Idyllwild in Fuchsia, Lago in Turquiose

Instructions.

Dahlia: Beginner friendly and easy to follow. I still managed to finish the neck and arm opening with a band instead of a binding by mistake.

Durango: Beginner friendly and easy to follow.

Greenwood: Beginner friendly and easy to follow. Link to video demonstrating binding technique.

Idyllwild: Beginner friendly and easy to follow. Pattern notches included to line up curved side seams and position the bands.

Lago: Beginner friendly and easy to follow. Pattern notches included to line up curved side seams and position the bands.

VS tanks back collage 1

VS tanks back collage 2

Left to right: Dahlia in Cobalt, Durango in Eggplant, Greenwood in Tomato Red, Idyllwild in Fuchsia, Lago in Turquiose

Fit.

Dahlia: Size small graded to medium at the hip per my measurements. A little bit of bunching at the shoulder seam area.

Durango:  Size 10 per my measurements. Dropped shoulder adjustment of 3/8in was critical to reduce gaping. I don’t think I stretched the binding around the armscye, enough as you can see there is still gaping going on there.

Greenwood: Size 10 per my measurements. Shortened front and back straps by 1/4in and then did a 1/4in dropped shoulder adjustment.  Shortened 1/2in at hemline.

Idyllwild: Size small graded to medium at hips. Shoulder seam sits back about 1/4in from my shoulder point. A 1/4in dropped shoulder adjustment to the front bodice should fix that. Neckband pattern piece seems a tad too long around the CF curve. It will need to be shortened 1/2in.

Lago: Size 6 graded to 8 at the hips. No shoulder adjustment needed (due to racerback shape?) Bands fit perfectly.

** For all these patterns I’ll need a sway back adjustment and to grade the back piece a little larger at the hip to account for my full seat.

VS tanks side collage 3

VS tanks side collage 2

Left to right: Dahlia in Cobalt, Durango in Eggplant, Greenwood in Tomato Red, Idyllwild in Fuchsia, Lago in Turquiose

Style.

Dahlia: Standard and cropped options. I like the gently curved hem.

Durango:  CB seam allows for easy swayback adjustment if needed and potentially easier to use up your remnants. Swing style minimizes the need to grade for wider hips. Racerback bra needed.

Greenwood: Wider scooped neckline. Straps give great coverage.

Idyllwild: Sleeveless style gives more coverage across the shoulders.

Lago: Cute racerback curves, but racerback bra needed.

VS tanks side collage 2

Left to right: Dahlia in Cobalt, Durango in Eggplant, Greenwood in Tomato Red, Idyllwild in Fuchsia, Lago in Turquiose

Investment.

Dahlia: $11  Two length options included.

Durango: $0 One view included.

Greenwood: $10-$12 Two neckline options included.

Idyllwild: $10 includes multiple sleeve, neckline, and length options.

Lago: $0 One view included.

Durango collage

For me, the Durango is the winner. I like the fit through the body and the pattern just needs a little tweaking to adjust for my swayback.

As always, thanks for reading today.

You can follow me on instagramBloglovin, or by entering your email in the right side bar.

This post contains affiliate links, if you purchase through my links I get a small commission to help pay for my sewing hobby.

Save For Later

Pin this image, so you can come back when you’re ready to start sewing your version.


Ladies Caroline Dress- Who Made It Best

Welcome back to Who Made It Best, a series on mahlicadesigns.


Who Made It Best is a friendly challenge where one of my fellow bloggers joins me in making up the same pattern to see Who Made It Best. The challenge rules are simple: 1. We agree on a pattern to use 2. sew it up to suit our personal styles 3. share it with you and ask you to vote. (Oh, and we keep what we’re up to a secret from each other)

Jillayne from Hazelnut Handmade has joined me in making up the Ladies Caroline Dress for this week’s challenge. The Ladies Caroline Dress has a fitted bodice with gathered or pleated skirt, with several sleeve and neckline options. Please check out Jillayne’s blog here to see what she made.

The Caroline Dress pattern was one of the first pdf’s I ever purchased, but at the time I thought it was above my skill level so it got set aside. How things have changed; my sewing skills have improved to a point where I found this pattern quite easy to make.

I didn’t notice this in my muslin, but I got some serious gapping in the back armscye. I took out a 1/2in wedge along the shoulder seam for this version and altered my pattern to take out an additional 1/2in wedge across the shoulder blade if I should choose to make the pattern again.

The Pattern: Ladies Caroline Dress made in size 10 and altered as described.

The Fabric: Robert Kauffman’s London Calling primrose pansy cotton lawn. I used 1.75 yards.

So, who do you think made their Ladies Caroline Dress the best? Please visit Hazelnut Handmade for more pictures and details on her version, then place your vote for Who Made It Best. The poll will be on both blogs, so you can see both versions before you choose your favorite. Voting open for one week and results will be posted on Instagram.

VOTE HERE

You can also take a look at the Bronte Tee, Shoreline Boatneck, Sorbetto Top,  Greenwood Tank, Cheyenne Tunic, and Chi Town Chinos that were part of past Who Made It Best challenges.

You can follow me on instagram, Bloglovin, or by entering your email in the right side bar.

As always, thanks for visiting and voting today.

Breaking Ground with True Bias Lander Pants

Some patterns just stand out as instant must haves. The Lander Pants were that for me and by all the Landers I see on Instagram, for many others too.

After making my Coffee House Pants from Blue Dot Patterns, I was all-in on the idea that I could pull off a wide leg pant, so why the heck not try the Landers. Plus that button fly and slightly higher waist looks so stylish.

I don’t have a lot of experience sewing pants and those that I have made have been pretty time intensive due to details like topstitching, welt pockets, or my pattern hacking. Sewing the Landers really helped put into perspective that sewing pants could be a pretty quick project.

I’m Breaking Ground on these also by sewing my first button fly. Seriously, it’s not difficult, but I’m always apprehensive about screwing up button holes.

The Pattern: Lander Pants & Shorts from True Bias. I made a straight size 10 shortened by 2in and did not need to do my typical full seat adjustment. I did sew a muslin, but you might not need to do one. The pattern includes a 1in seam allowance on the outseam to allow for fitting. You be the judge.

I found the drafting and pattern instructions are on par with the better indie designers. My only criticism is the order of construction has you sew the legs together front and back before working on the fly. That’s a lot of bulk to be maneuvering while working on the fly.

The Fabric: It’s a mystery! Pulled deep from my stash, inherited years ago, origins unknown. Some sort of natural fiber slub woven. It was perfect in my mind for the Landers.


Thanks for reading about my Breaking Ground project today.

Please visit today’s other bloggers in the Breaking Ground Blog Tour:

Sewing Vortex, Sewing A La Carte, Little Heart Threads, The Sewing Scientist

You can read more about the Breaking Ground Blog Tour, see all the bloggers in the tour, learn how to participate, and enter the giveaway Here.

As always, thanks for stopping by today.

B6388 Top for the Red White and Pink Tour

27368405_10212519528197898_3611939951619528043_o

As I moved my cold weather tops into my dresser last fall, I found myself unable to descern what was what in the stacks of grey, black, and navy. Man did I need some variety, so I’ve worked on addeding some color (here & here) and print (here).

When I was selecting fabric for my next Simply By Ti Ambassador* project, I thought I’d go in an unexpected direction by choosing a super bright pink. I haven’t worn pink in at least a decade, so I’m not even sure if it works for me, but here we go. What do you think?

I don’t usually dress on theme for holidays, but I think I’m going to be pretty in pink this Valentines day. The Red White and Pink tour will be full of ideas for you to check out along the theme -keep reading to the end to see the full tour.

The Pattern:  B6388 view C in a size medium with no alterations.  I’d made the dress view previously, so there was no guesswork as to fit or size.

Just after I had finished my top version, Elle Gee posted about two dresses she made with the pattern. I think I need to try some color mixing next.

The Fabric:  Fuchsia French Terry from Simply by Ti. I’ve sewn with the French Terry from the shop several times and I just love it. It’s soft, has just the right body, and is easy to sew with.


We’re sharing Red White and Pink all month.
Let’s get inspired!

February 1st: Sewing By Ti (intro),  Mahlica Designs
2nd: Sewing With D
3rd: Sewing With Sarah
Sunday, February 4th: Tenille’s Thread
5th: My Heart will Sew On
6th: Kathy Kwilts and More
7th: Stitched By Jennie
8th: EYMM
9th: With Love In Every Stitch
10th: The Bear and the Pea Atelier
Sunday, February 11th: Our Play Place
12th: My Sewing Roots
13th: Margarita on the Ross
14th: Very Blissful
15th: Seams Sew Lo
16th: Sew Sew Ilse
17th: Aurora Designs
Sunday, February 18th: Sewing Scientist
19th: Manning the Machine
20th: The Fairy Dust Bin
21st: Hazelnut Handmade
22nd: Kate Will Knit
23rd: Lulu & Celeste
24th: Flaxfield Sewing
Sunday, February 25th: Twinado Alley
26th: Ma Moose
27th: Auschick Sews
28th: Oak Blue Designs


As always, thanks for reading today.

You can follow me on instagram, Bloglovin, or by entering your email in the right side bar.

*As a Simply by Ti Ambassador I receive complementary fabric from the Simply By Ti shop to use for a project in exchange for sharing it with you.

Synthia Top pattern review

We are in the midst of winter here in Colorado and I am longing for spring weather. I find myself sewing a mix of warm clothing for my freezing reality and springy pieces out of hope for the future.


I made up the Synthia Top from Designer Stitch* as part of her pattern testing team and I just adore this blouse. I’m not really into ruffles as they can seam too girlish for me, but this feels feminine and sophisticated.

My floral fabric plus the lightness of the ruffle make me ready for warmer days.


The Pattern Synthia Ruffle Top from Designer Stitch in size 3 (C cup) and shorter length. I used a 9in zipper instead of the 20in length that is recommended and really could have gotten away with not using one at all This will really depend on the person though. The Synthia also comes in a version without the ruffle that will make a great basic piece for your wardrobe.

As is usual for Designer Stitch, the pattern drafting and instructions are top notch. I always appreciate a pattern that comes in different cup sizes saving me the trouble of the alteration. The ruffle is so cleverly constructed that you’ll have a delightful ah-ha moment after you complete it.

The Synthia Top pattern is on sale for $7 (reduced from $10) for a limited time.

The Fabric Stash woven with a lovely drape. Purchased from Boho Fabrics about 2 years ago. Yay for stashbusting!

As always, thanks for reading today.

You can follow me on instagram, Bloglovin, or by entering your email in the right side bar.

*This post may contain affiliate links, if you purchase through my links I get a small portion to help pay for my sewing hobby.

Flounce Dress featuring Simply By Ti Fabrics

As my little guy is getting older, I’m getting back to a place where I can easily wear dresses again. I find that when it comes to dresses, I’m drawn to the short sleeve and sleeveless looks, leaving a gap in my wardrobe for the fall and winter.

I have a couple long sleeve dresses now for everyday wear, but I’ve been wanting something a little less casual.  I really liked the nice front and back v-neck and fitted bodice of the Flounce Dress from DG Patterns.

For my Simply By Ti Ambassador** project, I chose the black and white ponte from Simply by Ti. It shouldn’t be any surprise that I was drawn to the graphic print. I like working with ponte for its stability and ponte being a little heavier weight works really well for cold weather garments.

The Pattern:  Flounce Dress and Top from DG Patterns*. The pattern comes loaded with options; including a top or dress version, several necklines, sleeve lengths, gathered or pleated skirt, and of course the flounce detail. I chose to make the long sleeve dress with moderate v-neck, pleated skirt and no flounce.

I made a size 10 per my measurements and the fit is wonderful. I did make two modifications for fit that are pretty normal for me. I shorten the skirt by about 5in for it to hit where I like and slimmed down the sleeves for my skinny arms.

I’ll remind you to always read the instructions first. I was moving along though the pattern and had almost made myself the sleeveless version. (The sleeve construction is included with the instructions for the top version)

The Fabric:  Black and White ponte from Simply by Ti. The weight of the ponte will give me just enough warmth for my cold weather dress, but most of all I just love this print.

As always, thanks for reading today.

You can follow me on instagram, Bloglovin, or by entering your email in the right side bar.

**As a Simply by Ti Ambassador I receive complementary fabric from the Simply By Ti shop to use for a project in exchange for sharing it with you.

*This post may contain affiliate links, if you purchase through my links I get a small portion to help pay for my sewing hobby.

Cadence Pant for the Fresh Start blog tour with DG Patterns & A Giveaway

Welcome to the Fresh Start Tour

with DG Patterns.


A few months ago DG Patterns released the Cadence Pant pattern and I found myself pretty smitten with the fun floral fabric Daniela used to make them.

I rarely wear florals let alone pants that do anything to draw attention to my lower half. As you know I do tend to break my own rules from time to time and for the Fresh Start blog tour with DG Patterns I’m doing just that.

My Cadence Pants are completely out of character for me; a print and on a white background. I’ll be honest, I’m going to have to push myself past my fear of ruining them with spilled something or other to wear these.

The Pattern: Cadence Pant from DG Patterns in size 8 graded down to size 4 through the legs. I added a fly shield and used a bias binding to trim my waist band facing.

The Fabric: I found this French Peacock cotton woven at Boho Fabrics. It softens up with washing and was just right for this project.

There’s more:

Join my fellow bloggers this week as we showcase how we’re getting a Fresh Start with DG Patterns. (Be sure to read on to learn about our sponsor giveaway)

DG Patterns is offering a 50% discount during the tour to help you get some fresh patterns. Use code FRESHSTART50 to save on any purchase.

Your Fresh Start Tour bloggers are:

Monday: Sew Cucio, Flax Field Sewing, Fee Bricolo, mahlicadesigns, Sewjourns

Tuesday: Lilla Gumma, Create Whimsy, Frullemieke, Hutsepruts, A Custom Clothier

Wednesday: House of Estrela, FABulous Home SewnSprouting Jube Jube

Thursday: Very Blissful, Stitches by Laura, Auschick Sews, it’s Liesel

Friday: Kathy’s Kwilts and More, Stitched by Jennie, Sewsewilse, Our Play Place

Southern Belle Fabrics is generously sponsoring the Fresh Start Tour. During the tour use code: DGBLOGTOUR to save 20% in the shop.

Discount code expires Jan 21st 2018 11:59PM CST

Southern Belle Fabrics is also offering a fabric giveaway. Enter below to win a MFRB Mystery Box valued at $60+.

Giveaway includes shipping to US and Canada (up to $45 in free shipping)


A Rafflecopter Giveaway

Giveaway winner will be announced through social media on or about January 20th.

                *****************************************************************

As always, thanks for reading today.

You can follow me on instagram, Bloglovin, or by entering your email in the right side bar.

This post may contain affiliate links, if you purchase through my links I get a small portion to help my sewing hobby.