 Here’s a little How To for the crazy quilt ornaments that I make. These are a great quick project to use up left over scraps. Make your own or take a look at my etsy store to purchase one of mine. These instructions and your finished project are intended for personal use, please do not resell.
Notes:
- Finished square is 3in X 3in
- Use a 2mm stitch length.
- I use about an 1/8in to seam the crazy quilt pieces. This is pretty narrow, but since these are decorative I’ve not had any problems. Furthermore, since the scraps I use are pretty small, a larger seam allowance would eat up more fabric than I would want.
- For best use of your scraps use the small pieces in the center area and larger pieces on the outer area.
- You’ll notice I don’t use a batting. If you choose to add one, you will need to add width to your muslin and backing fabric to accommodate the thickness.
Supplies:
Muslin or base fabric, backing fabric, fabric scraps, small scrap of fusible web (optional).
Cut one 3.5in square of muslin and backing fabric. Cut one 1in x 2in of coordinating fabric for the loop.
Make the loop:
Fold the loop piece in half lengthwise and press. Fold in the long raw edges to the center crease, press. Fold in half again and press. Stitch a scant 1/8in to close the long edge. This will give you plenty of length to make the loop as big or small as you like.

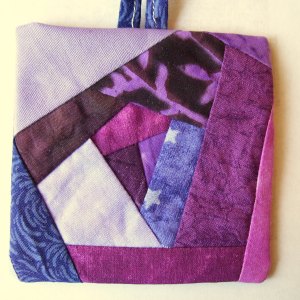
Crazy Quilt:
Choose a 4-5 sided scrap piece for the center of your quilt and place right side up in the center of your muslin square. Choose your next scrap piece to fit along one edge of your center piece and place right side down. Aline your edges and sew through all three layers (your top scrap, your center piece, and the muslin) using a 1/8in seam allowance.
 Open up the seam and heat press or finger press to lay flat. Trim away any of the second piece that extends beyond the edges of your center piece.
Choose your next scrap and aline along the second edge of the center piece. Continue adding scrap pieces around the center area at random angles until the entire 3.5in square muslin is covered.

Make the quilt sandwich:
Square up your quilt square to 3.5 in X 3.5in using a rotary cutter, mat, and ruler or the tools of your choice.
Choose one side to leave an opening for turning. Look for a side that does not have a seam ending in the middle section. Make note of this side or add a pin to remember it.
Center your loop on any of the remaining three sides. With quilt square right side up, line up the raw edges of the loop with the raw edge of the quilt square and position to make the loop as big or small as you like. Baste using 1/8in seam or pin in place with the pin heads outside of the square for easy removal when sewing.
Position your backing piece on top of of your quilt square with right sides facing and pin in place if desired. You now have a small pile with (from bottom to top) your quilt square right side up, loop positioned on one edge, and backing fabric. Right sides facing.

Sew your Quilt:
Using a 1/4in seam allowance.
Begin on the side you will leave open. Position your needle 1in from the corner, back-stitch 2-3 stitches and then sew towards the corner, pivot, and sew around the remaining edges. When you come back around to the beginning edge that you will leave open, stitch about 1in from the corner and take a few back-stitches.

Finishing:
Trim your corners. Turn right side out using your favorite tool to gently push out the corners. Fold the unsewn edges of the opening to the inside and press all edges. If the quilt appears puffy, use a scrap of fusible web in the middle to tack it down. Slip stitch the open edge closed.


