Paro Cardigan on mahlicadesigns

I have a quick review this week of the new Paro Cardigan from Itch to Stitch Designs.

Kennis’ patterns are well drafted and well written, so no worries there. All the details you need like lengthen/shorten lines and clear markings for the pleats, but nothing confusing.

The Pattern: The Paro Cardigan from Itch to Stitch in size 4 with no alterations. The Paro is a longer cut cardigan, but if you want to shorten it take care to keep the proportions correct and avoid getting a peplum -unless that’s what you want. My friend Crystal from Sewing Vortex is planning a coatigan version- how cool.

I have super skinny arms and always have to slim down my sleeves, but not with the Paro. If you have more shapely arms you may need to adjust them.

The Fabric: I used 2 yards of an abstract chevron ponte from Girl Charlee and black Maggie London ponte. Both stash fabrics! I’d recommend using more stable knits for the design – some of the testers used sweater knits and had to adjust for the extra stretch. I thought the pleat details also looked better in the stable knits versions.

You may purchase the Paro Cardigan pattern from Itch to Stitch on sale for a limited time.

The Paro cardigan should take you about 4 hours cut to finish.

Total cost: $9   Fabric $9      Pattern $0*


*I received the pattern free for being a pattern tester. I’ve included my Itch to Stitch affiliate links.

Quilted Jade Skirt for SV Design Crew

Jade Skirt v.2

I made up a modified version of the Jade Skirt from Paprika Patterns using a wonderful quilted double knit from Sew Vagabond. I recently joined the SV Design Crew**.

Jade Skirt styling

The Pattern: I’ve made the Jade skirt before here, so I knew it would be perfect for making a mini skirt to show off the quilted texture of this fabric. To skip the folded front, I used the front lining pattern piece as my shell instead. I also lengthened the front and back pattern pieces to 16in. The Jade’s waistband is one curved piece, so to conserve fabric and keep the textured pattern of the fabric a little more lined up, I pieced the waistband instead.

I made up a size 5 again, lengthening it as I said above and then, because the fabric has a good stretch, I end up using a 3/4in seam allowance on the sides instead of 1/2in given in the pattern.

I’ve done an exposed zipper before with only a so-so result, so I wanted to try one again to give the skirt that extra something and to get a better hold on the technique. I struggled getting the zipper in without having little tucks and wrinkles at the bottom corners. I finally got it after a few tries and changing the order of construction. Now I know what I need to do to nail it next time.

Jade Skirt styling

The Fabric: A natural fiber quilted double knit in navy from Sew Vagabond Shop (available late summer) for the shell and a navy jersey knit from my stash for the lining. I’ve actually used a similar fabric before, but wow what a difference between the two. My Jasper dress made in a quilted jaquard made it into my February Fail post because the fabric was just an absolute disaster, it has that slick polyester feel and is snagging and pilling like crazy. This navy quilted knit is holding up so well after washing and even after having to rework that exposed zipper many times and a little seam ripping too.

Fabric comparison

I’ve styled my new Jade with a rtw blouse and my Burda 7140 faux leather jacket, with my Melly Sews Peasant Blouse, and a rtw plain white tee.

Jade styling collage

Making a modified Jade skirt should take you about 3.25 hours, assuming you get an exposed zipper in on the first try. In a size 5 with a pieced waistband I used 1/2yard of the quilted knit and 1/2yard of the jersey knit lining.

Total Cost: $3   Pattern: stash   Fabric shell: Free**  Lining: $1   Notions: $2

** When I make a qualifying purchase as part of the SV Design Crew, I receive 2 free yards of fabric to make what ever I want and Sew Vagabond Shop gets to use my pictures to show off their fabrics.

There’s still some winter left, right? Burdastyle 10/2015 #109

Well, I got sucked in by Burdastyle‘s modern aesthetic again, despite knowing I’d have little help from them to get it done. Their directions are wanting. Thankfully this is easy to sew.

Take a look at this beauty…

So chunky, so luxurious. And such an inaccurate representation of the top. Look at how much of the sweater is clipped up on her back, behind her elbow.

Muslin time for sure. I started with my size, 38, based on my 35.5in bust. The result is the refrigerator box of boxy tops. And what’s up with the seam line placement going across the bust? That’s just strange to me. Alteration time.

Burda Muslin collage

First up, I raised the bust line seam by 1in on all pieces.

Burda Raglan Sweater by mahlicadesigns

The pattern has shaping to curve over your shoulder. These points were about 2in past my shoulder on each side, so I used that and the ease around my chest as indicators of how much I could bring the pattern in. I cut my pattern pieces down to the smallest size along the side seams of the bodice, sides of the cowl, and the arm seam. On top of that, I folded out/removed a total of 2in vertically from the center of the front, back and cowl neck pieces. On the sleeve, I slashed the pattern piece up the middle from cuff to (not through) the seam line at the shoulder. I overlapped the cuff part of the slash by 1/2, removing 1in total, and taped up the skinnier sleeve piece.

Burda Raglan Sweater by mahlicadesigns

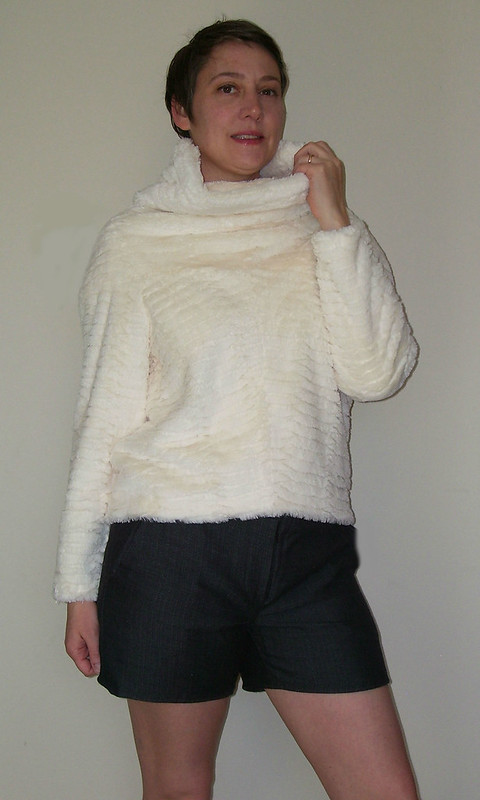
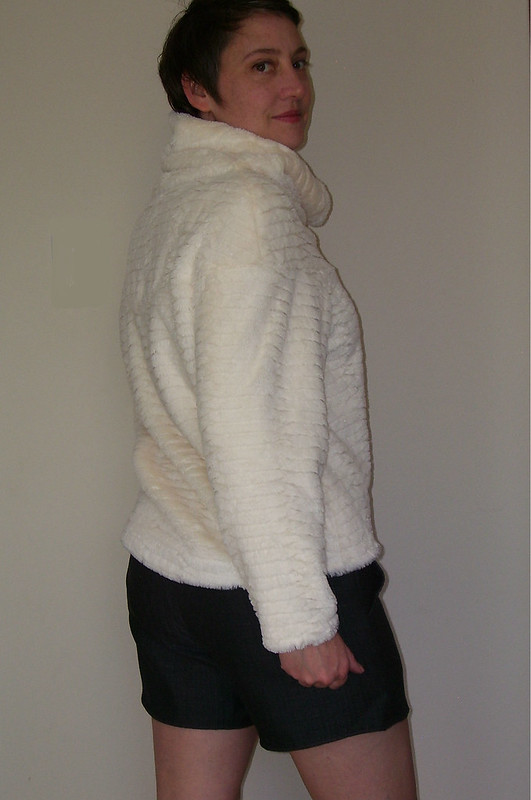
After finishing up my faux leather jacket and surviving, I thought I really wanted to go luxe on this project and try some faux fur. I added a lining because while the faux fur is so silky and soft, it is supported by a web-like substraight that I didn’t like against my skin. I did a hybrid of underlining and lining using a ponte from my stash. I hand stitched the hems and catch stitched the interior seam allowances open after trimming away a bit of the fur.

Burda Raglan Sweater by mahlicadesigns

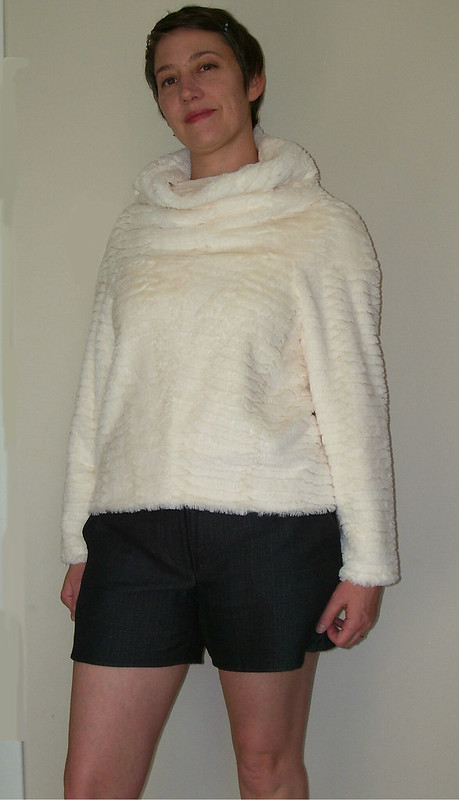
This sweater is Warm, which is just what I wanted. There’s still some winter left to enjoy the coziness of this sweater. Don’t be fooled by my modeling in my Charcoal shorts and Jade skirt.

Burda Raglan Sweater by mahlicadesigns

Things to note if you make this sweater:

I’m a shorty (5’4″) and the front hem line falls a couple inches below my navel.

Burda Raglan Sweater by mahlicadesigns

Unless you make this really big, you should expect your sweater to lift up if you raise your arms higher than shoulder level. Hopefully looking at how the shoulders and arms go together in the line drawing and on my muslin sheds some light on why.

I’m feeling pretty good about my warm wardrobe options now. It’s time to look toward spring and get sewing.

So, what do you think, did I overcorrect? I feel like I lost some of the boxy look, especially in the cowl.

Burdastyle 10/2015 #109 made in fur with a lining should take you about 4 hours to complete. (Add more time if you choose to catch stitch your seam allowances)

Pattern: $6    Fabrics: $25   Total: $31

Jade Skirt from Paprika Patterns for Summer Crush week

Meet my Summer Crush, the Jade Skirt from Paprika Patterns. (LinkUp your Summer Crush here)

Jade Skirt by mahlicadesigns

My interest was piqued last fall when the Jade came out, but it wasn’t until spring that I decided what fabric to use. Thanks to #sewlongsummer the Jade is finally taking up residence in my closet. I can really see this being a key part of my Core Wardrobe. The length is good for summer and paired with some colorful tights will be cute in fall and winter too.

Jade skirt by mahlicadesigns

I used a  Maggy London ponte from Fabric Mart for the shell and a cotton jersey from Girl Charlee for the lining. I’m very pleased with both fabrics for this project. The ponte is a good quality and the jersey has the right stability needed to support the folds on the Jade. The color is not as saturated on the jersey as I would like, so it may only be used in supporting rolls in other garments.

Jade skirt by mahlicadesigns

The pattern is not as difficult as those front folds make it look. There’s a tutorial video and a practice sheet to make sure you can do the folds correctly. I watched the video a couple of times and followed the tip to use colored pins and had no trouble with the folds. In fact, I got it on the first try.

Jade skirt by mahlicadesigns

Once you tack down those folds, the rest of the construction is elegant in its simplicity. The instructions include options to add an exposed zipper or an elastic waistband. I didn’t need to do either.

Jade Skirt by mahlicadesigns

The Jade Skirt should take you about 3.75 hours cut to finish.

Pattern: $7      Fabric: $9    Total: $16

SBCC Tonic 2 Tee Core Wardrobe part 1

My first foray into building my core wardrobe is a long sleeve tee using the SBCC Tonic 2 Tee pattern.

I can only think of two items that I’ve done using a knit and one of those was a complete nightmare. This time I’m going in ready for success powered by sewing blogs.

Melly Sews suggests using the lightning aka wobble aka stretch stitch on knits so the seams can maintain the fabrics stretchable quality. Lladybird uses a walking foot so both layers of your knit feed through evenly. The Tiramisu Circus has a nice post on stabilizers for knits.

First off let’s talk about the pattern. It was free so that’s great. Instructions are super easy, though I modified the neckline procedure. The instructions have you apply the neckline trim while one shoulder seam is still open, then tacking down the trim after the shoulder seam is closed. That seamed sloppier than I want, so I did it the old-fashioned way of inserting the circle of trim into the closed neckline. Even if you follow her instructions your left to guess how much to stretch your trim so it will lay flat instead of gaping. A little guidance there would be nice. I had a little gaping that I had to press the heck out of, but it practically disappeared after washing. I like that the pattern calls for self fabric for the neckline trim.

My first seams, the shoulder seams, incorporated all three of my knit fabric firsts; walking foot, stay tape, and lightning stitch. Other than the fabric getting munched on the first couple stitches almost every time, things were working to plan. When I attached the neckline trim though, I found that the stitch length was so short that it was going to take forever to get this sewn. I did a few tests to try to figure out the problem and didn’t have my aha moment until I was half way through attaching the first sleeve.

My solution? Sulky Solvy original water soluble stabilizer that I bought forever ago thinking I’d make one of those lacy thread scarves. So glad I didn’t cause I stopped thinking those were cool after five minutes.  I started laying down strips of this stuff on top of my fabric and it helped my walking foot get enough grab on the top layer to move things through and give me the stitch length I was expecting. Wrapping a bit of this stuff around the beginning of my seams also helped with the afore-mentioned munching.

So here’s the results.

Tonic 2 Tee

I chose to make a medium since I was between sizes and I’m sick of tees that are too tight under the arms. Next time I’d definitely go with the small as I have plenty of room here. I took off 1.5in from the bottom before hemming and this tee is still on the longer side. Overall I’m not displeased with the tee but not terribly excited either. I’m holding judgement until I make this again in a smaller size and can make a couple of adjustments. I think I’d like a smaller neck opening and I’d like to figure out how to pinch out those folds between bust and underarms.

100_3652

Tonic 2 Tee backview

This project took a surprising 3.75 hours. Using the walking foot and fiddling with the stabilizer is just slow going, but worth it to get those seams to play nice.

So I’m wondering if its worth all the time and effort to make something so basic. Would it be better to keep looking for RTW tees that fit? But that would mean clothes shopping.

Frankie Dress. The Denver Sewing Collective Challenge.

100_3623

The Denver Sewing Collective is starting to put out monthly challenges. October’s challenge was to use that fabric you’ve been holding onto in your stash out of fear to use it or just because you didn’t know what to do with it. I had 4 yards of this large print in my stash as a hand me down. I just let it sit there because it’s not my color and big florals aren’t me either.

So I was feeling up to a challenge after visiting the DSC Meetup in September. After a lot of looking through my Pinterest boards for dress ideas and through my own pattern stash I thought I’d work up Simplicity 2886. The pattern envelope is no help for view A but I found better pics on Craftsy the other day.

One of my goals was to minimize seams to prevent breaking up the print. Here’s where Frankie starts to earn her name after Frankenstein’s monster. I redrafted the bodice to eliminate the midriff piece and eliminated the back center seam. This worked pretty well but made attaching the bodice lining a bit time intensive. The box pleated skirt was pretty easy to put together too.

Here’s the result (with unfinished hem).

In proess

Something about the darts on the bodice just looked strange to me and man is this an unflattering cut for me. Thanks to some input from Pam, Jill, and Jamie at the DSC October Meetup I came home with a plan to make Frankie a bit more of a mishmash and make those darts look better and to make the dress look a little less juvenile on me. To make the silhouette a better fit for my body shape I came away with the idea to redo the skirt to be more the shape of a shift dress and to add darts to the skirt to line up with those on the bodice.

100_3631

I traced off the bottom skirt part of Vogue 1809 DKNY (oop) as a guide and added a bit to the center front to account for the darts I was going to add. Mashing up the two patterns worked really well. The final silhouette is much more flattering and extending the line of the bodice darts down into the skirt looks better too. Too bad I didn’t just start with a shift dress pattern so there wouldn’t be the seam at the waistline. Oh well.

100_3630

Lessons learned:

1. The waistline of a dress needs to fall at my natural waist, not higher. This is going to be very helpful as I work on my Core Wardrobe.

2. Oh how valuable it is to have a kind fellow sewists to point out where you’ve messed up and how to fix it.

3. It is possible to line a bodice after the front and back are pieced together, but so time intensive it may be worth the back center seam.

4. Box pleats may work for me in a drapier fabric.

100_3626

If you were to work up this dress it would take you about 3 hours. I probably spent another 3 hours redrafting, making muslins, and redoing the skirt.

Snuggle Time. Winter PJs for the little guy.

100_3584

I’m trying so hard to plan ahead my sewing projects instead of reacting to the “oh no, we don’t have fill in the blank” moments. A couple months ago, I pulled out the box of 2T hand me downs I have for the little guy to get things into circulation and figure out what we still need. Somehow we always seem to need winter pajamas. Victory! I still have time, I have go-to patterns (Vintage Vneck and Clean Slate Pants by Melly Sews), and I have just barely enough fleece in my stash.

100_3583

To start, I had just under 1/3 square yard of each of the two colors of the fleece. It took some arranging and rearranging to get the pattern pieces to fit that small area. Adding a blue side stripe and waistband was the perfect solution for not enough fabric for the pants and to tie the two pieces together. I cut a 4T instead of 2T width on the top to adjust for the fleece not being as stretchy as a knit. I made the V-neck opening a bit wider to account for this also.

Look, there's a Robot!
Look, there’s a Robot!

The pants went together so easily, hurray!

The top went together so easily until the neckline. Oh man, I just could not get the point of that V without a pucker. So let’s try it on and see how much it shows. AAAARRRGG! It doesn’t fit over his head. I can laugh it off now, but this quick and easy project was already taking on problem child qualities pretty fast.

I can dance like a robot.

Alrighty take a breath, I had just enough of a scrap to make a placket opening instead. Back to the sewing table. I used the instructions from the Prepster Pullover as a guide to add the placket.

The top took 1.75 hours plus an additional hour to add a placket.

The bottoms took 1.75 hours.

(Not counting all my pattern rearranging to make it work on my limited fabric)

Under the Banner

My father has delved into the art of marquetry (wood veneers inlaid to make a composition) and I’ve been trying to encourage him by managing his blog Earlsmarquetry and being a sounding board for his ideas.

custom pet - CopyCustom pet portraits by Earl’s Marquetry

With a couple shows lined up for the fall, Atlanta’s Makers Faire and the art show at Roselawn, I wanted to make him something for his booth. I landed on making him a banner that could fit along the front of his table. I downloaded some letter templates and after measuring their width, I calculated the spacing I would need to make it all fit on a banner 10in tall and 70in long.

I have four layers here in this reverse applique banner; the dark brown front and backing, a layer of flannel to give it some body, and a layer of woody looking fabric layered under the brown front to be revealed by the reverse applique. I traced and sewed the letters, then cut out the top layer of brown to reveal the woody fabric for the letters.

100_3533

Even with my meticulous measuring, I still goofed the spacing up. Unfortunately I traced and stitched the first word before discovering my mistake so the second word is a little scrunched.

100_3535

A project like this should take you about 3.5 hours.

The Polly Top

I’ve had a really productive month, so stay tuned for future posts featuring some of my work.  It feels great to get some UFOs (unfinished objects) knocked out, to work on some stash busters, and to wrap up some of the mending and utility sewing that just piles up.

I came across this little cutie while scouring Pinterest for top patterns to give my summer wardrobe a little pick up.

100_3314

This is the Polly Top, a free pattern download from By Hand London.

I was drawn to the simplicity of the silhouette and wanted to try out how the shaped piecing of the contrasting front worked instead of darting around the bust.

100_3313

I chose these silkie fabrics to use up some of my stash and hoped it would be a good layering piece under my monk collar jacket.

For the top edge of the contrasting front piece to fall on my bust in a flattering way, I had to shorten the shoulder strap length about 1.5 inches and adjusted the underarm scythe down about an inch also. Pretty easy fitting.

100_3315

The neck and arms are finished with bias binding of the same material. I pressed my binding in half and then again with the edges folded in to make it easier to attach and fold over the raw edges of the top. This was well worth the extra few minutes of pressing time, since I’m certain it gave me a much neater result. The whole project took me just under four hours.

I’m definitely going to use this pattern again to make another summer top in a light weight cotton.