My Montavilla Dress for Minerva

I’ve been on a small Sew House Seven sewing kick for a while. I’ve made up the Free Range Slacks, a short sleeve Merlo Field tee, and an Underwood Tank and Dress. I’m sure I’ll be making another Toaster Sweater soon too.

Today I’d like to give you a look at my latest Sew House Seven creation, the Montavilla Dress that I made for the Minerva blogger network. You can read the full details here.

Until next time,

Melissa E of mahlicadesigns

The Georgette Gyspy for Minerva

I’ve not sewn with Georgette fabric before, so I recently chose a large gradating stripe Georgette dress fabric from Minerva to learn about the fabric.

You can read more about the Georgette dress I made with it over on the Minerva blogger network. Full details here.


Until next time,

Melissa E of mahlicadesigns

Parker Peplum Dress Hack

I’m back today with a simple hack I’ve done with the Parker Peplum Top pattern turning it into a dress and using the organic bamboo jersey from DG Patterns Shop*

Turning the Parker into a dress is quite simple. All you need is a circle skirt pattern or draft your own. There are tons of tutorials online to walk you through it.

I cut my circle skirt 19.5 in long and simply attached it to the bottom of the completed bodice. Viola, Parker Peplum Top is now a dress!


The Pattern: Parker Peplum top from Seen & Sewn Patterns in size medium. I added a circle skirt to make mine a dress. The Parker is a loose-fitting peplum with an option for a regular tee.

The Fabric: Organic bamboo jersey in black and white stripes. This was my first experience sewing with organic bamboo jersey. It’s quite similar to rayon jersey in its weight and drape, but this has a silkier smooth feel to it.


As always, thanks for reading today.

You can follow me on instagram, Bloglovin, or by entering your email in the right side bar.

*As a DG Patterns Fabric Ambassador I receive complementary fabric from the DG Patterns fabric shop to use any way I like in exchange for sharing about it with you.

This post contains affiliate links. If you purchase through my links, I get a small commission to help fund for my sewing hobby.

Save For Later: Pin this image, so you can come back when you’re ready to start sewing your version.


McCalls7351 Shirt Dress pattern review

Here’s a little story about the Who Made It Best Challenge that isn’t.

I’ve come close to making the popular shirtdress style when I made a Marigold dress a couple years back, but I hadn’t felt like I was losing out on anything by not having a proper one. When Stephanie from the Petite Sewist, suggested the M7351 shirtdress to do together for a Who Made It Best challenge, I was ok with the idea but didn’t think I’d wear it much outside of church on Sunday.


As we worked on our muslins, I found I had to go down a full size in the bodice and was alright from there. Stephanie was so frustrated getting the fit correct that she has put it in the naughty corner. The challenge was off, but I was starting to like the dress.


As I worked through the project I  relearned the lesson to read through the directions ahead of time.  Where I got burned on this was the instruction to hand stitch the entire placket and neckband facing – that equals about 8 feet of hand stitching on my dress. After doing all that handstitching, the next step is to topstitch all along that same seam. Gosh darn it, I could have just topstitched and skipped all that hand stitching. Catherine Daze’s Blog found the same thing in another McCalls shirtdress pattern too.


One of the final steps is the turn under and hem the sleeves. I just didn’t like the look of this, so I settled on the idea of adding a cuff. Going through my patterns I found the cuff from the Onyx Shirt by Paprika Patterns would give the look I was going for. First I shortened the sleeve by 1 1/2in at the hem line and determined that a size 7 cuff from the Onyx would fit my new opening, then attached the cuff following the directions for the Onyx.


The Pattern McCalls7351 view B with no pockets. Size 14 C cup in the bodice and size 16 skirt. My measurements put me in a straight size 16 but after muslining the bodice I sized down to the 14.  Sleeve shortened by 1.5 inches and I added the size 7 cuff from the Onyx shirt pattern.

The Fabric Robert Kauffman yarndye in wineberry. Used 2.5 yards


As always, thanks for reading today.

You can follow me on instagram, Bloglovin, or by entering your email in the right side bar.

You may also like to see: my Marigold Dress

Save for later

Ladies Caroline Dress- Who Made It Best

Welcome back to Who Made It Best, a series on mahlicadesigns.


Who Made It Best is a friendly challenge where one of my fellow bloggers joins me in making up the same pattern to see Who Made It Best. The challenge rules are simple: 1. We agree on a pattern to use 2. sew it up to suit our personal styles 3. share it with you and ask you to vote. (Oh, and we keep what we’re up to a secret from each other)

Jillayne from Hazelnut Handmade has joined me in making up the Ladies Caroline Dress for this week’s challenge. The Ladies Caroline Dress has a fitted bodice with gathered or pleated skirt, with several sleeve and neckline options. Please check out Jillayne’s blog here to see what she made.

The Caroline Dress pattern was one of the first pdf’s I ever purchased, but at the time I thought it was above my skill level so it got set aside. How things have changed; my sewing skills have improved to a point where I found this pattern quite easy to make.

I didn’t notice this in my muslin, but I got some serious gapping in the back armscye. I took out a 1/2in wedge along the shoulder seam for this version and altered my pattern to take out an additional 1/2in wedge across the shoulder blade if I should choose to make the pattern again.

The Pattern: Ladies Caroline Dress made in size 10 and altered as described.

The Fabric: Robert Kauffman’s London Calling primrose pansy cotton lawn. I used 1.75 yards.

So, who do you think made their Ladies Caroline Dress the best? Please visit Hazelnut Handmade for more pictures and details on her version, then place your vote for Who Made It Best. The poll will be on both blogs, so you can see both versions before you choose your favorite. Voting open for one week and results will be posted on Instagram.

VOTE HERE

You can also take a look at the Bronte Tee, Shoreline Boatneck, Sorbetto Top,  Greenwood Tank, Cheyenne Tunic, and Chi Town Chinos that were part of past Who Made It Best challenges.

You can follow me on instagram, Bloglovin, or by entering your email in the right side bar.

As always, thanks for visiting and voting today.

B6388 Top for the Red White and Pink Tour

27368405_10212519528197898_3611939951619528043_o

As I moved my cold weather tops into my dresser last fall, I found myself unable to descern what was what in the stacks of grey, black, and navy. Man did I need some variety, so I’ve worked on addeding some color (here & here) and print (here).

When I was selecting fabric for my next Simply By Ti Ambassador* project, I thought I’d go in an unexpected direction by choosing a super bright pink. I haven’t worn pink in at least a decade, so I’m not even sure if it works for me, but here we go. What do you think?

I don’t usually dress on theme for holidays, but I think I’m going to be pretty in pink this Valentines day. The Red White and Pink tour will be full of ideas for you to check out along the theme -keep reading to the end to see the full tour.

The Pattern:  B6388 view C in a size medium with no alterations.  I’d made the dress view previously, so there was no guesswork as to fit or size.

Just after I had finished my top version, Elle Gee posted about two dresses she made with the pattern. I think I need to try some color mixing next.

The Fabric:  Fuchsia French Terry from Simply by Ti. I’ve sewn with the French Terry from the shop several times and I just love it. It’s soft, has just the right body, and is easy to sew with.


We’re sharing Red White and Pink all month.
Let’s get inspired!

February 1st: Sewing By Ti (intro),  Mahlica Designs
2nd: Sewing With D
3rd: Sewing With Sarah
Sunday, February 4th: Tenille’s Thread
5th: My Heart will Sew On
6th: Kathy Kwilts and More
7th: Stitched By Jennie
8th: EYMM
9th: With Love In Every Stitch
10th: The Bear and the Pea Atelier
Sunday, February 11th: Our Play Place
12th: My Sewing Roots
13th: Margarita on the Ross
14th: Very Blissful
15th: Seams Sew Lo
16th: Sew Sew Ilse
17th: Aurora Designs
Sunday, February 18th: Sewing Scientist
19th: Manning the Machine
20th: The Fairy Dust Bin
21st: Hazelnut Handmade
22nd: Kate Will Knit
23rd: Lulu & Celeste
24th: Flaxfield Sewing
Sunday, February 25th: Twinado Alley
26th: Ma Moose
27th: Auschick Sews
28th: Oak Blue Designs


As always, thanks for reading today.

You can follow me on instagram, Bloglovin, or by entering your email in the right side bar.

*As a Simply by Ti Ambassador I receive complementary fabric from the Simply By Ti shop to use for a project in exchange for sharing it with you.

Flounce Dress featuring Simply By Ti Fabrics

As my little guy is getting older, I’m getting back to a place where I can easily wear dresses again. I find that when it comes to dresses, I’m drawn to the short sleeve and sleeveless looks, leaving a gap in my wardrobe for the fall and winter.

I have a couple long sleeve dresses now for everyday wear, but I’ve been wanting something a little less casual.  I really liked the nice front and back v-neck and fitted bodice of the Flounce Dress from DG Patterns.

For my Simply By Ti Ambassador** project, I chose the black and white ponte from Simply by Ti. It shouldn’t be any surprise that I was drawn to the graphic print. I like working with ponte for its stability and ponte being a little heavier weight works really well for cold weather garments.

The Pattern:  Flounce Dress and Top from DG Patterns*. The pattern comes loaded with options; including a top or dress version, several necklines, sleeve lengths, gathered or pleated skirt, and of course the flounce detail. I chose to make the long sleeve dress with moderate v-neck, pleated skirt and no flounce.

I made a size 10 per my measurements and the fit is wonderful. I did make two modifications for fit that are pretty normal for me. I shorten the skirt by about 5in for it to hit where I like and slimmed down the sleeves for my skinny arms.

I’ll remind you to always read the instructions first. I was moving along though the pattern and had almost made myself the sleeveless version. (The sleeve construction is included with the instructions for the top version)

The Fabric:  Black and White ponte from Simply by Ti. The weight of the ponte will give me just enough warmth for my cold weather dress, but most of all I just love this print.

As always, thanks for reading today.

You can follow me on instagram, Bloglovin, or by entering your email in the right side bar.

**As a Simply by Ti Ambassador I receive complementary fabric from the Simply By Ti shop to use for a project in exchange for sharing it with you.

*This post may contain affiliate links, if you purchase through my links I get a small portion to help pay for my sewing hobby.

Sew Long Summer…hello Butterick 6388 sweater dress

I say Sew Long Summer with French terry and cold weather dresses.

This fall’s dress is Butterick 6388. It was a hit with me the first time I saw the pattern. The top and dress views are packed with the details I like: a collar to keep me warm, interesting design lines in the bodice, and a slight dolman sleeve.

The pattern is very easy to make and went together in less than 2 hours cut to finish. The dress is so comfortable and I see it working very well as a wardrobe piece that will work in the fall with flats and with tights and boots in the winter.  I have a top version planned in another french terry in my stash, but I might keep my eyes open for an interesting sweater knit to use.

As always, thanks for reading today.

I hope you’ll visit todays bloggers in the Sew Long Summer Blog tour:

Tenilles Thread,  Sewing with D,  mahlicadesigns

Shoreline Boatneck- Who Made It Best

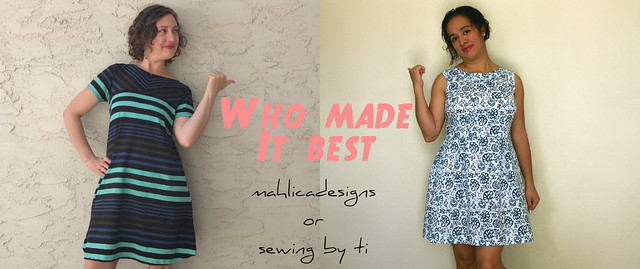
Welcome back to Who Made It Best, a new series on mahlicadesigns.

Side by Side label collage

Who Made It Best is a friendly challenge where one of my blogger friends joins me in making up the same pattern to see Who Made It Best. The challenge rules are simple: 1. We agree on a pattern to use 2. sew it up to suit our personal styles 3. share it with you and ask you to vote. (oh, and we keep what we’re up to a secret from each other)

Ti from Sewing by Ti has joined me in making up the Shoreline Boatneck from Blank Slate Patterns for the challenge and you can check out her version here.

side by side head shot label collage

The Shoreline pattern comes with several options for bodice and sleeve lengths and then when you add in the options from the expansion pack, it can be hard to choose where to start. I just went practical. I really need a longer sleeve dress for cooler weather but the impending summer pushed me to going for the short sleeve option.

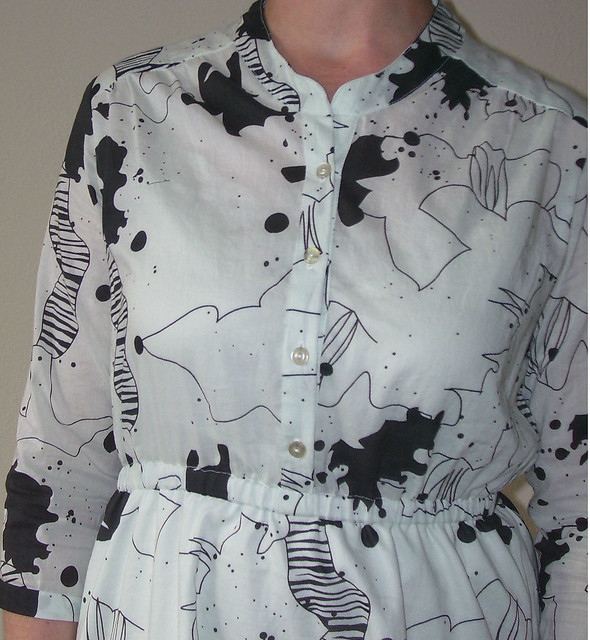
I recently purchased this striped knit from Simply by Ti (total coincidence that I used a fabric from my challenger’s shop) to add to my stash thinking I’d use it for a dress sometime. As I formulated my plan for the Shoreline, I knew these stripes would be the perfect fabric.

If you’ve followed my blog for any time, you will know I just can’t leave well enough alone, I have to brainstorm through my pattern hack ideas to take it up a notch. Somewhere online lives my inspiration for the bodice hack I did here, but I cannot find it now to share.

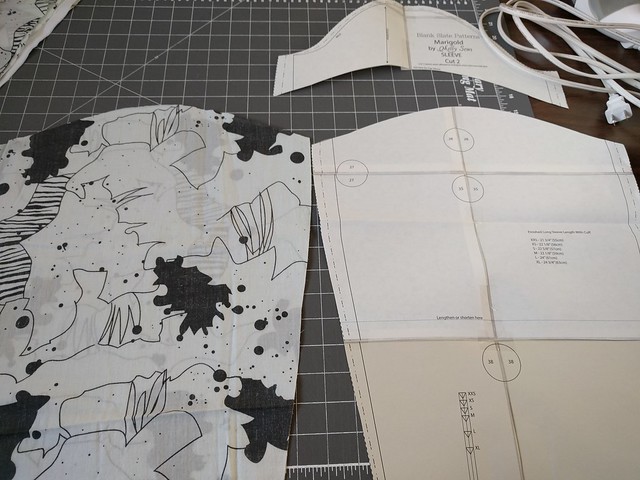
For the hack, I traced off the front bodice piece from shoulder to 1/2in (my seam allowance) below the bottom of the armscythe. I then folded the top of the dress pattern piece over to cut out the lower portion of the bodice (plus 1/2in s.a.). I traced my new bodice piece onto a large piece of paper and cut out the middle to make myself a window to help me determine my stripe placement.

You can see all my hash marks as I tried and only partially succeeded in lining up the bodice stripes to my sleeve stripes.

Stripe matching on the sleeves only came out so so, but look at those side seams! I still feel very proud every time I get that stripe matching nailed.

I’m barely 5’4″, so for my shorty self I had a choice between lengthening the tunic or shortening the dress. I went with the tunic, so I would have a narrower sweep at the hem and lengthened by 2in at the marked lengthen line at the waist and then added another 2in at the hem line.

As you read my post today, I’ve already worn my dress to a graduation party and as a day dress on my vacation. At first I thought the dress was a little too roomy around the waist, but now I’m glad that it hides my over eating well.

I’d made the Shoreline in the past as a tee and it wasn’t true love -I like a wider boatneck opening; but I love this dress! I want more more more. (My hubby says this is his favorite dress I’ve made.)

So, who do you think made the Shoreline best? Please visit Sewing by Ti for more pictures and details on her version, then place your vote for Who Made It Best. The poll will be on both sites, so you can see both versions before you choose your favorite. Voting open for one week.

VOTE HERE

You can follow me on instagram, Bloglovin, or by entering your email in the right side bar.

Many thanks to Blank Slate Patterns for providing the updated copy of the Shoreline Boatneck pattern for Ti and I to use for our posts.

The new Sorbetto- Who Made It Best

Who Made It Best, a new series on the mahlicadesigns blog, is launching this month.

Who Made It Best is a friendly challenge where one of my blogger friends joins me in making up the same pattern to see Who Made It Best. The challenge rules are simple: 1. We agree on a pattern to use 2. sew it up to suit our personal styles 3. share it with you and ask you to vote.

Sarah from Musings of a Seamstress has joined me in making up the new Sorbetto top from Colette Patterns for the first challenge and you can check out her version here.

The Sorbetto was re-released based on Colette’s new pattern block and there has been a lot of chatter out there about it. (Ally J. has a nice post comparing the original and new versions.) Honestly, I wouldn’t have made up the new Sorbetto without Sarah suggesting it. I made up the original several years ago when it first came out and I was a newbie at sewing. It wasn’t very remarkable other than leaving me scratching my head about the dart placement.

Since I haven’t made the Sorbetto in years or any other Colette pattern ever, I worked up a muslin of the short sleeve top to check the overall fit and to see if I may want to add it to my list of summer blouses to make. I’m not sure if I’ll be making the blouse, but I did learn that the bust dart needed to be moved up by 1 inch and got a good feel for the length.

To make myself a Sorbetto dress, I added about 20in in length to the front & back pieces, added 2in to the sweep at the hemline front & back, turned the front pleat into an inverted box pleat (stitched about 4in from neckline down) and assembled as normal. Hack complete.

Please visit Musings of a Seamstress for more pictures and details on her version, then place your vote for Who Made It Best. The poll will be on both sites, so you can see both versions before you choose your favorite. Voting open for one week.

VOTE HERE

You can follow me on instagram, Bloglovin, or by entering your email in the right side bar.

Want to join me in a Who Made it Best challenge? Contact me at mahlicadesigns@gmail.com

Breaking Ground with Designer Stitch

The Gypsy Tunic Dress from Designer Stitch was an easy choice for the Breaking Ground Tour. I loved the kimono sleeve style and the maxi length option the first time I saw it. The tester photo gallery is full of great examples and the patterns in her shop show some skillful drafting, so I knew this was a designer I needed to try.

I look at the Gypsy as the perfect summer dress for me. The kimono sleeve and loose fit are good for letting the body breath in warm weather, the elastic waistband gives the dress shape while still being comfortable, and the maxi length is ideal for when I want to cover my legs.

The Gypsy also comes with a crossover front, hi-lo hem, and tunic options.

It seems like I’m constantly learning about new indie pattern designers and it can seem overwhelming to keep track of it all. I’ve recently added an Indie Pattern List to my blog to catalogue them all. I hope this will be a helpful resource for you.

As always, thanks for joining me today. Please visit my fellow bloggers on today’s Breaking Ground blog tour:

Very Blissful, Ronda B Handmade, Adventures with Bubba and Bugmahlicadesigns

Here’s a little sneak peek.

Thursday new collage

Day & Night Dress Challenge from mahlicadesigns

Have you been enjoying all the dresses on the Day and Night Dress Challenge blog tour this week? Here’s where to look if you’ve missed anyone.

Sunday, Jan 8th: Elizabeth of Elizabeth Made This, Brittany of Brittany J Jones
Monday, Jan 9th: Maria of How Good is That?, Tonya of Sew So Petite
Tuesday, Jan 10th: Je’Tua of Robertswife, Meg of Cookin’ and Craftin’, Melanie of Its Melanie Darling
Wednesday, Jan 11th: Linda of Elle Gee Makes, Tee of Maggie Elaine
Thursday, Jan 12th: Bianca of Thanks I Made Them, Daniela of On the Cutting Floor
Friday, Jan 13th: Melissa of Mahlicadesigns, Rachel of Sew Redy, Renata of Runnningnstyle, Sonja of Sewing ala Carte
Saturday, Jan 14th: Doja of Elewa blog, Judith of Judith Dee’s World, Tanya of Mrs. Hughes

When initially presented with the Day & Night Dress Challenge my plan was to not only have Day and Night looks but also have dresses with uses that were day and night too. A breezy colorful dress for summer and a reserved black dress for winter. Alas sewing room failures have led in a different direction. Instead I’m showing how to make a Day look and a Night look from one pattern.

My Night look took a little consideration. I very infrequently (read: once a year) go to events that call for a dressy look. My criteria in choosing the Capitol Hill Dress from Straight Stitch Designs was that 1. it is a long sleeve dress, of which I have none 2. made from knits offering versatility of use and 3. front pleat to add detail, but not too fussy for fabrics with visual interest.

I choose a sequined jersey from Colorado Fabrics to give the Capitol Hill it’s evening look.

I can wear this to the annual holiday party or a date night with my husband.

For my Day look, my plan was to make something breezy and colorful to take along to Cancun and I thought the Carkeek Dress from Straight Stitch Designs fit perfectly. Unfortunately the cotton batiste I chose just does not have the drape needed for the look. Fail, but I have a plan to save the fabric.

So I turned to my stash to make a Capitol Hill in a day look using this space dyed jersey I purchased from Finch Fabrics. The color really warms up my monochromatic winter wardrobe.

You can enter your Day and Night looks in the challenge here to win one of the prizes that Elizabeth has lined up.

THE 1ST PLACE WINNER WILL RECEIVE:

THE 2ND PLACE WINNER WILL RECEIVE:

The random drawing winner will receive:

Day & Night Dress Challenge is coming for you!

I have fun news to share with you!

daynightgraphicdone680

Elizabeth of Elizabeth Made This is hosting the Day and Night Dress Challenge in January and there will be a chance for you to participate for one of three cool prizes.

I’ll be participating in the blog tour (see more here) to start things off January 8 to January 14th.

The community challenge (see more here) takes place January 8th through January 28th.

Elizabeth has lined up an impressive group of sponsors and prizes for the competition. Check them out here!

I really hope you will sew along with us in the challenge and stop by to see what the lineup of bloggers has put together to inspire you.

Marigold Dress by mahlicadesigns

After making the Marigold Blouse, I was ready to step up to making the Marigold Dress from Blank Slate Patterns in a cotton voile I purchased from IndianBeautifulDirect last year.

Marigold 2

100_4483

No fit alterations were needed, not even my usual FBA. I did make a few changes to minimize the print showing through when using layers of the very sheer fabric. I added a lining to the skirt portion, omitted the pockets, and used a piece of the lining material for the inside yoke piece on the bodice. I also made 3/4 length banded sleeves because I made a goof when cutting them out.

Marigold 3

This is not the way to make your sleeves 3/4 length, but it worked out for me because I have short, skinny arms. Since I made the Marigold blouse first, I cut the sleeve pattern apart to use the cap sleeve portion, but forgot to tape it back together before cutting the long sleeve dress version. To fix my mistake, I laid the sleeve head portion of the pattern over the top of my sleeve fabric piece and recut the top edge. I ended up with sleeves at a perfect 3/4 length but I needed to cut a wider band to fit around my forearm. I wasn’t sold on putting a traditional buttoned cuff at the 3/4 length, so I did a simple band instead.

Marigold Sleeve mess up

Marigold 1

If you’d like some more Marigold inspiration, take a look at the Pinterest boards I put together. Marigold Blouses, Marigold Dresses, Marigold Skirts

Marigold back

The Marigold Dress should take you about 5.5 hours, cut to finish. A 3/4 sleeve dress without pockets or sash in size small used 3 1/8 yards @ 45in width.

Fabric $16.95  Lining $6.41  Notions $2  Pattern: $ 4.53*  Total: $29.89

* $9.06 was the sale price I paid. I divided it by two since I made this pattern twice.

Get Fall Fabulous with the Jasper Sweater Dress

Are you excited for a chance to win the Jasper Sweater pattern from Paprika Patterns? Be sure to link up your Fabulous Fall creation for your chance to win.

Jasper Dress

I love the Jasper Sweater pattern. I’m a sucker for a cowl neck, the hoody version has an interesting asymmetry at the neckline, princess seams are for everybody, and welt pockets make you look like a sewing super star. Now, I rarely make a pattern twice and this is my third Jasper, so you know I’m a true fan.

Jasper Dress

For my dress version, I picked up this quilted knit jacquard in a royal blue from Fabric Mart. The fabric did not have as much body as I was hoping for in my fall/winter dress, so my solution was to underline the bodice with an interlock knit from my stash. The jacquard doesn’t hold a press, so I omitted the welt pockets.

Jasper Dress

The underlining worked perfectly to give me the warmth I was wanting. This Jasper dress is going to work nicely for fall’s cool days and easily worn through the winter with tights or leggings.

Japser Dress

Throwback Sew Days with Butterick 5029

Me Made May was quite a spark for me to continue evaluating my wardrobe.  I had already paired down my closet and done a little work with the Wardrobe Architect series, so taking pictures and trying to make outfits during MeMadeMay was a logical step in continuing the process. So, while digging through my closet for me made clothes to wear,  I was confronted with my decision to save anything handmade from my initial paring down session.

Frankly there’s stuff in there that doesn’t get worn much. My solution is to trot it out for all to see and ask you to chime in on it. And hence, my Throwback Sew Days posts begin.

First up for evaluation is this Butterick 5029 dress I made a few years back. It’s a cotton in an almost tribal print detail.

Butterick 5029 by mahlicadesigns

My evaluation: At the time, I modified the front cross over portion of the bodice to cover a bit more. You can see I wasn’t quite successful. I have more coverage but it’s too wide where the ties cross my shoulders. I think putting in a little tuck will make it more narrow at the shoulder and may help with the gapping at the bust. The waist yoke is also a little too wide. I should have adjusted it more for my short waist. There’s no fixing it now.

Butterick 5029 by mahlicadesigns

I go back and forth on if this color is flattering for me, it’s pretty close to my skin tone.

Butterick 5029 by mahlicadesigns

So what do you think? Is it a keeper or should I put it in the upcycle pile?

Bonnell Dress by mahlicadesigns

What to say about this super cute dress pattern? Oh, I know. Go get it.

100_3983Here’s what to like about the Bonnell Dress:

Triangle cut outs at the sides balanced by a higher neckline so you’re not showing too much skin. A slight V-shaped back to keep things interesting from the rear too.

100_3933I made a size 6 in a quilting cotton with metallic dots from Joanns as a pattern tester for Dixie DIY. (The final pattern may be different)

Bonnell dress by mahlicadesignsMy thoughts:

The dress looks complicated with those cut outs, but it really goes together pretty easily. Dixie’s instructions and illustrations are clear and easy to follow.

Bonnell Dress by mahlicadesignsThe toughest part is making sure you mark and sewing accurately on the triangle parts and sticking it out through all those darts. Twelve darts in all, geesh that’s a time eater, but well worth the great fit of the bodice.

100_3928I made a small adjustment to the shoulder seam which is common for me, dropping the seam by 3/8in at the outer edge to take care of some gaping around the arm hole.

Next time I would reposition the pockets lower so my arms can rest in more of a natural position for me. If I were to make it again in a quilting cotton, I would make the skirt portion smaller with a little less gathering. My sewing friends at the Denver Sewing Collective meetup recommended  I also add about 1/4in width to the bust dart to take care of the extra fabric you see at the sides of my waist. Isn’t fitting fun?

So, are you ready to give it a try? The Bonnell Dress Pattern goes on sale soon.

The Bonnell should take you about six hours.

Fabric $10.75 Lining $2 Zipper $2.25  Total Cost: $15

Handmade wardrobe $ Priceless

McCalls 6559 Summer Stripes dress; Core Wardrobe part 5

Come on warm weather, I’d like to see you.

100_3794

The warmth is still a ways off for us, but that’s why we take vacations right? In honor of warm vacations to come and because I just need/want to focus on spring and summer Core Wardrobe pieces I’m trying a pattern out of my stash. McCalls 6559.

100_3796

I found this striped knit, in my Core colors, in the Joanns red tag section. It was pretty stiff feeling, but at $2.5/yd I thought it would make a good beach cover up and give me some practice matching stripes. To my surprise, it softened up nicely after washing. Now I have a nice striped dress for summer, bonus!

100_3801

I sewed up view D in a size 12. I went with the maxi length after I realized I had bought more yardage than I remembered and what the hey, why not test out how maxi length looks on me using a bargain fabric. I can always shorten it.

I made a few simple modifications to the pattern and instructions.  I used a 1/4in seam allowance at the sides because I was concerned about having enough width at my hips and thighs, this turned out to be unnecessary. Instead of turning and topstitching, I used self fabric as neck and armhole binding, I just think this looks better. I removed 3in from the length, I’m 5’4, and sewed the hem at 5/8in.

100_3802It took extra time of course, but I’m pretty pleased with the pattern matching at the side seams.

I can see this pattern being pretty useful in a lightweight knit as pajamas, as a beach coverup in the shorter length as I originally planned, and to show off some awesome prints.

McCalls 6559 took 3 hours, including the extra time needed to match stripes and add neck and armhole bindings.

Frankie Dress. The Denver Sewing Collective Challenge.

100_3623

The Denver Sewing Collective is starting to put out monthly challenges. October’s challenge was to use that fabric you’ve been holding onto in your stash out of fear to use it or just because you didn’t know what to do with it. I had 4 yards of this large print in my stash as a hand me down. I just let it sit there because it’s not my color and big florals aren’t me either.

So I was feeling up to a challenge after visiting the DSC Meetup in September. After a lot of looking through my Pinterest boards for dress ideas and through my own pattern stash I thought I’d work up Simplicity 2886. The pattern envelope is no help for view A but I found better pics on Craftsy the other day.

One of my goals was to minimize seams to prevent breaking up the print. Here’s where Frankie starts to earn her name after Frankenstein’s monster. I redrafted the bodice to eliminate the midriff piece and eliminated the back center seam. This worked pretty well but made attaching the bodice lining a bit time intensive. The box pleated skirt was pretty easy to put together too.

Here’s the result (with unfinished hem).

In proess

Something about the darts on the bodice just looked strange to me and man is this an unflattering cut for me. Thanks to some input from Pam, Jill, and Jamie at the DSC October Meetup I came home with a plan to make Frankie a bit more of a mishmash and make those darts look better and to make the dress look a little less juvenile on me. To make the silhouette a better fit for my body shape I came away with the idea to redo the skirt to be more the shape of a shift dress and to add darts to the skirt to line up with those on the bodice.

100_3631

I traced off the bottom skirt part of Vogue 1809 DKNY (oop) as a guide and added a bit to the center front to account for the darts I was going to add. Mashing up the two patterns worked really well. The final silhouette is much more flattering and extending the line of the bodice darts down into the skirt looks better too. Too bad I didn’t just start with a shift dress pattern so there wouldn’t be the seam at the waistline. Oh well.

100_3630

Lessons learned:

1. The waistline of a dress needs to fall at my natural waist, not higher. This is going to be very helpful as I work on my Core Wardrobe.

2. Oh how valuable it is to have a kind fellow sewists to point out where you’ve messed up and how to fix it.

3. It is possible to line a bodice after the front and back are pieced together, but so time intensive it may be worth the back center seam.

4. Box pleats may work for me in a drapier fabric.

100_3626

If you were to work up this dress it would take you about 3 hours. I probably spent another 3 hours redrafting, making muslins, and redoing the skirt.