Toaster Sweater & Tabor V-Neck Mashup Tutorial

Hi there. I hope you are happy and healthy.

{mahlica’s note: Hey, if you are not seeing photos, please try clicking through to the post (click the post title) instead of reading on my home page. Bear with me as I figure out this glitch}

Last week I made up a pattern mashup using the Toaster Sweater and Tabor V-Neck patterns from Sew House Seven. My goal was to recreate a GAP tee from my “Stripes” pinterest board. I think I got there with the design lines, but with the irregularly striped fabric I used from my stash, I’d give myself a 9 out of 10 based on not having the stripes matched up on the raglan seam.


Here’s how I did it.

Supplies needed:

Toaster Sweater Version 1 and Tabor V-Neck patterns assembled and cut to your size, tracing paper, 3 different colored pencils/pens, fabric, and basic sewing supplies.

Alter the Toaster’s front bodice.

Fold the Toaster sleeve piece in half lengthwise lining up the underarm seams. Mark your fold for several inches at the upper edge of the sleeve pattern to denote the shoulder line.

Trace off the Toaster front bodice. Leaving about 8in of paper below the bottom cut line and 10in above the top of the neckline. (Set aside for a minute.)

Line up the front bodice and sleeve pattern pieces along the raglan seam. Overlap the pieces by 5/8in to remove the seam allowance and temporarily tape the pieces together. They need to line up along the upper part of the seam near the neckline. They won’t line up further down the seam.

Reposition your tracing over the front bodice/sleeve. Using a contrasting colored pencil (orange), trace along the extended neckline and upper edges of the sleeve. Mark the shoulder line for several inches. These traced lines will be your points of reference for future steps.


To draw the v-neck line, place the Tabor front bodice piece on top of your tracing. Line up the Tabor with the Toaster’s shoulder and make sure the Center Front fold lines are parallel. Trace along the Tabor’s v-neck line. (Keep your pattern pieces under the tracing paper for future steps)


Lengthen the Toaster bodice to eliminate the bottom band. I added 6.5in below the original cut line and extended the side seam down. You may need more length depending on your height. I’m 5’4″. Keep in mind that the Toaster is a semi cropped style, so if you need room at the hips, you’ll want to curve that side seam, instead of extending it straight down.

Alter the Toaster’s back bodice.

You can trace off the Toaster back bodice piece leaving extra paper above the neckline or simply tape on a scrap piece of tracing paper like I did. Overlap the Toaster back bodice and back portion of the sleeve along the seam allowance. Like the process for the front, you’ll be able to overlap the seam allowances close to the neck line, but they won’t match up along the lower portions. Using a contrasting colored pencil (blue), trace around the upper portion of the back bodice to create reference lines. Set the back bodice aside for a minute. Extend the Center Back fold line up, then free hand or use a curved ruler to draw in a new, higher neck line that matches up with the curve on the sleeve (Gray lines in the pic below). Tape on a scrap of tracing paper and trace over the new neckline curve you created. Lastly, add length to the back bodice piece just as you did the front.


Alter the Toaster’s sleeve.

No need to trace off a new sleeve. Lay your sleeve piece over your tracing paper, lining up the upper edges with your traced reference lines (orange). Fold down the front triangle point along the line you traced for the vneck (green area) and add a small triangle at the back edge to fill in the gap (green area).


Lay the Toaster’s cuff piece over the bottom edge of the Toaster’s sleeve, lining up the two pieces to make a smooth cutting line along the side edges of the sleeve. Temporarily tape together.


Alter the Tabor’s neckband (maybe).

I used the wide lapped neckband from the Tabor pattern. In the end, I shortening the neckband by 1in to get my rayon jersey to lay flat. This may not be needed for more stable fabrics. I suggest basting in the neckband and determining if you need to shorten it. I took out the extra length from the center back neckband seam.

Now you can cut out your new lengthened Toaster bodice with a v neckline pattern piece and the back and sleeve pieces if you traced those off.

Sewing overview:

Apply the small piece of interfacing to the bottom of the Vneck and stay stitch according to the Tabor’s pattern/instructions.

Assemble the bodice and sleeves according to the Toaster’s instructions.

Sew and insert the neckband according to the Tabor’s instructions.

Hem your sleeves and bodice according to your liking.

You’re finished with your Toaster Tabor Mashup! I hope you love it. Tag mahlicadesigns on Instagram, so I can see your version.

As always, thanks for reading today.

You can follow me on instagramBloglovin, or by entering your email in the right side bar.

You might like to see my Toaster with Tapirs, Toaster in sweater knit, Tabor vneck, Tabor layered vneck tutorial.

Pin it for later!


Layered V-Neck Tutorial from mahlicadesigns

I ran across a picture of a v-neck tee a while back that had a double layered neck band and added it to my collection of interesting clothing details to try someday. Unlike most things in my little collection, I did spend some time working this one out using the Tabor V-neck pattern and I’ve put together a tutorial to share with you.

For my layered V-neck I used oatmeal Baby French Terry from Simply By Ti. The baby french terry is light enough to drape nicely in the Tabor and there’s barely any bulk in the double layered neckband. When choosing fabric for your project, experiment by folding layers together to see if you like how they look.

I’m really happy with the overall look I achieved with the layered neckband and this color has been a very useful addition to my wardrobe. If I were to do it again though, I might not use the Tabor pattern combined with this technique. The V on the Tabor is pretty deep and using a narrower band than the pattern calls for at the center front makes me feel a little exposed.

Maybe, but probably not, I’ll put on the wider band that the Tabor calls for (because I love this top) and make another layered V-neck using another pattern.

Layered V-Neck Tutorial

The measurements provided are based on the Tabor V-neck size 8. As a guideline, the outerband should come down and cover approximately 2/3 the length of the front of your v-neck, shoulder to center front. My innerband starts at the shoulder and goes to center front. You can also cut the inner band to fit the entire neckband if you are not concerned about bulk.
You can adapt the technique to your favorite V-neck tee pattern, but you’ll need to adjust the band lengths I’ve given to fit.

Cut your custom bands:

Innerband cut 2:   2.25in X 14in    (3/4in finished width)

Outerband cut 1:   3in X 25in    (1 1/8in finished width)

Interface the center V on the bodice of your tee and sew the front and back together at the shoulders.

Apply fusible web along the short ends of the outerband piece. Fold back the short ends wrong sides together by 1/2in and press to secure with the fusible web.

Mark the center (center back) and mark the shoulder seams 5in away from center back on the outerband.

Sew the innerband pieces together forming a V at center front. Using a 3/8in seam allowance, insert and baste the innerband into place along the V. Don’t baste the entire length of the inner bands, just a few inches around the center V.

Starting at center back, leaving the outerband unfolded, pin the single layer of the outerband in place along the neckline. Stretch the outerband slightly as you pin in place from center back to the shoulder seam. The bands don’t need to be eased in from shoulder to center front.

Next, pin the innerband in place along the bottom portion of the neckline up to the shoulder seam. The innerband should overlap the single layer of the outerband.  Trim away any excess length of the inner band that extends past the shoulder seam.

Lastly, fold over the outerband, sandwiching the innerband within and repin all layers as needed along the entire neckline. Remember the outerband is eased slightly between the shoulders and center back.

If you want to check your proportions first, baste the entire neck band into place (innerband and outerband now functioning as one unit) using a 3/8in seam allowance.

Sew/serge your layered neckband into place using 3/8in seam allowance. Complete the construction of your tee per the pattern instructions.

As always, thanks for reading today.

You can follow me on instagram, Bloglovin, or by entering your email in the right side bar.

You might also like: Tabor V-Neck and Lander shorts

Save For Later

Pin this image, so you can come back when you’re ready to start sewing your version.

Chi Town Skirt in Corduroy for The Fabric Guys

In an effort to spark some motivation to sew, I put together a small sewing plan to round out my fall wardrobe. I included a Chi Town Skirt, a couple pairs of pants and some easy to make tops.

I’m working through the bottoms slowly and have pretty much given up on the idea of making the tops. I guess making a plan didn’t really work to get the fires lit under my sewjo after all.


I did add a wonderful rust corduroy skirt to my wardrobe though. Here’s a sneak peek of the Corduroy Chi Town skirt that I made for the Sewcial Network blog featuring corduroy from The Fabric Guys. You can read the full details here.


On the topic of corduroy, I needed a refresher on sewing with it, so I compiled all the tips I gathered up into one helpful post to share. Click through to see.

11 Tips for Sewing with Corduroy

Until next time,

Melissa E of mahlicadesigns

Tessa Sweater Dress- featuring DG Patterns Ribbed Knit

The Tessa Sweater Dress I made to share this week helps me get close to having all the winter wardrobe pieces I need this year. I really like wearing dresses, but it can be hard to feel warm enough in the cold months, so I’m hoping a nice sweater dress will do the trick.

When Daniela listed this ribbed sweater knit in her shop, I knew I wanted to try sewing with it and hoped it would work for a sweater dress. I’d not sewn a dress with sweater knit before, so I was a little concerned that the length of the piece would cause the fabric to stretch and lengthen when worn. In this case I believe the structure that the ribbing offers and the smaller weave keep things in nice shape.

My plan was to sew up the Tessa Dress last minute to wear for Thanksgiving. I’d look nice, be comfortable all day, and have room for an expanding belly. I came down sick just before the big day and only just got the meal prep I was responsible for complete with the help of my husband- thanks my dear.

Sewing was not happening when I just wanted to crawl into bed, so the Tessa and I missed Thanksgiving. No worries though, I got to wear her to my office Christmas party last week and had a wonderful time.

The Pattern: I used the Tessa Sweater & Dress Pattern from DG Patterns in a size 10 based on my measurements. Through the hips I graded down to an 8 for a closer fit. Depending on the stretch of the fabric, I could easily sew up a straight size 8 next time.

The Fabric: Striped ribbed sweater knit (similar) from the DG Patterns shop.

As always, thanks for reading today.

You can follow me on instagram, Bloglovin, or by entering your email in the right side bar.

You might also like the Lazo Trousers I made in the DG Patterns’ Organic Tencel.

Save For Later: Pin this image, so you can come back when you’re ready to start sewing your version.

*As a DG Patterns Fabric Ambassador I receive complementary fabric from the DG Patterns fabric shop to use for a project in exchange for sharing it with you.

Sail Away Tank featuring Simply By Ti Fabrics

I’m coming at you today with my Sail Away tank hack made with Simply By Ti fabric** My intention was to show my Sail Away outfit together, but I goofed and didn’t get pictures of the tank and Landers together.

See all of my Sail Away outfit inspiration here.

The Pattern The free Durango Tank modified as described below. Size 10. Also shown are the Lander shorts from True Bias.

The Fabrics Navy with ivory stripes rayon for the tank and khaki stretch twill for the shorts. Both from Simply By Ti** Rayon jersey is great for its drape and that’s what I really wanted for the tank to lay well over my hips. The stretch twill is the perfect fabric for shorts. The stretch is great for making a trim fitting pair of Landers, doesn’t bag out, and the weight is just right for bottoms.

The Hack

Durango Tank in size 10. I shortened the tank by 1in at the waist line and did a 1/2in sway back adjustment to fit my particular shape. I also dropped the neckline by 1 in at CF and CB. Next, I traced the full front bodice to draw my contrast piece.

To make my S-curve contrast piece, I measured 9 3/4in up from the CF hem line to mark my natural waistline at the CF and at the left (as worn) side seam. On the right (as worn) side seam I marked 4 1/2in up from the CF hem line. I used my french curve to draw a convex curving line from the left side flattening out at the CF, then curving in a concave curve from CF to the right side.

Grab another piece of tracing paper and trace the bottom of your bodice piece marking the S curved line very clearly. Mark a notch at the CF of the curved line. Make sure you have space above the curve on your new tracing to add a seam allowance. Add your seam allowance to the top of your piece and transfer the CF notch to the new cut line. I use a compass to add seam allowances to curved lines. Be sure to draw your grain line marking and the perpendicular bias line marking if you are going to switch up your stripes like I did. Trim away excess paper from your new pattern piece

Go back to your main bodice piece and add the same seam allowance below the original curve line you drew and mark the CF notch. Trim away the excess paper below the new curve line you’ve drawn.

Now cut out your fabric. Attach the lower portion of the bodice to the top bodice piece before continuing with the pattern instructions as normal.

Make yours even better by making your curve more S-shaped than mine.

As always, thanks for reading today.

You can follow me on instagram, Bloglovin, or by entering your email in the right side bar.

**As a Simply by Ti Ambassador I receive complementary fabric from the Simply By Ti shop to use for a project in exchange for sharing it with you.

You might also like Sail Away Lander shorts.

Save For Later

Pin this image, so you can come back when you’re ready to start sewing your version

Sail Away Lander Short Tutorial & How To Attach Slotted Buttons

Lander wm 4

I got a lot of positive feedback on my Sail Away Lander shorts that I made in the Who Made It Best challenge. They turned out pretty close to my vision, so I’m happy.

If you’d like to make a pair for yourself or borrow any of my ideas, I’ve put together a tutorial of my modifications to make it easier for you. Check out my Sail Away inspiration board for even more ideas.

I made modifications that fall into three categories: 1. Angle the pocket opening 2. Lengthen for a higher waist and 3. Relocate the fly closure.

I’ll also share how I attached my slotted buttons.

Size: I originally made a pair of Lander pants and shorts in size 10 per the measurement chart. I like the length I get in that size, but really needed to size down to an 8 for a better fit in the width. For my Sail Away Landers I wanted a pretty slim/snug fit in the stretch twill, so I sized down even further to a 6, still keeping the length of my pieces at a size 10.

  1. Angled Pocket

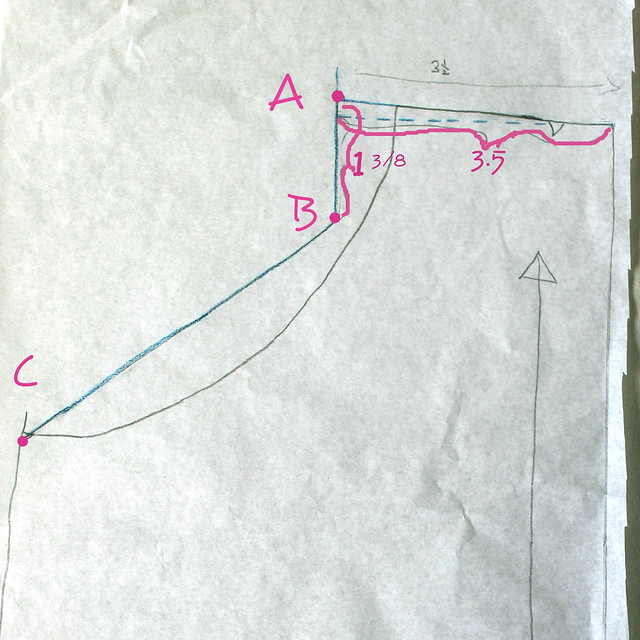
Trace off the pocket pattern piece in your size and be sure to add the grainline marking. Measure and mark a line 3 1/2in away from and parallel to the long edge of the pocket. Mark the point (a) where the slightly curved top edge of the pocket meets the newly drawn parallel line. Measure down 1 3/8in from your (a) mark and mark again (b). Mark point (c) where the original pocket curve meets the side of the pocket. Connect (b) and (c) with a straight line. You now have an angled pocket opening. ** You may have to tweak these measurements slightly for a different size, but they will get you really close. (Original design lines are in grey pencil, newly drafted lines are in blue pencil)

Pocket alteration 1.2

Next up you’ll need to draw a new pocket interfacing piece. Simply trace your new angled pocket edge and draw a matching line 1in away to create the new piece.

Interfacing collage


2. Lengthen for a higher waist

I measured down 1 1/2in from top of the side seams (front & back pieces) to mark my lengthen line. Your lengthen line should be perpendicular to the grain line. Cut and spread 1in (or more). I’m short-waisted so 1in was plenty for me.

I chose not to lengthen my pocket piece. If you choose to, I suggest lengthening below the angled pocket opening, so you don’t skew those proportions.

3. Move the fly

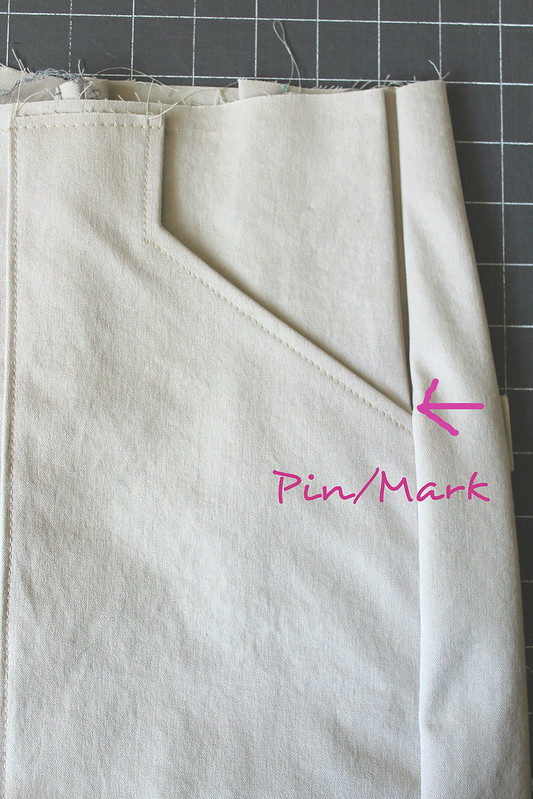
We’re mostly just switching up the construction a little. Pin or mark just above the pocket on the side seam. Stitch the side seam closed from bottom(hem) up to your marking and back stitch to reinforce.  The dot marking on the fly pieces will match up to the top of your side seam stitching.

Pin mark

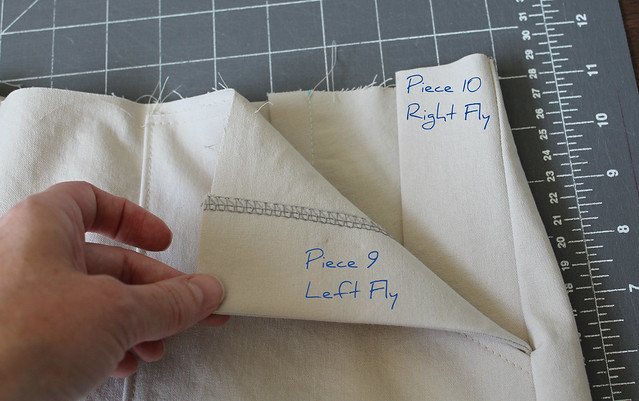
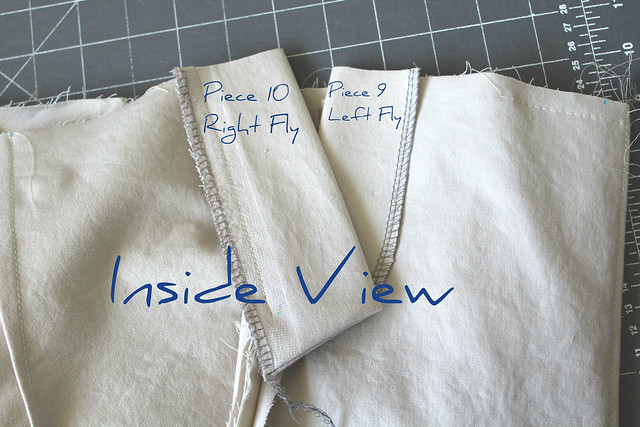
In the pattern instructions the left fly attaches to the left (as worn) center front and the right fly piece attaches to the right (as worn) center front. Instead, you will attach the Left fly to the Front pant/short piece and the Right fly to the Back pant/short piece.

Fly pieces

Fly pieces inside view

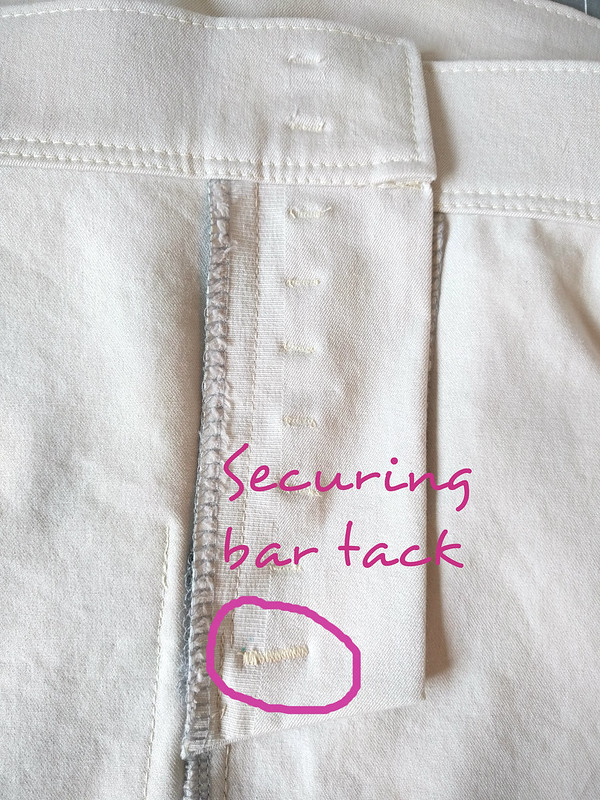
Follow the pattern instructions for completing the fly and button closure. The fly pieces as cut will extend up past the waistline, simply trim any excess. Once you have the fly completed, you’ll want to add a securing bar tack through the two fly pieces. Make sure they are laying flat over each other like they do when the fly is closed. Pin together and sew the bar tack through the two layers.

Bar tack detail 1

Note: Moving the fly to the side will make the pattern notches on your waistband irrelevant, but you’ll be fine. Simply attach following the directions and ease any areas that need it.

Things to consider.

  1. I’ve made two Landers before, so I knew I would be ok with a shorter side fly.
  2. I made mine with stretch twill, so going down a size and the shorter fly still works for me.
  3. Raising the waist may require further alterations of your CB seam, darts, and possibly the waistband.

Attaching Slotted Buttons (aka Canadian buttons or bar buttons)

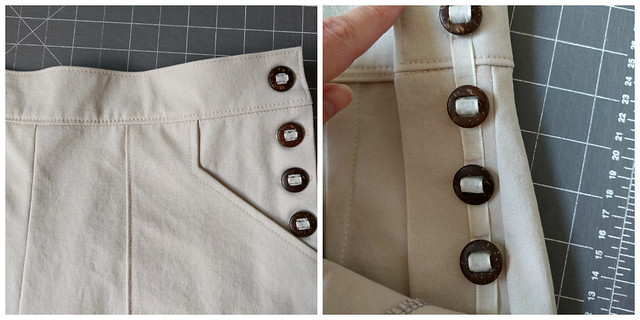
I turned to the Self Sewn Wardrobe facebook group for direction with these.  I got the suggestions that these are attached with a ribbon, twill tape, or self fabric running through them and an example pic from a rtw jacket with this type of closure. I haven’t found a tutorial to verify that I did this properly, but this will get you started. If you have any suggestions, I’d love to hear them.

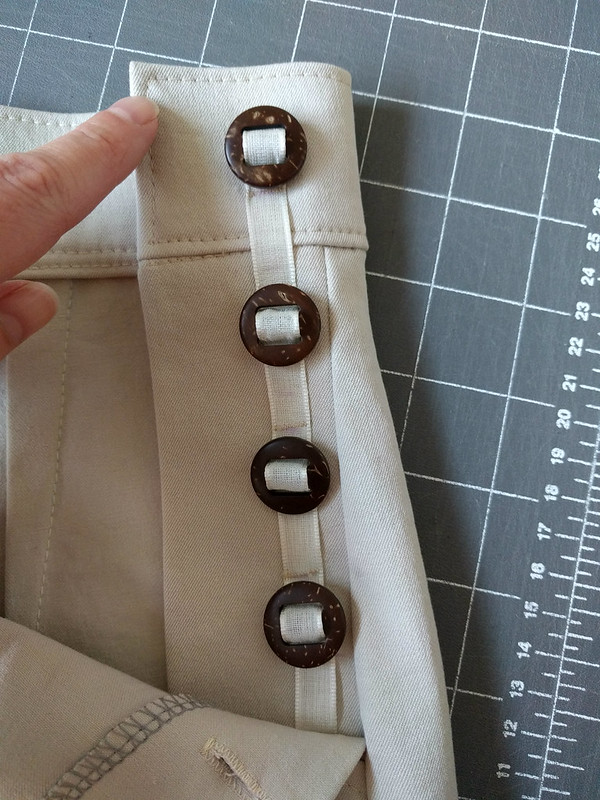
Your ribbon will run right down the middle of your buttons, so mark your button placement to the outside of each button so you can still see the markings after laying down the ribbon. Don’t skip the marking because we’ll be shifting those buttons up and down on the ribbon as we sew.

placket collage

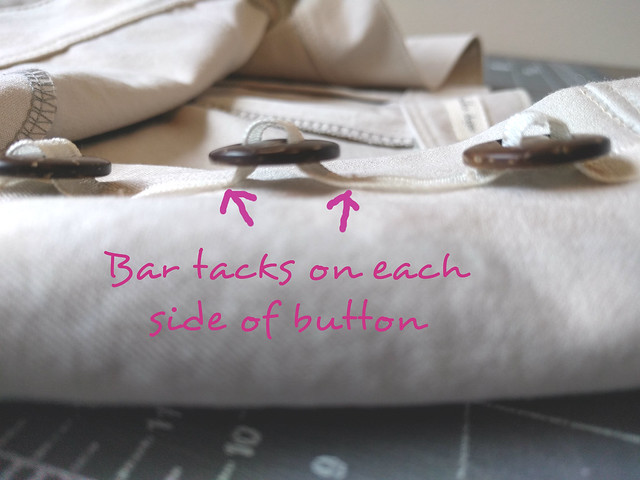
Cut your ribbon about 1.5 times the length of the fly and slide all the buttons onto the bottom of the ribbon. Starting at the top of the fly. Slide one button up to the top of the ribbon leaving about 5/8in of ribbon extending above the top of the button. Position your button to line up with your placement mark, fold under the top edge of the ribbon by 1/4in and pin the ribbon in place. Also pin or mark your ribbon just above the top of your button. Slide the button down and out of the way to make two bar tacks. One along the top folded edge of the ribbon and the second on the marking for the top of the button. Straight stitch along the edges of the ribbon between the bar tacks.

Slide the button back up into position and get ready to experiment with how much slack you’ll need in the ribbon. I tried using a match stick, chop stick, and a couple other things before settling on the shaft of my seam ripper. Place your spacer beneath your button keeping the button centered with your button placement marking. Pin down the ribbon to line up with the bottom edge of the button. Your next bar tack will go where you pin. Remove your spacer and test how well the button fits through the button holes. Adjust as needed. When you have the slack determined and the ribbon pinned, slide the button up as far as you can and make a bar tack where you pinned. Your first button is now secured.

Button detail

Repeat this process for the rest of your buttons. Positioning your button with the ribbon flat, marking and sewing the top bar tack along the top edge of the button, repositioning the button with your spacer to get your slack, and marking and sewing the bottom bar tack. If you have a presser foot that will fit, straight stitch along the ribbon edges between your buttons. (I couldn’t make that work.)

Slotted Button Detail 1

After all your buttons are secured, leave enough ribbon to extend to the bottom of the fly and straight stitch along the ribbon edges to secure. I was also able to catch the bottom of my ribbon in a bar tack that I used to secure my fly pieces together. Trim any excess.

Next time I’d do the top button with a separate piece of ribbon. I think I’d like the looks of that better. I’d also apply my buttons before attaching the waistband, then I could secured top edge of the ribbon in a seam and have a nicer finish.

As always, thanks for reading today.

You can follow me on instagram, Bloglovin, or by entering your email in the right side bar.

Save For Later

Pin this image, so you can come back when you’re ready to start sewing your version.


A Margo Mod for Pattern Hack week on The Monthly Stitch

Since seeing this cute top on pinterest, I’ve had it on my sewing list to make one for myself. The Margo Blouse quickly came to mind as a pattern I could use as a jumping off point.

Margo Hack by mahlicadesigns

I’m calling this one a success!  With just a few minor missteps working with these fabrics, I found the fruition of my idea came along pretty easily.

Margo Hack by mahlicadesigns

The Pattern: The Margo Blouse from Blue Dot Patterns. I used the straight hem version with the 3/4 length sleeve in a size small. After making my modifications to the yokes, I followed the pattern directions for an easy finish.

The Fabric: 1/2y of rayon/spandex jersey and 1/2y black mesh. I also used 3/8in elastic in the sleeve hems as directed and 5/8in FOE at the neckline.

Margo Hack by mahlicadesigns

The Mods:

1. I added my own button plackets, made from the jersey knit, to the back by cutting the back yoke in half at center back and adding a 1in x 4.25in finished placket piece to each edge. I overlapped the plackets, basted along the bottom and then attached the yoke to the bodice as normal.

2. I raised the neckline at center front by 2.5in and smoothed out the curve.

3.  I used FOE to finish my neckline (the pattern has yoke facings as a finish) and French seams at the shoulder and sleeve seams.

Margo Hack by mahlicadesigns

Next time I would raise the seamline across the front about 3/4in, it just looks a little low to me with the shear fabric. I would also only raise the neckline at center front by 2in instead of 2.5in, it feels a little high.

Making a modified Margo should take you about 4.75 hours or less.

Total Cost: $11.50     Fabrics: $10    Notions $1.50      Pattern $0*

I’m submitting my Margo hack into The Monthly Stitch’s contest for Indie Pattern Month. Take a look at what other sewists are doing and return to The Monthly Stitch on June 24th to vote for your favorite pattern hacks.


*I received a free copy of the Margo Blouse Pattern for hosting the Creative Sewing Challenge.

Georgia On My Mind. I hacked the Georgia Top again

I made my first Georgia Top for the Creative Sewing Challenge back in November and when putting together a post to inspire creativity with the Georgia pattern, I just had to put another version on my “to sew” list.

Georgia Hack by mahlicadesigns

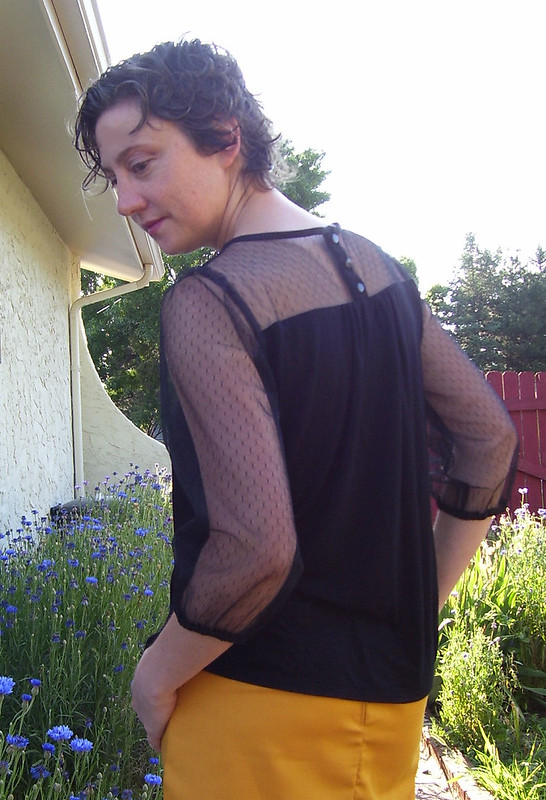
I used the Georgia Top from Blue Dot Patterns in a size small again and modified the pattern by adding length to the sleeves and making a new cutting line for the lace piecing (tutorial below).

Georgia Hack by mahlicadesigns

I used a stable jersey knit from my stash paired with a lace purchased from Fabric Mart. I’ve not sewn with lace before, but since the lace I chose is not as fine and sheer as some lace can be, I just treated it like a knit and constructed the whole project with my serger. No problems.

Georgia Hack by mahlicadesigns

I’m just as pleased with my second Georgia, but have to laugh at myself for making two versions that have built in ventilation.

Georgia Hack by mahlicadesigns

Get my look (tutorial):

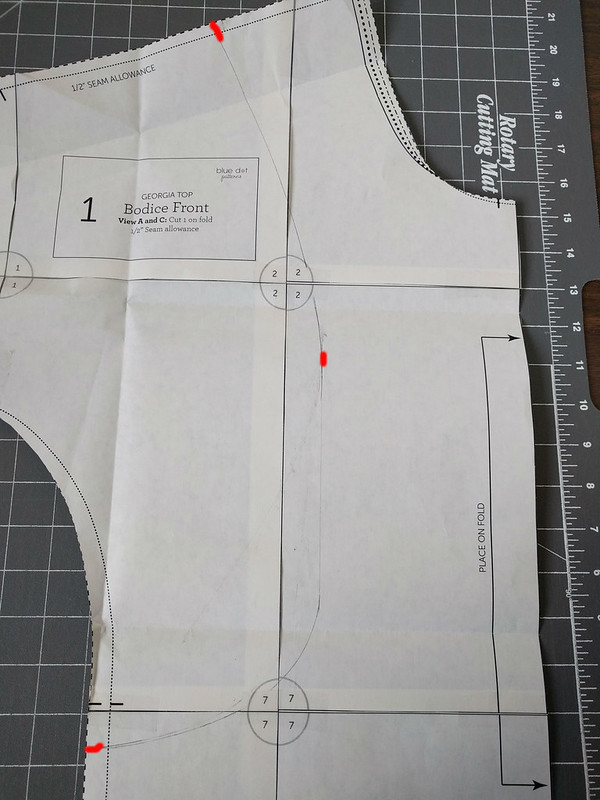
Let’s draw a new pattern line on the front pattern piece. I marked my outside shoulder at 4.25in from the neckline. I made a bust mark 4in down from CF neckline and 5in over (next time I’d make it 6in over to cover more of my chest). I marked the side 4in up from the bottom. I used a French curve to draw my new cutting line; keeping the line through most of the body vertical with a slight curve up to the shoulder and a dramatic curve at the waistline.

**I had the benefit of having a Georgia already made that I could use to determine the placement of my markings.

New Drawing lines

Cut along your new pattern line. Take a moment to label your new piece. Use your new front piece to trace your line onto the unmodified back piece. Cut your new pattern line on the back and label.

New drawing line traced

New Pieces Cut

I added 7.5in to the sleeve to make it long sleeve on me ( I’dd add more next time). I recommend you do some measuring to figure what will work for you.

Tips:

  • Label your new pattern pieces.
  • Add seam allowance to your new cut lines: I marked the cutting line on my fabric with chalk; you can trace off new pattern pieces if you want.
  • Make sure you’re ok with the amount of exposure the lace will give. I plan on wearing a cami.

A modified Georgia top should take you 2 hours to complete. Add about 20 minutes to draw new pattern lines.

Fabric $3  Pattern $0*  Total Cost $3

I received the Georgia Top Pattern free as a gift for hosting the Creative Sewing Challenge

Twisted Tuck Wristlet tutorial by mahlicadesigns

Feature collage

For the September Sew With Me challenge on facebook, I needed to make an accessory. After being stumped a while, I came up with an idea for an accessory that I actually needed; a small purse with a handle. I drafted my own pattern, so I wanted to do a practice run before working with a faux leather for my final version. The first version out of quilting cottons was made up for my So Sew Easy Sewing Swap partner. I hope she likes it.

Since I put in some effort to draft my pattern and work out the twisted tucks detail, I wanted to share a tutorial so you can make one too.

You’ll need:

Twisted Tuck Wristlet template, 4.5in X 14in rectangle for twisted tuck detail, 3in X 11in piece for strap, 11in X 8in for interior pocket (optional), fusible fleece or heavy weight fusible stabilizer, 9in zipper.

Cut Exterior Fabric: 1 main body, 2 front side pieces, 1 tuck piece, 1 strap piece

Cut Interior Fabric: 2 main body, 1 pocket.

Cut fusible fleece: 2 main body (hint: trim away about 1/2in from edges to reduce bulk in your seams, especially at the top edge)

First we’ll make the twisted tucks insert.

  1. Grab your 4.5 x 14 inch piece. Mark one of the shorter ends on the wrong side as the Top. Make your first fold, wrong sides together, 2in down from the Top edge. Press. Sew 3/4in away from and parallel to your folded edge.**
  2. Make your next fold, wrong sides together,  1 5/8in down from the stitching line you made in step #1. Press and sew 3/4in from your folded edge. Repeat until you have a total of five tucks.
  3. Press tucks down. Baste tucks down on one edge using 3/8in seam allowance. Fold and pin tucks up on other side. The edges will not line up squarely, that’s ok, its more important to keep the piece squared up. Baste in place using a 3/8in seam allowance. You should have 1/2in of fabric above your top tuck and more below your bottom tuck.Tucks collage
  4. Using a 1/2in seam allowance, attach the side pieces to the tucks insert, lining the pieces up at the top. Press. The insert should be a little longer than the side pieces, trim away any excess after the side pieces are attached.

front

Next, we finish getting our pieces ready.

5. Trim 1/2in away from the top, flat edge of the fleece if you haven’t done that already. Apply the fusible fleece to the wrong sides of the two exterior pieces.

6. Press the pocket piece in half lengthwise, wrong sides together. Center the pocket on top of one of the lining pieces, right sides up. The lower raw edge of the pocket should line up with the lower edge of the lining piece. Bits of the pocket will hang over. To make a 3in card slot, I mark the center of the pocket, then measure and mark 1.5in out each side of center. Stitch along the marked lines, backstitching at the top to reinforce. You can divide the remaining pocket area as desired or leave them alone.  Tip:  1.75in to 2in width is good for a lipstick slot. Trim off any overhanging parts of the pocket.Pocket7. Press the strap in half lengthwise wrong sides facing. Open up, fold long edges in to meet at the center, press, and fold again. Same as if you’re making a double fold binding. Stitch 1/8in from the folded edges to close the strap. Place one of the exterior pieces right side up. Position the strap 1in down from top edge and with raw edges facing out. Baste in place.

backAssembly:

8. Mark a line 1/8in down from top edge on right side of a Lining piece.** Position the zipper right side up along this line, making sure the top zipper stop is about 3/8in in from the side. Pin in place. Position one of the Exterior pieces on top, right side down. The zipper is sandwiched between the layers. Using a zipper foot, stitch 1/2in from edge. Repeat with the second lining and exterior pieces.

Wristlet zipper insertion collage

9. Open out the layers so zipper is in the center. Press and topstich about 1/8in away from exposed zipper tape.

Top stitching collage

10. With needle & thread, make a new zipper stop about 3/8in from edge. Trim away excess length of the zipper. Open zipper by about 3/4s.zipper end collage

11. Fold one exterior piece over onto the other exterior piece, right sides together. Line up exterior and lining pieces, making sure open edges of zipper are lined up. Pin as needed.

12. Leave a 3in opening at the bottom edge of the lining pieces. About 1.5in from center bottom of lining, start stitching with a 5/8in seam allowance, as you sew around the curve gradually change your seam allowance to 1/2in. before you reach the zipper. Sew slowly as you go over the zipper. As you come back around to the lining, increase your seam allowance to 5/8in after the curve.stitching

13. Carefully trim excess bulk from the zipper corners. Clip the curves and trim seam allowance around the bottom edge of the lining by about half.

14. Pull the wristlet right side out through the opening in the lining. Hand stitch the lining closed. Use a turning tool to push out the corners at the top and smooth out the lining and curves.

lining opening

Zip it up and your done!

Final collage 3

** This sentence edited after publishing to be more clear.

Fabric Bins tutorial

This week I needed a quick and easy project, so I tried out a crafty idea that I saw in Nai Nai’s kitchen. I’d like to share with you how I quickly made a few fabric bins to help wrangle the loosey goosey stuff that lives in the drawers at my house. I’m sure there are plenty of templates and tutorials out there, but I just wanted to dive in and do it my way. Mine are 7x2x2.

100_3784

You’ll Need:

 Some basic sewing gear, heavy weight fusible stabilizer, two 12×7 inch pieces of coordinating fabric.

100_3775

Tip: Making multiples is efficient and easy. Stack multiple layers of fabric when cutting and chain stitch your corners.

Step 1: Cut a 12in X 7in rectangle in each fabric (2total) and one 12in X 7in interfacing.

Step 2: Apply the fusible to the wrong side of the outside fabric.

Step 3: Mark a 2.25in square at each corner. Stack your layers and cut out the corners.

100_3776

Step 4: Sew each corner, right sides together, using a 1/4in seam allowance. Sew from the raw edges down all the way past the cut edge. See below. Do this for all eight corners.

100_3781100_3780

Step 5: Nest the two pieces right sides together, pin if needed. Sew the top edge using 1/4in seam allowance and leaving a 2in opening along one of the longer edges. Turn right side out.

Step 6: Fold under raw edges of the 2in opening and pin as needed. Topstitch along the entire top edge closing the opening.

100_3784
All Done

Optional Step 7: For some added shaping, pinch together each upper corner and topstich for about 1/2in from the upper edge. See below.

Topstitch the top 1/2 inch

100_3783
Topstitched corners for more structure

Abigail Bib by mahlicadesigns

I recently made a Caterpillar Onesie as a gift for a girlfriend’s new baby, shortly thereafter I received an invite for a welcome baby party. I sure didn’t want to show up empty handed , so I needed something quick and easy since my new little guy (three months old now) doesn’t give me much time for sewing and crafting any more. Hurray again for Pinterest. I love the bibs made over at Stubbornly Crafty and used her template to make my own simplified version.

Here’s how I made mine.

Supplies: Approximately one 12 x 15 piece each of terry cloth and quilter’s cotton, coordinating ribbon, and sew on velcro.

Cut out one bib in each of the fabrics using the template. Aline your ribbon across the quilters cotton and sew in place along the top and bottom edge of the ribbon. Using one of your machines fancy stitches might look nice here.

Place your bib pieces right sides together. Starting about three inches from one of the bottom corners, stitch toward the corner and around the bib. After rounding back around the other bottom corner, stop stitching to leave an opening about four inches so you may turn the bib right side out. Clip the seam allowance in the curved areas. Turn your bib and use a tool to push out the corners and curves.

Pin the bottom opening closed. Top stitch around the entire bib, being sure to catch the front and back of the bottom opening to secure it shut.

Sew on your velcro to each side of the neck flaps. Be sure one piece is sewn on the front, and one piece to the back so it will close properly.

Follow me on Pinterest

The Helene Bib Onesie by mahlicadesigns

I’m borrowing my bib idea from my Sweet Treats Top to make another baby gift for one of my friends. This will use the third of a five pack of Onesies I  purchased recently; I’m challenging myself to use them all in a creative way. Let’s see how I do.

Here’s how I made the Helene Bib Onesie.

Supplies: Onesie or other top, two 3/8 in buttons, 1 1/4 in x 2 in fabric for the placket, 4 in x 7 in fabric for the ruffle, and 3/4 in x 1 1/2 in fusible interfacing (optional).

Fold the 4 x 7 in ruffle piece of fabric in half length wise, right sides facing. Sew along the short ends using a 1/4 in seam allowance. Turn and press. Using a long basting stitch, stitch along the top raw edge of the ruffle piece. Use the basting stitches to gather the upper edge into a ruffle.

Pin the ruffle in place at the center front of your neckline.

Center and fuse the interfacing to the wrong side of the placket piece, then fold in all raw edges by 1/4 in and press towards the center of the wrong side. Pin the placket in place over the ruffle, being sure to cover the raw edges of the ruffle.

Top stitch around the edge of the placket through all layers.

Hand sew on your buttons.

Flag Garland tutorial by mahlicadesigns

Among my circle of friends, lots of babies are on the way. What a great way for me to combine my love for handmade and trying out some of the very cute ideas I’ve run across on Pinterest. (Follow me on Pinterest)

Here’s how I did it.

Supplies: Fabric quarters or larger scraps in assorted colors. Double fold binding about 40 in  long. Basic sewing supplies.

I wanted to make my finished flags 4 in across the base and 4 in at center height, so I drafted a paper board template with a 4.5 in base and a 4.5 in height and connected the sides. If you have a quilting ruler, it may be more efficient for you to use the marked angles on the ruler to make your triangles of your chosen size rather than make a paper board template.

I made my garland with 12 flags; purples on one side and pinks on the other.

Cut out a total of 24 triangles to make 12 finished flags. I cut out 12 purples and 12 pinks. Pair up your triangles right sides facing. Using a 1/4 in seam allowance, chain sew all your triangles along one side. Next, chain sew along the other side making sure your seam lines cross at the tip of your triangles. Grade and trim the seam allowances near the triangle points. Turn and press your flags. Top stitch around the outer edges.

About 10 in from the end of your binding, place and pin your first flag. Space your flags about 5 in from the beginning edge on one flag to the next.

Fold your binding in half lengthwise and begin sewing from one end. After sewing 2.5 in, stop with your needle down. Lift your presser foot and loop the top edge of your sewn binding around and fit it inside the still open binding. Continue sewing to make your loop and your garland.

Stop sewing 4 in from the end of your binding. Remove from your machine and trim your threads. Now, starting from the unsewn end of the binding, sew 2.5 in and repeat the process to make another loop. Continue sewing until you meet your original seam, back-stitch, remove, and trim your threads.

Caterpillar Onesie by mahlicadesigns

I came across diddledumpling‘s  really cute idea for a caterpillar detail on Pinterest and was inspired to make one as a gift. This will use the second of a five pack of Onesies I  purchased recently, I’m challenging myself to use them all in a creative way.

Here’s how I made mine.

Supplies: Onesie or other top, six 3/8 in buttons,  small bit of black embroidery floss.

Arrange your buttons along your top and sew in place. Use the embroidery thread to create the antenna. I made french knots and back-stitches.

Follow me on Pinterest

Crochet necklace tutorial by mahlicadesigns

I thought I’d make a quick and easy crochet necklace for a girlfriend’s birthday.

Here’s how to do it.

Supplies: Bernat Matrix trellis yarn or similar. Size J or similar crochet hook. One coordinating button. Scissors.

Measure out a 12 inch tail of your yarn and then make your slip knot to begin your crochet. Simply chain stitch for 15 inches. Keeping your hook in the last chain, measure out another 12 inches and cut your yarn. Pull your 12 inch yarn tail through your last loop to secure your chain and remove your hook. Repeat this process to make three strands for your necklace.

Group your three strands together and make a knot at the beginning and end of your chains.

To make a closure, we will add the button and create a loop. Thread one side of your yarns through your button. I had no problem fitting three yarns through a standard button. Now drape your necklace around your neck to a length you would like and adjust the button along the yarns to fit at the back of your neck. Make a couple knots to secure your button and trim the excess yarn. For the loop, measure the length of your yarns to match up to your button side, make a loop around your button to make sure it will fit and knot off your loop. Trim your excess yarn.

How to make a monogram top for baby by mahlicadesigns

I came across a really cute appliqued top by Dana at made and was inspired to make a monogram onesie for the new guy on his way to our family. Since the Onesies I purchased came in a 5 pack, I’m challenging myself to use them all in a creative way. Let’s see how I do.

Here’s how to make the monogram.

Notes: You can skip the fusible part and attach the letter directly to the top using your outlining stitches in the step starred below**

Supplies: Onesie or other top, craft felt approximately 2in by 2in,  embroidery floss, fusible interfacing**, letter templates, fabric marking tools, large eyed needle, scissors, iron.

Choose a letter template that fits the area on your top or trace it out free hand. Place your letter template (right side down) onto the wrong side of your craft felt, trace the outline, and cut out your shape. Repeat this step for the fusible interfacing, the non-fusible side should be face up when looking at your letter.

Now, start adding running stitches to the interior of your letter using the embroidery thread. Fill up the middle area first, we will use the last row of running stitches along the outer edge to baste on your interfacing. This is a great way to use up those short lengths of threads you’ve been keeping.

I placed all my knots to the back, but you could have them on the front for more texture if you like.

Attach the fusible interfacing to the back of your letter using one last row of stitches around the outer edge of your letter. **(Alternately you can use this last row along the outer edge to attach the letter directly to the top and skip the fusible.) All those knots should now be covered and the fusible side should be facing out.

Center your letter onto your top and pin in place. Set your iron to the setting recommended for the fusible interfacing. From the inside of the top, press to fuse the letter in place.

These instructions and your finished project are intended for personal use, please do not resell.

Crazy Quilt Ornament: the tutorial

100_2874Here’s a little How To for the crazy quilt ornaments that I make. These are a great quick project to use up left over scraps.  Make your own or take a look at my etsy store to purchase one of mine. These instructions and your finished project are intended for personal use, please do not resell.

Notes:

  • Finished square is 3in X 3in
  • Use a 2mm stitch length.
  • I use about an 1/8in to seam the crazy quilt pieces. This is pretty narrow, but since these are decorative I’ve not had any problems. Furthermore, since the scraps I use are pretty small, a larger seam allowance would eat up more fabric than I would want.
  • For best use of your scraps use the small pieces in the center area and larger pieces on the outer area.
  • You’ll notice I don’t use a batting. If you choose to add one, you will need to add width to your muslin and backing fabric to accommodate the thickness.

Supplies:

Muslin or base fabric, backing fabric, fabric scraps, small scrap of fusible web (optional).

Cut one 3.5in square of muslin and backing fabric. Cut one 1in x 2in of coordinating fabric for the loop.

Make the loop:

Fold the loop piece in half lengthwise and press. Fold in the long raw edges to the center crease, press. Fold in half again and press. Stitch a scant 1/8in to close the long edge. This will give you plenty of length to make the loop as big or small as you like.

Crazy Quilt:

Choose a 4-5 sided scrap piece for the center of your quilt and place right side up in the center of your muslin square. Choose your next scrap piece to fit along one edge of your center piece and place right side down. Aline your edges and sew through all three layers (your top scrap, your center piece, and the muslin) using a 1/8in seam allowance.

Open up the seam and heat press or finger press to lay flat. Trim away any of the second piece that extends beyond the edges of your center piece.

Choose your next scrap and aline along the second edge of the center piece. Continue adding scrap pieces around the center area at random angles until the entire 3.5in square muslin is covered.

Make the quilt sandwich:

Square up your quilt square to 3.5 in X 3.5in using a rotary cutter, mat, and ruler or the tools of your choice.

Choose one side to leave an opening for turning. Look for a side that does not have a seam ending in the middle section. Make note of this side or add a pin to remember it.

Center your loop on any of the remaining three sides. With quilt square right side up, line up the raw edges of the loop with the raw edge of the quilt square and position to make the loop as big or small as you like. Baste using 1/8in seam or pin in place with the pin heads outside of the square for easy removal when sewing.

Position your backing piece on top of of your quilt square with right sides facing and pin in place if desired. You now have a small pile with (from bottom to top) your quilt square right side up, loop positioned on one edge, and backing fabric. Right sides facing.

Sew your Quilt:

Using a 1/4in seam allowance.

Begin on the side you will leave open. Position your needle 1in from the corner, back-stitch 2-3 stitches and then sew towards the corner, pivot, and sew around the remaining edges. When you come back around to the beginning edge that you will leave open, stitch about 1in from the corner and take a few back-stitches.

Finishing:

Trim your corners. Turn right side out using your favorite tool to gently push out the corners. Fold the unsewn edges of the opening to the inside and press all edges. If the quilt appears puffy, use a scrap of fusible web in the middle to tack it down. Slip stitch the open edge closed.